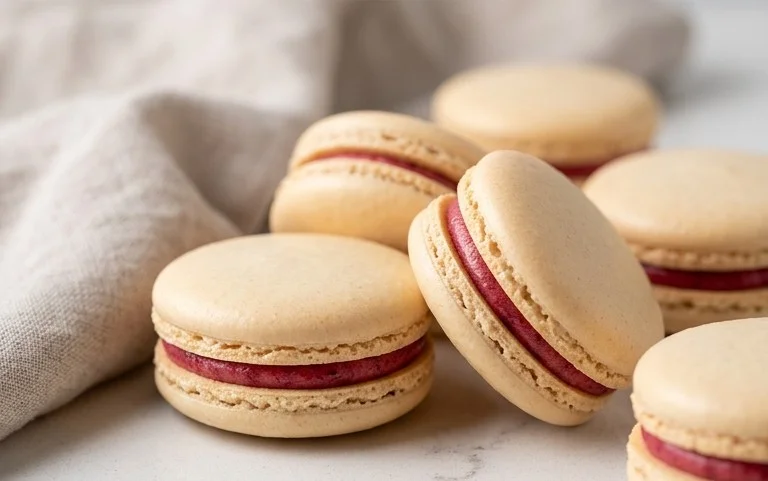
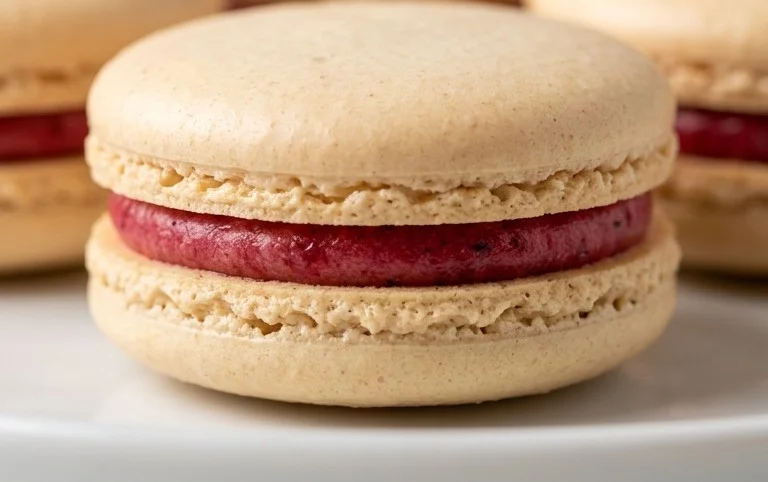
Easy French Macaron Recipe- Perfect Pastel Treats
French macaron recipes can seem intimidating, can’t they? Those delicate, jewel-toned cookies, with their perfectly smooth shells and luscious fillings, appear to be the pinnacle of patisserie perfection. But trust me, achieving that ethereal French macaron is more accessible than you might think. What is it about these little meringue sandwiches that captures our hearts and taste buds? It’s the delightful contrast: the crisp, almost impossibly light shell yielding to a soft, chewy interior, all crowned with an explosion of flavor. They are miniature works of art, perfect for gifting, celebrating, or simply treating yourself to a moment of pure, unadulterated joy. This French macaron recipe will guide you step-by-step to creating these exquisite delights in your own kitchen. Get ready to impress yourself and everyone you know!
French Macaron Recipe
There’s something undeniably elegant and utterly delicious about French macarons. These delicate, colorful meringue cookies with their smooth, crisp shells and soft, chewy interiors, sandwiched with a creamy filling, are a true patisserie delight. While they might seem intimidating, with a little patience and attention to detail, you can absolutely master the art of making them at home. This recipe will guide you through creating perfect French macarons, so let’s get started on this delightful baking adventure!
Ingredients:
Preparation and Macaronage
The foundation of a successful macaron lies in precise ingredient preparation and a technique called “macaronage.”
Step 1: Prepare Your Dry Ingredients
Begin extract by weighing out your almond flour and powdered sugar accurately. It is crucial to use super-fine almond flour. If yours is not already super-fine, you can pulse it in a food processor with the powdered sugar for a few seconds to break down any larger pieces. Then, sift these two ingredients together at least twice through a fine-mesh sieve. This step is vital for achieving smooth macaron shells without any lumps. Discard any larger almond pieces that remain in the sieve. Add the 1/4 teaspoon of salt to the sifted almond flour and powdered sugar mixture and whisk gently to combine. Set this aside.
Step 2: Whip the Meringue
In a clean, grease-free bowl of a stand mixer (or using a hand mixer), add your room temperature egg whites. Begin extract whipping them on medium-low speed until they become foamy. Gradually add the granulated sugar, a tablespoon at a time, while continuing to whip. Increase the speed to medium-high and continue whipping until you achieve stiff, glossy peaks. The meringue should be firm enough to hold its shape and not drip when the whisk is lifted. This stage is critical for providing the structure to your macarons.
Step 3: Incorporate Color and Flavor
Once your meringue has reached stiff peaks, add your chosen liquid-gel food coloring. Start with a few drops and mix it in until the color is evenly distributed. Be aware that the color will lighten slightly when the dry ingredients are added. If you desire a more vibrant hue, add another drop or two until you reach your desired shade. Next, gently fold in the pure vanilla extract. Mix until just combined, being careful not to overmix.
Step 4: The Art of Macaronage
Now comes the most delicate part: macaronage. This is the process of folding the dry ingredients into the meringue to create a batter that is fluid enough to flow but thick enough to hold its shape. Add about one-third of your sifted almond flour and powdered sugar mixture to the meringue. Using a rubber spatula, gently fold it in using a scraping motion around the sides of the bowl and then cutting through the center. Repeat this process, adding the dry ingredients in two more additions, until the batter reaches the “lava flow” consistency. To test this, lift your spatula; the batter should fall off in a thick, ribbon-like stream and slowly settle back into itself, like molten lava. Be careful not to overmix, as this will lead to flat, spread-out macarons. Under-mixing will result in lumpy shells with peaks.
Baking and Assembly
Once your batter is ready, it’s time to pipe and bake.
Step 5: Piping and Resting
Prepare two baking sheets by lining them with parchment paper or silicone baking mats. Transfer your macaron batter into a piping bag fitted with a round tip (about 1/2 inch). Pipe small, uniform rounds onto the prepared baking sheets, holding the piping bag directly above the sheet and applying even pressure. Leave about an inch of space between each macaron. Once you’ve filled a baking sheet, firmly tap the bottom of each sheet on your countertop several times. This helps to release any trapped air bubbles, which can cause the macarons to crack during baking, and also helps them to flatten out.
Now, it’s time for the crucial resting period. Let the piped macarons sit at room temperature for at least 30 minutes, or until they form a slightly dry skin. You should be able to gently touch the surface without any batter sticking to your finger. This skin is essential for developing the characteristic “feet” of the macaron. While they rest, preheat your oven to 300°F (150°C).
Step 6: Baking the Macarons
Bake the macarons one sheet at a time, placing the tray in the center of the preheated oven. The baking time will vary depending on your oven, but typically it takes 12-15 minutes. You’ll know they’re ready when the shells are firm to the touch and the “feet” have developed. They should not wobble when gently nudged. If they do, bake for another minute or two. Carefully remove the baking sheet from the oven and let the macarons cool completely on the sheet before attempting to remove them. Trying to remove them while warm will likely result in them sticking and breaking.
Step 7: Filling and Maturing
Once the macaron shells are completely cool, gently peel them off the parchment paper or silicone mat. Pair up shells of similar size. Now, it’s time for the delightful filling! Pipe your chosen frosting onto the flat side of one macaron shell, then gently sandwich it with another shell. Repeat this process until all your shells are filled.
For the best flavor and texture, it’s recommended to let your macarons mature in an airtight container in the refrigerator for at least 24 hours. This allows the flavors to meld and the shells to soften slightly, creating that signature chewy interior. Remove them from the refrigerator about 20-30 minutes before serving to allow them to come to room temperature. Enjoy your homemade French macarons!
Conclusion:
Congratulations! You’ve navigated the delightful world of French macarons. This recipe offers a truly rewarding baking experience, yielding delicate, airy shells with a satisfyingly crisp exterior and a chewy interior. The versatility of the French macaron is its true magic – with this foundational recipe, you’ve unlocked a universe of flavor possibilities. Imagin extracte the joy of sharing these beautiful, homemade treats with loved ones, whether it’s for a special occasion or simply to brighten an ordinary afternoon. Don’t be discouraged if your first attempt isn’t absolutely perfect; even slightly imperfect macarons taste divine! I encourage you to embrace the process, have fun, and experiment with different fillings and flavorings. The journey to mastering the French macaron is as enjoyable as savoring the final delicious result. So go ahead, preheat your oven, and let’s make some magic!
Frequently Asked Questions:
Why are my macarons cracked on top?
Cracked macaron shells often indicate that the oven temperature was too high or that the macarons were not properly rested before baking, allowing the meringue structure to develop. Ensure your oven is accurately calibrated and don’t skip the resting step.
Can I make French macarons ahead of time?
Absolutely! French macarons are best when “matured” for at least 24 hours. Store them in an airtight container in the refrigerator, layered between parchment paper. This allows the filling to soften the shells slightly, creating that perfect chewy texture.
What are some easy flavor variations I can try?
For a simple flavor boost, try adding a teaspoon of finely ground freeze-dried fruit (like raspberries or strawberries) to your dry ingredients for colorful and fruity shells. You can also experiment with extracts like vanilla, almond, or rosewater in both the shells and your chosen buttercream filling.
French Macaron Recipe
A classic French macaron recipe for delicate, chewy meringue cookies with a crisp shell.
Ingredients
-
150 grams sifted super-fine almond flour
-
180 grams powdered sugar
-
1/4 teaspoon salt
-
120 grams large egg whites
-
60 grams granulated sugar
-
4 drops liquid-gel food coloring
-
1 teaspoon pure vanilla extract
Instructions
-
Step 1
Whisk together almond flour, powdered sugar, and salt in a bowl. Sift the mixture through a fine-mesh sieve, pressing out any lumps. Set aside. -
Step 2
In a clean bowl, whisk egg whites until foamy. Gradually add granulated sugar, one tablespoon at a time, whisking until stiff, glossy peaks form. This is your meringue. -
Step 3
Add the food coloring and vanilla extract to the meringue and gently fold it in until evenly distributed and the desired color is achieved. -
Step 4
Gradually fold the dry ingredients into the meringue in three additions, using a spatula. Fold until the batter flows like lava and forms a ribbon when lifted. This is called macaronage. -
Step 5
Transfer the macaron batter to a piping bag fitted with a round tip. Pipe small, even circles onto baking sheets lined with parchment paper or silicone mats, leaving space between each. -
Step 6
Tap the baking sheets firmly on the counter several times to release any air bubbles. Let the macarons rest at room temperature for about 30-60 minutes, or until a skin forms and they are no longer sticky to the touch. -
Step 7
Preheat your oven to 300°F (150°C). Bake the macarons for 12-15 minutes, or until they have developed ‘feet’ and the tops are firm. They should not brown. -
Step 8
Let the macarons cool completely on the baking sheets before carefully peeling them off. Once cooled, pair matching macarons and fill with your choice of frosting or filling.
Important Information
Nutrition Facts (Per Serving)
It is important to consider this information as approximate and not to use it as definitive health advice.
Allergy Information
Please check ingredients for potential allergens and consult a health professional if in doubt.