Red White Blue Dirt Cups-Easy Patriotic Dessert
Red, White and Blue Dirt Cups are an absolute showstopper, perfect for any occasion that calls for a little patriotic flair and a whole lot of fun! Whether you’re gearing up for the Fourth of July, a summer picnic, or just want to bring a smile to someone’s face, these delightful treats are guaranteed to be a hit. What’s not to love about the irresistible combination of creamy pudding, crunchy cookie crum extractbles, and sweet, vibrant fruit? It’s a simple yet sophisticated dessert that appeals to both kids and adults alike, offering that nostalgic “dirt cup” experience with a festive twist. We’ll guide you through creating these iconic Red, White and Blue Dirt Cups, ensuring your dessert is as visually stunning as it is delicious, making it a truly special addition to any celebration.

Red, White and Blue Dirt Cups: A Patriotic Treat!
Get ready to celebrate any occasion, from Memorial Day and the Fourth of July to a fun summer afternoon, with these incredibly easy and undeniably delicious Red, White and Blue Dirt Cups. These are a guaranteed crowd-pleaser, especially for the younger ones, and require absolutely no baking. The combination of creamy pudding, crunchy Oreo “dirt,” and playful gummy worms makes for a dessert that’s as fun to assemble as it is to eat. We’re going to layer these classic flavors with a festive patriotic twist, transforming a simple treat into a vibrant masterpiece. So gather your ingredients and let’s get diggin extractg into this delightful recipe!
Ingredients:
Preparing the Pudding Base
Our journey begin extracts with the creamy foundation of our dirt cups. The cheesecake pudding mix provides a wonderfully rich and tangy base that perfectly complements the sweetness of the other components. It’s a flavor that’s universally loved and incredibly versatile.
Crushing the “Dirt”
No dirt cup is complete without its signature “dirt,” and in our case, that means delicious Oreo cookies. These will not only provide the visual appeal of soil but also a delightful crunch that adds texture to every spoonful.
Layering the Patriotic Colors
This is where the magic happens! We’ll be dividing our pudding and adding vibrant red and blue hues to create a festive, layered effect. This step is where our dirt cups truly earn their patriotic name.
Step-by-Step Instructions:
First, let’s prepare our pudding. In a large mixing bowl, whisk together the contents of both cheesecake pudding boxes with 4 cups of milk. It’s important to whisk vigorously for at least two minutes to ensure the pudding mix is fully incorporated and there are no lumps. Once whisked, cover the bowl tightly with plastic wrap, making sure the plastic wrap touches the surface of the pudding. This prevents a skin from forming. Place the bowl in the refrigerator to chill and set for at least 30 minutes, or until firm enough to hold its shape. While the pudding is chilling, you can move on to preparing your “dirt.”
Next, it’s time to create our edible “dirt.” Take all 19 Oreo cookies and place them into a zip-top bag. Seal the bag tightly, removing as much air as possible. You can then use a rolling pin, the bottom of a heavy glass, or even your hands to crush the cookies into fine crum extractbs. Aim for a texture that resembles coarse sand or actual soil – not a powder, but not large chunks either. You can also pulse them in a food processor for a quicker, more consistent crum extractb. Once crushed, set the Oreo crum extractbs aside.
Now for the fun part: coloring our pudding! Once the pudding has set, divide it into three equal portions. Place each portion into a separate bowl. To the first bowl, add ¼ teaspoon of red gel food dye. Stir gently until the color is evenly distributed and a vibrant red is achieved. Be careful not to overmix, as this can affect the pudding’s texture. To the second bowl, add ¼ teaspoon of blue gel food dye and stir until you have a beautiful blue hue. Leave the third portion of pudding plain white. Gel food coloring is recommended because it’s more concentrated than liquid coloring, meaning you need less to achieve intense colors without watering down your pudding.
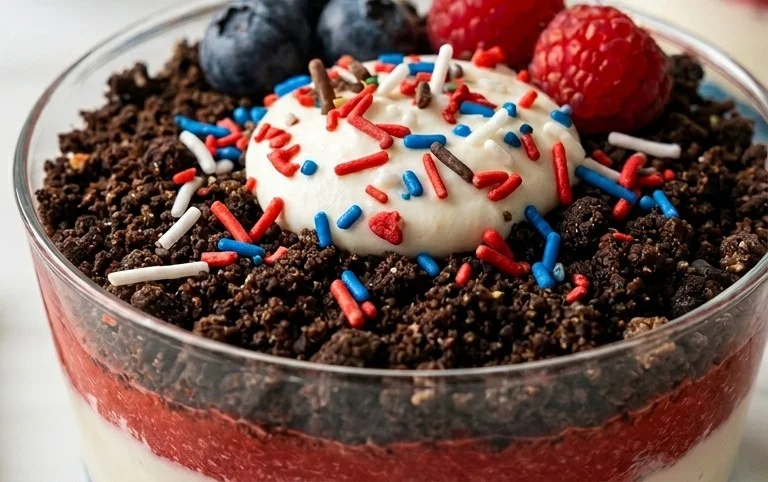
It’s time to assemble our dirt cups! Grab your serving dishes. These can be individual clear glasses, small mason jars, or even plastic cups. Start by placing a layer of the crushed Oreo “dirt” at the bottom of each serving dish. This will create the base of our dessert. Next, add a layer of your white cheesecake pudding. Don’t worry about making it perfectly smooth; a slightly rustic look actually enhances the “dirt cup” theme. Follow this with another layer of Oreo crum extractbs, then a layer of red pudding. Continue layering in this manner: dirt, white pudding, dirt, blue pudding, dirt, and then finish with a final layer of dirt. You want to create distinct layers of color and “soil” to make it visually appealing. Ensure each layer of pudding is gently spread to cover the previous layer of crum extractbs.
The final touch that brings our Red, White and Blue Dirt Cups to life is the addition of gummy worms and a bit more “dirt.” Gently push 2 red and blue gummy worms into the top layer of Oreo crum extractbs on each dirt cup, so they appear to be “crawling out” of the dirt. You can even break some of the gummy worms in half to give the illusion of them being partially buried. For an extra touch of authenticity, sprinkle a few more crushed Oreo crum extractbs over the top of the pudding and around the base of the gummy worms. This reinforces the “dirt” look and makes them pop. Chill the assembled dirt cups in the refrigerator for at least another 15-30 minutes before serving to allow the flavors to meld and the pudding to firm up further. These are best served cold!
Enjoy your delicious and festive Red, White and Blue Dirt Cups! They’re a simple yet impressive dessert that will surely be a hit.
Conclusion:
There you have it! Our Red, White and Blue Dirt Cups are more than just a dessert; they’re a delightful and easy way to celebrate holidays, parties, or simply bring a touch of festive fun to any occasion. The combination of creamy pudding, crunchy cookie crum extractbs, and sweet gummy worms creates a truly satisfying and visually appealing treat that’s a guaranteed hit with kids and adults alike. They’re incredibly simple to assemble, making them perfect for getting the little ones involved in the kitchen and fostering a love for baking. I truly hope you give this recipe a try and experience the joy it brings!
Serving these vibrant cups is a breeze. They’re perfect as individual party favors, delightful additions to a dessert buffet, or even as a fun after-school snack. Consider topping them with a small American flag for an extra patriotic touch. If you’re looking to switch things up, consider adding a layer of fresh berries between the pudding and cookie crum extractbs for added texture and flavor, or even using chocolate pudding for a deeper chocolatey experience. The possibilities are endless!
Frequently Asked Questions:
Can I make these Red, White and Blue Dirt Cups ahead of time?
Absolutely! You can prepare the cookie crum extractbs and the pudding a day in advance. Assemble the cups a few hours before serving to ensure the cookie crum extractbs stay a little bit crunchy. Storing them covered in the refrigerator is best.
What other candies can I use instead of gummy worms?
Feel free to get creative! You could use Swedish Fish for a red and blue theme, or even small candy buttons for a different kind of “dirt” topping. Small pretzel sticks can mimic twigs, and chocolate chips can look like little pebbles.
Is this recipe suitable for very young children to make?
Yes, this Red, White and Blue Dirt Cups recipe is fantastic for little hands! With a bit of supervision, they can help crush the cookies (in a zip-top bag), layer the pudding, and artfully place the “worms.” It’s a wonderfully engagin extractg and edible activity.
Red, White and Blue Dirt Cups
A patriotic and fun dessert featuring creamy cheesecake pudding layered with crushed Oreos and colorful gummy worms.
Ingredients
-
2 boxes cheesecake pudding (3.4 ounces each)
-
4 cups milk
-
19 Oreo cookies (crushed)
-
1/4 teaspoon red gel food dye
-
1/4 teaspoon blue gel food dye
-
8 red and blue gummy worms
Instructions
-
Step 1
In a medium bowl, whisk together the cheesecake pudding mix and milk according to package directions. Divide the pudding into three equal portions. -
Step 2
To the first portion of pudding, add the red gel food dye and mix until evenly colored. To the second portion, add the blue gel food dye and mix until evenly colored. Leave the third portion white. -
Step 3
In a separate bowl, crush the Oreo cookies until they resemble dirt. You can do this in a food processor or by placing them in a zip-top bag and crushing with a rolling pin. -
Step 4
Begin layering the dirt cups. In each serving cup, add a layer of crushed Oreos, followed by a layer of white pudding. Repeat layers of Oreos and colored puddings, alternating red and blue, ending with white pudding on top. -
Step 5
Add a final layer of crushed Oreos to the top of each cup to resemble dirt. -
Step 6
Decorate each dirt cup with red and blue gummy worms, sticking them into the ‘dirt’ so they appear to be crawling out. -
Step 7
Chill the dirt cups in the refrigerator for at least 15 minutes before serving.
Important Information
Nutrition Facts (Per Serving)
It is important to consider this information as approximate and not to use it as definitive health advice.
Allergy Information
Please check ingredients for potential allergens and consult a health professional if in doubt.