Bunny Rabbit Cake Recipe- Whimsical Dessert Fun
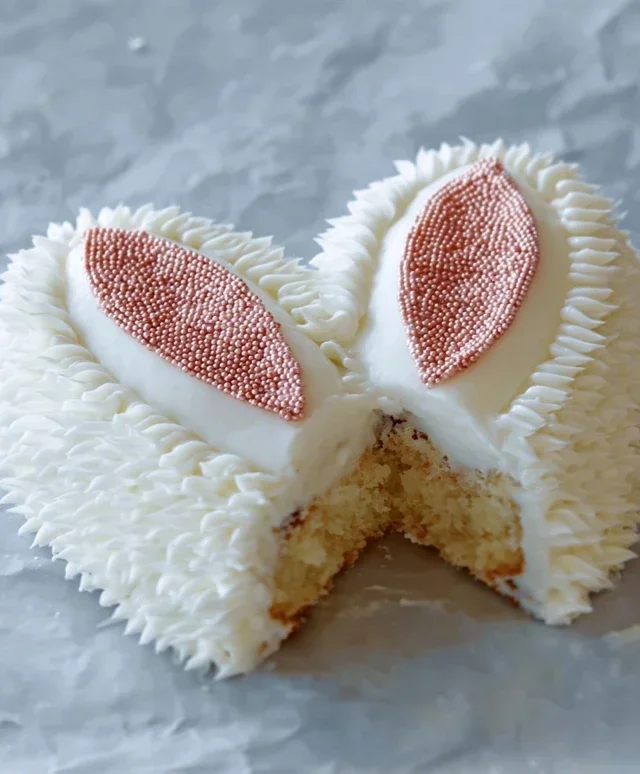
This Bunny Rabbit Cake is more than just a dessert; it’s a delightful centerpiece that brings smiles to faces of all ages, especially during spring celebrations! We all know how much kids (and let’s be honest, many adults too!) adore a whimsical cake, and this particular Bunny Rabbit Cake takes the cake, literally. Its charming design, featuring fluffy frosting ears and a sweet little nose, makes it an instant showstopper. What truly makes this Bunny Rabbit Cake special is the joy it creates. It’s perfect for Easter gatherings, birthday parties, or just because you want to add a touch of magic to your day. Imagin extracte the delighted squeals as your little ones discover this adorable creation! It’s surprisingly achievable, making it a fantastic baking project for families to create together.
Get Ready to Bake Some Magic!
Discover the steps to creating your very own show-stopping Bunny Rabbit Cake.
Bunny Rabbit Cake
There’s something undeniably charming about a cake shaped like a bunny, especially when it’s destined for a birthday party or an Easter celebration. This Bunny Rabbit Cake is not just adorable; it’s a delicious, moist vanilla cake that’s surprisingly simple to assemble. The key to its success lies in a few cleverly placed cake layers and some thoughtful frosting techniques. Get ready to impress your guests with this whimsical creation – it’s a project that’s as fun to make as it is to eat!
Ingredients:
Baking the Cake Layers
The foundation of our bunny is a classic vanilla cake. We’ll be baking two standard round cakes and one smaller cake for the ears.
1. Preheat your oven to 350°F (175°C). Grease and flour two 8-inch round cake pans and one 6-inch round cake pan. For the ears, you can also use a standard loaf pan and cut out ear shapes later, but using a smaller round pan will give you a more consistent shape. Line the bottoms of the 8-inch pans with parchment paper for easy removal. In a medium bowl, whisk together the all-purpose flour, baking powder, and salt. Set aside. In a large bowl, cream together the softened unsalted butter and granulated sugar until light and fluffy. This is crucial for a tender cake, so don’t skimp on this step! Beat in the eggs one at a time, ensuring each egg is fully incorporated before adding the next. Stir in the vanilla extract. Gradually add the dry ingredients to the wet ingredients, alternating with the milk, begin extractning and ending with the dry ingredients. Mix until just combined, being careful not to overmix. Overmixing can lead to a tough cake. Divide the batter evenly between the prepared 8-inch pans and the 6-inch pan. Bake the 8-inch cakes for 30-35 minutes, and the 6-inch cake for 25-30 minutes, or until a wooden skewer inserted into the center comes out clean. Let the cakes cool in their pans for 10-15 minutes before inverting them onto a wire rack to cool completely. Ensuring the cakes are fully cooled is vital before frosting; warm cakes will melt the frosting.
Making the Frosting
A fluffy, sweet vanilla buttercream is the perfect canvas for our bunny. We’ll make a slightly larger batch to ensure we have enough for frosting and decorating.
2. While the cakes are cooling, prepare the buttercream frosting. In a large bowl, beat the softened unsalted butter until creamy. Gradually add the powdered sugar, a cup at a time, mixing well after each addition. Once all the powdered sugar is incorporated, add the ¼ cup of milk and 1 teaspoon of vanilla extract. Beat on medium-high speed until the frosting is light and fluffy. This can take anywhere from 3-5 minutes. If the frosting is too thick, add a little more milk, a teaspoon at a time, until you reach your desired consistency. If it’s too thin, add a bit more powdered sugar. We want a spreadable, yet firm frosting.
Assembling the Bunny
This is where the magic happens! We’ll use the cake layers to create the bunny’s body and head.
3. Once the cakes are completely cool, it’s time to assemble. Place one 8-inch cake layer on your serving platter or cake board. This will be the base of the bunny’s body. If your cakes are domed, you can gently trim the tops with a serrated knife to create flat surfaces, which will make stacking easier and more stable. Frost the top of this layer generously with a portion of your buttercream. Place the second 8-inch cake layer on top of the first. Now, take the 6-inch cake and place it on top of the second 8-inch layer, off-center, to create the bunny’s head. You’ll want to position it slightly forward and to one side, as if the bunny is peeking around. Use a generous amount of frosting to “glue” the layers together, ensuring they are stable.
Decorating the Bunny
Now for the fun part – bringin extractg our bunny to life! We’ll use frosting and a few embellishments to create the adorable details.
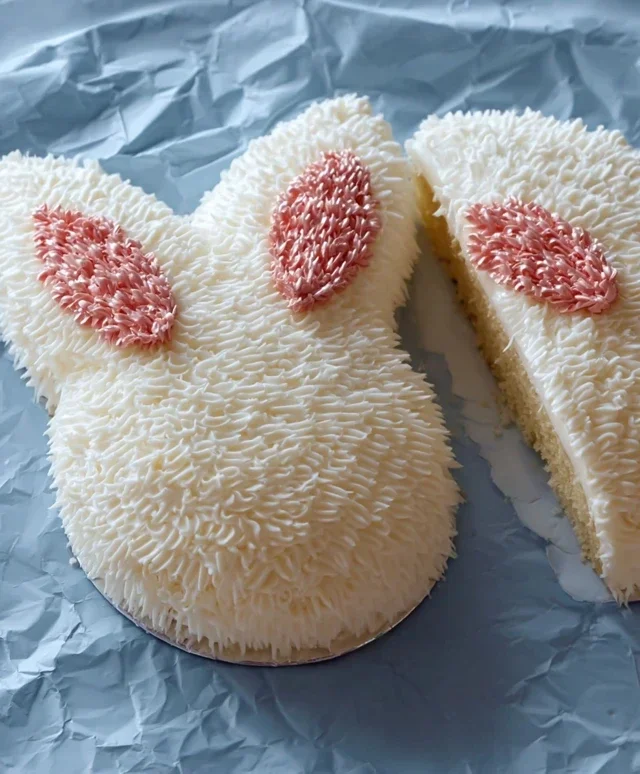
4. Frost the entire cake with a thin layer of white buttercream. This is called a crum extractb coat and it helps to seal in any loose crum extractbs and provides a smooth surface for the final frosting. Chill the cake in the refrigerator for about 20-30 minutes to allow the crum extractb coat to firm up. Once chilled, apply a thicker, final layer of white buttercream all over the cake. Smooth the frosting as best you can with an offset spatula or a bench scraper. For the ears, you can use the excess cake from trimming or cut shapes from another cake. Alternatively, you can frost two large cookies or use molded fondant. For a furry texture, you can use a fork or a piping bag with a grass or star tip to create short, feathery strokes all over the cake. For a simpler, softer look, you can gently press shredded coconut into the frosting to resemble fur.
Adding the Finishing Touches
The final details really make our bunny pop!
5. Now, let’s add the bunny’s features. For the inner ears, take a small amount of your white frosting and tint it pink with a few drops of pink food coloring. Use a small spatula or spoon to gently spread or pipe the pink frosting onto the inside of the ears. If you made separate ear shapes, you can frost them and then add the pink inner ear detail. For the eyes, you can use an edible black marker to draw them on, or place two small black candies (like M&Ms or chocolate chips) onto the face. For the nose, a small pink jelly bean or a dollop of pink frosting works perfectly. You can also use a piping bag with a small round tip to pipe a mouth. If you want a more textured tail, you can pipe a fluffy ball of white frosting on the back or attach a marshmallow. Let your creativity guide you! This Bunny Rabbit Cake is a wonderful project for bakers of all levels and a guaranteed hit with kids and adults alike. Enjoy the process and the delicious results!
Conclusion:
I hope you’re as excited as I am to try this delightful Bunny Rabbit Cake recipe! It’s a wonderfully simple yet impressive dessert that’s perfect for Easter, spring birthdays, or just any occasion where a touch of whimsical charm is needed. The beauty of this cake lies in its adaptability; whether you use your favorite vanilla cake batter or opt for a richer chocolate base, the adorable bunny shape always steals the show. It’s a fantastic project for bakers of all skill levels, and the joy it brings to those who see and taste it is truly rewarding.
This Bunny Rabbit Cake is fantastic because it combines classic cake-making with a playful presentation. It’s a crowd-pleaser that’s surprisingly easy to execute, making it accessible even for begin extractner bakers. For serving suggestions, consider pairing it with fresh berries or a dollop of whipped cream. It also makes a stunning centerpiece for any dessert table. Don’t be afraid to get creative with your decorations! You can use colorful frosting, fondant details, or even edible flowers to personalize your bunny.
Ready to hop into baking? I wholeheartedly encourage you to give this recipe a try. You won’t be disappointed by the smiles it will undoubtedly bring.
Frequently Asked Questions:
Can I make this Bunny Rabbit Cake ahead of time?
Absolutely! You can bake and cool the cake layers a day in advance. Once completely cooled, wrap them tightly in plastic wrap and store them at room temperature. Frosting the cake is best done closer to serving time to ensure the decorations stay fresh and vibrant, but the cake itself holds up beautifully.
What kind of frosting works best for decorating the bunny?
A sturdy buttercream frosting is ideal for decorating this Bunny Rabbit Cake. It holds its shape well, making it perfect for piping details like fur, eyes, and the nose. Cream cheese frosting is also delicious, but it can be a bit softer, so be mindful of that when piping.
Are there any allergy-friendly variations?
Yes! You can easily adapt this recipe for common allergies. For a gluten-free version, use your favorite gluten-free flour blend. For dairy-free, substitute with plant-based milk and butter. Many recipes also offer egg-free options if needed. Just be sure to use a frosting that accommodates your dietary restrictions.
Bunny Rabbit Cake
A delightful and festive bunny rabbit-shaped cake, perfect for Easter or any spring celebration. This recipe guides you through creating a charming and delicious centerpiece.
Ingredients
-
2 cups all-purpose flour
-
1.5 cups granulated sugar
-
1 teaspoon baking soda
-
0.5 teaspoon salt
-
1 cup buttermilk
-
0.5 cup vegetable oil
-
2 large eggs
-
1 teaspoon vanilla extract
-
1 tablespoon white vinegar
-
1 cup powdered sugar
-
2 tablespoons milk
-
1 teaspoon lemon juice
Instructions
-
Step 1
Preheat oven to 350°F (175°C). Grease and flour a 9×13 inch baking pan. Prepare two 8-inch round cake pans for the bunny’s head and body. -
Step 2
In a large bowl, whisk together flour, sugar, baking soda, and salt. -
Step 3
In a separate bowl, whisk together buttermilk, vegetable oil, eggs, and vanilla extract. Add this wet mixture to the dry ingredients and mix until just combined. -
Step 4
In a small bowl, combine milk and white vinegar. Let it sit for 5 minutes to create a buttermilk substitute. Add this mixture to the cake batter and stir until smooth. -
Step 5
Pour batter into the prepared cake pans, filling the 9×13 inch pan about halfway and dividing the remaining batter between the two 8-inch round pans. -
Step 6
Bake for 30-35 minutes, or until a toothpick inserted into the center comes out clean. Let cakes cool in pans for 10 minutes before inverting onto a wire rack to cool completely. -
Step 7
Once cooled, carve the 9×13 inch cake into a bunny body shape and one 8-inch round cake into a bunny head. The other 8-inch round cake can be used for ears or other decorative elements. -
Step 8
Prepare a simple glaze by whisking together powdered sugar, milk, and lemon juice until smooth. Adjust consistency with more milk or powdered sugar as needed. -
Step 9
Frost the carved cake pieces with the glaze. Arrange the head and body pieces on a serving platter to form a bunny shape. Decorate with edible eyes, nose, and whiskers using frosting or candies.
Important Information
Nutrition Facts (Per Serving)
It is important to consider this information as approximate and not to use it as definitive health advice.
Allergy Information
Please check ingredients for potential allergens and consult a health professional if in doubt.