Patriotic Oreo Balls-Easy No-Bake Red White Blue Treats
Patriotic Oreo Balls are the ultimate treat for any occasion, but they truly shine when it’s time to celebrate the red, white, and blue! Imagin extracte little bites of pure joy, bursting with the familiar, beloved flavor of Oreos, all dolled up in festive colors. What’s not to love? These no-bake delights are incredibly easy to make, making them a perfect activity for family fun or a quick dessert fix. They’re incredibly versatile, too – whether you’re heading to a barbecue, a potluck, or simply want to add a touch of sparkle to your dessert table, these Patriotic Oreo Balls are sure to be a crowd-pleaser. Their delightful sweetness and iconic cookie crunch, combined with a vibrant, patriotic presentation, make them a truly special treat that always brings smiles.
Get Ready to Amaze Your Guests!
Here’s how to create your own masterpiece.
Patriotic Oreo Balls
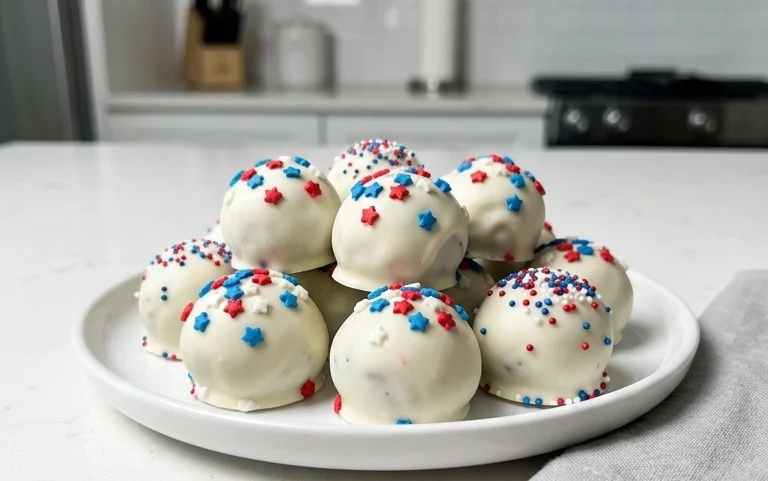
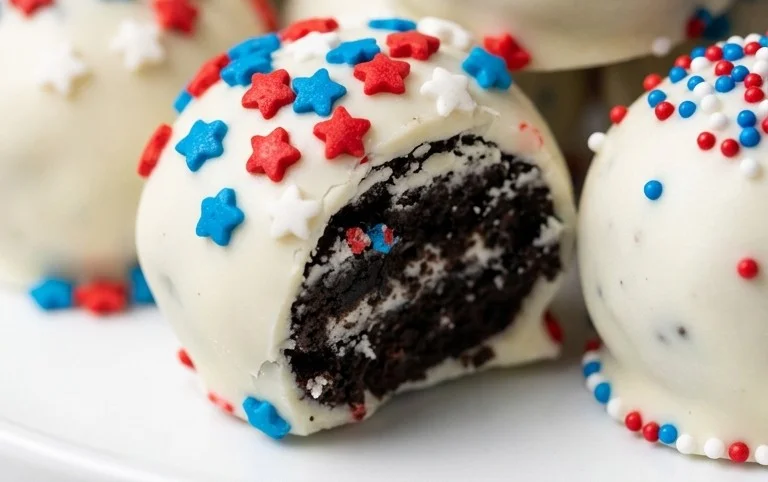
As the Fourth of July, Memorial Day, or any patriotic celebration approaches, the desire for festive and delicious treats is undeniable. These Patriotic Oreo Balls are not only incredibly easy to make but also boast a vibrant, eye-catching design that will be the star of any gathering. Imagin extracte little spheres of pure chocolatey bliss, dipped in brilliant red and blue, adorned with tiny white stars – they’re almost too pretty to eat! But trust me, they won’t last long. This recipe is perfect for bakers of all skill levels, from complete begin extractners to seasoned pros looking for a quick and impressive dessert. We’re using classic Oreo cookies and cream cheese for that irresistible fudgy center, then transforming them into edible works of art with candy melts and a touch of white chocolate. Get ready to impress your friends and family with these delightful, no-bake patriotic wonders.
Ingredients:
Crafting Your Patriotic Masterpieces
This recipe is broken down into a few key phases: preparing the Oreo mixture, shaping the balls, and the final decorative dipping. Don’t rush through any of these steps, as each plays a vital role in the final outcome.
Phase 1: The Delicious Oreo Base
The foundation of our Patriotic Oreo Balls is a simple yet incredibly satisfying mixture of crushed Oreos and cream cheese. This is where the magic begin extracts.
1. First, you’ll want to pulverize your Oreo cookies into fine crum extractbs. The easiest way to do this is by using a food processor. If you don’t have one, you can place the Oreos in a sturdy zip-top bag and use a rolling pin to crush them into a fine dust. Make sure to get them as fine as possible; this will ensure a smooth and cohesive mixture. You’ll need to process the entire family-size package, which is quite a generous amount, guaranteeing plenty of delicious balls. Once crushed, set them aside in a large mixing bowl.
2. Next, take your softened cream cheese. It’s crucial that the cream cheese is at room temperature; this makes it much easier to incorporate into the Oreo crum extractbs without any lumps. If it’s too cold, it will be difficult to mix and might result in an uneven texture. Add the softened cream cheese to the bowl with the Oreo crum extractbs. Now, it’s time to get your hands in there! Mix and knead the cream cheese and Oreo crum extractbs together until they are thoroughly combined and form a dough-like consistency. This might take a few minutes of vigorous mixing. The mixture should be firm enough to hold its shape but still slightly sticky. If it seems too dry, you can add another tablespoon of softened cream cheese; if it’s too wet, you can add a few more crushed Oreos.
Phase 2: Shaping the Spheres of Sweetness
Once you have your perfectly combined Oreo mixture, it’s time to roll them into uniform balls.
3. Now comes the fun part: shaping the Oreo mixture into balls. I find it easiest to use a small cookie scoop or a tablespoon to portion out the dough. Roll each portion between your palms to form smooth, compact balls, roughly 1-inch in diameter. Aim for consistency in size so that they all bake (or rather, set) and dip evenly. Place these rolled balls onto a baking sheet lined with parchment paper or wax paper. As you work, you’ll notice the mixture becoming less sticky as you handle it, which is a good sign. Make sure all the balls are relatively firm and don’t have any cracks. You should get quite a few delicious balls from this recipe, so be patient and enjoy the process. Once all the balls are rolled, place the baking sheet in the freezer for at least 30 minutes. This chilling step is essential. It firms up the balls, making them much easier to dip in melted chocolate without them falling apart or becoming misshapen.
Phase 3: The Patriotic Dip and Decorate
This is where your Oreo balls truly transform into patriotic showstoppers.
4. While your Oreo balls are chilling in the freezer, prepare your dipping station. Melt your red and blue candy melts separately. You can do this in the microwave in 30-second intervals, stirring between each interval until smooth, or you can use a double boiler. Candy melts can seize up quickly if overheated, so low and slow is the key. In separate microwave-safe bowls, melt the red candy melts until smooth and pourable. Do the same with the blue candy melts. Once they are both melted and smooth, you’re ready for dipping. Take your chilled Oreo balls out of the freezer. Using a fork or a dipping tool, carefully dip each ball into either the red or blue melted candy, ensuring it’s fully coated. Let any excess candy drip back into the bowl before placing the dipped ball back onto the parchment-lined baking sheet. You can alternate colors to create a beautiful patriotic pattern.
5. Now for the final flourish: the white chocolate drizzle and star sprinkles. Melt your Ghirardelli white melting wafers in a separate bowl using the same microwave method as the candy melts, stirring until completely smooth. Once melted, transfer the white chocolate into a piping bag or a small zip-top bag with the corner snipped off. Drizzle the melted white chocolate decoratively over the red and blue dipped Oreo balls. This adds a beautiful contrast and a touch of elegance. Immediately after drizzling, while the white chocolate is still wet, sprinkle the white star confetti sprinkles over the top of each ball. The sprinkles will adhere to the wet chocolate, creating that perfect patriotic star-spangled effect. Allow the dipped and decorated Oreo balls to set completely at room temperature, or for a quicker set, pop them back into the refrigerator for about 10-15 minutes. Once hardened, they are ready to be served and enjoyed! These are best stored in an airtight container in the refrigerator.
Conclusion:
And there you have it – a simple yet spectacular way to whip up some delicious Patriotic Oreo Balls! This recipe truly shines because it’s incredibly easy to make, requiring no baking and minimal fuss, making it perfect for last-minute celebrations or for involving kids in the kitchen. The combination of crushed Oreos, cream cheese, and a vibrant coating of patriotic colors is a guaranteed crowd-pleaser. They’re a fantastic dessert for any Fourth of July barbecue, Memorial Day gathering, or even just to add a festive touch to any summer day.
I love serving these Patriotic Oreo Balls alongside fresh fruit or as part of a larger dessert spread. They also look stunning arranged on a platter for a party. Don’t be afraid to get creative with your variations! You could try dipping them in white chocolate for a cleaner look, or even adding a sprinkle of edible glitter for extra sparkle. Perhaps even experiment with different Oreo flavors for a unique twist. I truly encourage you to give this recipe a try – you won’t be disappointed with the fun and delicious results!
Frequently Asked Questions:
Can I make these Patriotic Oreo Balls ahead of time?
Absolutely! These delightful treats are perfect for making in advance. You can store them in an airtight container in the refrigerator for up to 3-4 days. Allowing them to chill thoroughly helps them set nicely and intensifies the flavors.
What if I don’t have red, white, and blue candy melts?
No problem! You can achieve a similar patriotic look using white candy melts and food coloring. Simply divide the melted white candy melts into three portions. Tint one portion red and another blue using gel food coloring, leaving the third white. You can then drizzle or marble these colors onto your dipped Oreo balls for a festive effect.
Patriotic Oreo Balls
Delicious and easy no-bake Oreo balls decorated in festive red, white, and blue for patriotic holidays.
Ingredients
-
1 lb 2.12 oz Family Size package Oreo Cookies
-
8 ounce block cream cheese (softened to room temperature)
-
12 ounce bag red candy melts
-
12 ounce bag blue candy melts
-
⅓ cup Ghirardelli white melting wafers
-
White star confetti sprinkles for topping
Instructions
-
Step 1
Crush Oreo cookies in a food processor until fine crumbs form. -
Step 2
In a large bowl, combine Oreo crumbs and softened cream cheese. Mix until well combined and forms a dough. -
Step 3
Roll the mixture into small balls (about 1 inch in diameter). -
Step 4
Melt red and blue candy melts separately according to package directions. Melt Ghirardelli white melting wafers separately. -
Step 5
Dip the Oreo balls into the melted candy melts, coating them completely. For a patriotic look, dip some in red, some in blue, and drizzle some with white. -
Step 6
Place dipped balls on parchment paper. While the coating is still wet, sprinkle with white star confetti sprinkles. -
Step 7
Allow the candy coating to set completely. Refrigerate for easier handling if needed.
Important Information
Nutrition Facts (Per Serving)
It is important to consider this information as approximate and not to use it as definitive health advice.
Allergy Information
Please check ingredients for potential allergens and consult a health professional if in doubt.