Chocolate Dipped Fruit Cones-Easy Dessert Recipe
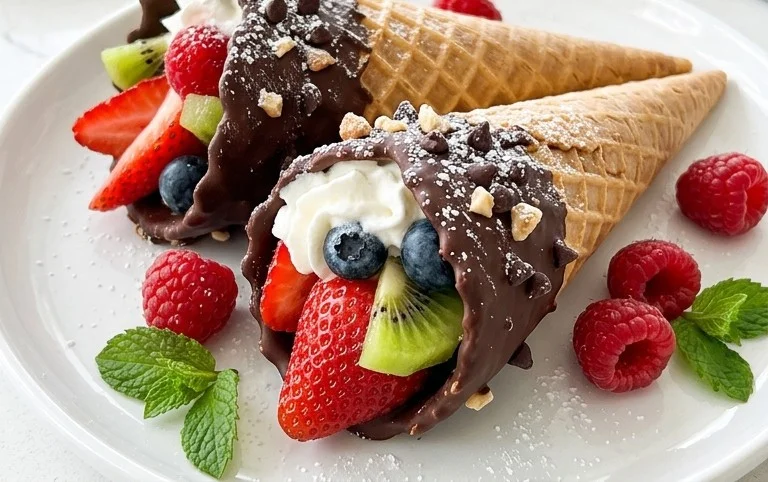
Chocolate Dipped Fruit Filled Cones are the whimsical dessert dreams you didn’t know you were having, but absolutely need to make. Imagin extracte biting into a crisp, golden cone, its interior bursting with vibrant, fresh fruit, all enrobed in a luscious shell of rich chocolate. It’s a symphony of textures and flavors – the satisfying crunch, the sweet and slightly tart fruit, and the decadent smoothness of chocolate, all coming together in perfect harmony. These aren’t just any cones; they are edible works of art that bring smiles to faces of all ages. Whether you’re looking to impress at a party, create a fun family activity, or simply treat yourself to something extraordinary, these Chocolate Dipped Fruit Filled Cones deliver pure joy. They’re wonderfully versatile, allowing you to customize the fruit fillings to your heart’s content, making each cone a unique and delightful creation.

Chocolate Dipped Fruit Filled Cones
Imagin extracte a delightful combination of crisp, crunchy wafer cones filled with a luscious, creamy filling and then dipped in rich, decadent chocolate. These Chocolate Dipped Fruit Filled Cones are a showstopper dessert that’s surprisingly simple to make. They’re perfect for parties, special occasions, or just a delightful treat to brighten your day. The beauty of this recipe is its versatility – you can customize the fruit filling to your heart’s content!
Ingredients:
Making the Creamy Filling
The foundation of our delicious cones is a smooth and flavorful cream cheese filling. This part is really easy and sets the stage for the delightful flavors to come.
Assembling and Dipping the Cones
Once our luscious filling is ready, it’s time to bring our cones to life. This is where the magic happens, transforming simple ingredients into an elegant dessert.
These cones are a delightful balance of sweet, tangy, and rich flavors. The creamy filling, bursting with fresh fruit, is perfectly complemented by the satisfying crunch of the cone and the decadent embrace of the chocolate. They are a delightful treat that is sure to impress!
Conclusion:
There you have it – a delightful and surprisingly simple recipe for Chocolate Dipped Fruit Filled Cones that’s sure to impress! These treats are fantastic because they offer a perfect marriage of textures and flavors: the crisp sweetness of the cone, the smooth richness of the chocolate, and the refreshing burst of fruit. They’re elegant enough for a special occasion but easy enough for a spontaneous afternoon delight. Imagin extracte serving these at your next get-together, or simply enjoying one as a personal indulgence. The beauty of this recipe lies in its adaptability. Don’t hesitate to experiment with different fruits like fresh strawberries, raspberries, or even diced mango. You can also get creative with your chocolate choices – dark, milk, or white chocolate all work beautifully. I truly encourage you to give these Chocolate Dipped Fruit Filled Cones a try; you might just find your new favorite dessert!
Frequently Asked Questions:
Can I make these cones ahead of time?
Yes, you can! It’s best to dip and fill the cones closer to serving time for optimal crispness of the cone and freshness of the fruit. However, you can prepare the fruit filling and melt the chocolate a few hours in advance and store them separately at room temperature. Once assembled, they are best enjoyed within a few hours.
What’s the best way to store leftover cones?
These cones are designed to be enjoyed immediately for the best texture. If you do have leftovers, store them in an airtight container in the refrigerator. Be aware that the cone may soften slightly due to the moisture from the fruit and chocolate.
Can I use frozen fruit instead of fresh?
While fresh fruit is recommended for its texture and flavor, you can use frozen fruit if you thaw it completely and drain off any excess liquid thoroughly before filling the cones. This will help prevent the cones from becoming soggy.
Chocolate Dipped Fruit Filled Cones
A delightful treat combining crispy cones, creamy filling, and a rich chocolate shell, studded with fresh fruit.
Ingredients
-
1 cup heavy whipping cream
-
1/2 cup powdered sugar
-
1/4 cup fresh strawberries, chopped
-
1/4 cup fresh blueberries
-
8 sugar cones
-
1 cup chocolate chips (dark or semi-sweet)
-
1 tablespoon coconut oil
Instructions
-
Step 1
In a chilled bowl, whip the heavy cream and powdered sugar until stiff peaks form. -
Step 2
Gently fold in the chopped strawberries and blueberries into the whipped cream. -
Step 3
Spoon the fruit-filled cream into the sugar cones, filling them almost to the top. -
Step 4
Melt the chocolate chips and coconut oil together in a microwave-safe bowl, stirring every 30 seconds until smooth. -
Step 5
Dip the top of each filled cone into the melted chocolate, letting any excess drip off. -
Step 6
Place the chocolate-dipped cones on a baking sheet lined with parchment paper. -
Step 7
Refrigerate for at least 30 minutes, or until the chocolate is set.
Important Information
Nutrition Facts (Per Serving)
It is important to consider this information as approximate and not to use it as definitive health advice.
Allergy Information
Please check ingredients for potential allergens and consult a health professional if in doubt.