Strawberry Pop Tart Cookies – Easy Homemade Treat
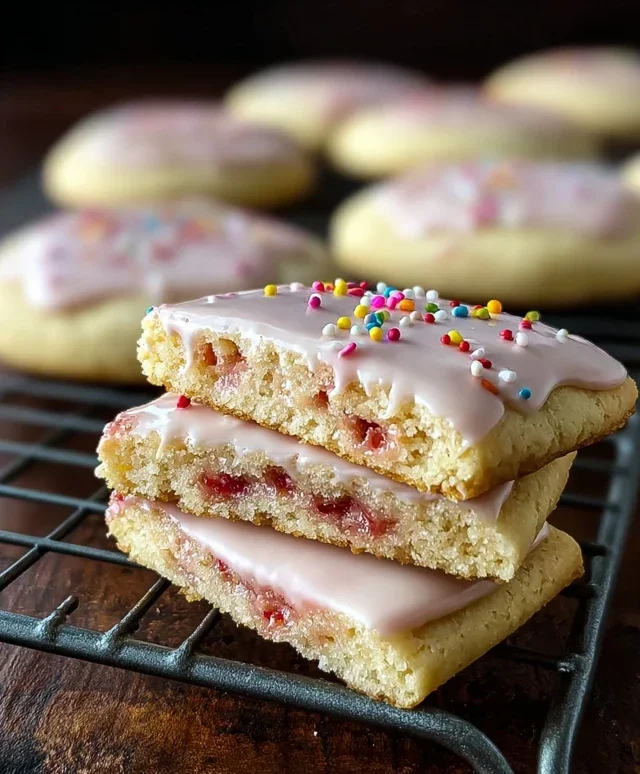
Strawberry Pop Tart Cookies are about to become your new favorite obsession. Remember that delightful burst of sweet, tangy strawberry filling and the crisp, buttery crust of your favorite toaster pastry? Now, imagin extracte all of that nostalgic goodness baked into a perfectly chewy, golden-brown cookie. Yes, you read that right! We’ve somehow captured the essence of those iconic breakfast treats and transformed them into an irresistible cookie form. It’s the perfect marriage of a classic cookie and a beloved childhood snack, offering that comforting flavor profile we all crave with the satisfying texture of a homemade cookie. These aren’t just any cookies; they’re a trip down memory lane, a bite of pure joy, and a delightful way to elevate your dessert game. Get ready to fall head over heels for these incredible Strawberry Pop Tart Cookies!
Strawberry Pop Tart Cookies
Get ready for a delightful explosion of nostalgic flavor! These Strawberry Pop Tart Cookies are my absolute favorite way to capture the essence of those beloved breakfast pastries in a fun, bite-sized cookie format. They’re surprisingly easy to make and have that perfect balance of sweet, slightly tart strawberry filling and a tender, buttery cookie base. Plus, the simple glaze adds that extra touch of sweetness and visual appeal that screams “treat yourself!”
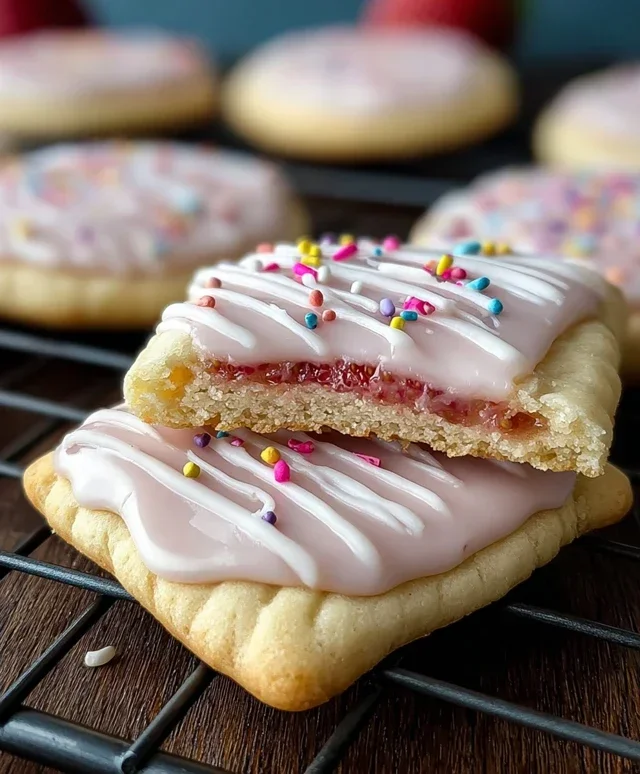
Imagin extracte biting into a soft cookie that has a hidden pocket of vibrant strawberry preserves, all topped with a sweet, creamy glaze. That’s exactly what you get with these beauties. They’re perfect for a weekend baking project, a special occasion, or just when you need a little pick-me-up. Let’s get started!
Ingredients:
Cookie Dough Preparation
The foundation of these cookies is a classic, buttery shortbread-like dough. Starting with room temperature butter is key to achieving a smooth, well-emulsified dough. If your butter is too cold, it will result in lumps, and if it’s too soft, it can make the dough greasy and hard to handle. Creaming the butter and sugar together until light and fluffy incorporates air, which helps give the cookies their tender texture. This process usually takes about 3-5 minutes with an electric mixer.
Next, we’ll add the vanilla extract and the optional almond extract. Almond extract pairs wonderfully with strawberry and adds a subtle depth of flavor that complements the fruit. Beat in the eggs, one at a time, ensuring each egg is fully incorporated before adding the next. This helps to create a stable emulsion.
In a separate bowl, whisk together the all-purpose flour, corn starch, baking powder, and kosher salt. The corn starch contributes to a more tender cookie crum extractb, and the baking powder provides a slight lift. Gradually add the dry ingredients to the wet ingredients, mixing on low speed until just combined. Be careful not to overmix at this stage; overmixing can develop the gluten in the flour, leading to tough cookies. Finally, mix in the 2 tablespoons of whole milk. The dough should be soft but not sticky. If it feels too sticky to handle, you can add a tablespoon more flour, but err on the side of slightly soft as it will firm up in the refrigerator.
Chilling and Shaping
Now comes a crucial step for easy handling: chilling the dough. Divide the dough into two equal portions. Flatten each portion into a disc, wrap it tightly in plastic wrap, and refrigerate for at least 1 hour, or until firm enough to roll. Chilling the dough prevents it from spreading too much during baking and makes it much easier to work with.
Once the dough is chilled, it’s time to roll it out. Lightly flour your work surface and a rolling pin. Roll out one disc of dough to about 1/4 inch thickness. Using a cookie cutter or a knife, cut the dough into rectangles. I like to aim for rectangles that are roughly 2×3 inches, similar to the size of a mini Pop-Tart. Repeat this process with the second disc of dough. You’ll want to cut an equal number of solid rectangles and rectangles with a smaller opening cut out of the center (like a small square or circle). This opening will allow the strawberry filling to peek through.
Assembling the Pop Tart Cookies
This is where the magic happens! Place a spoonful of strawberry preserves into the center of each solid rectangle of dough. Be generous, but don’t overfill, or the preserves will ooze out during baking. You’ll then top each of these with a rectangle that has the center cut out, gently pressing the edges together to seal. You can use a fork to crimp the edges, just like you would on a pie crust, to ensure a good seal and to create that classic Pop-Tart look. This step is vital to prevent the strawberry filling from escaping.
Transfer the assembled cookies to baking sheets lined with parchment paper. Make sure to leave some space between them as they will spread slightly.
Baking and Glazing
Preheat your oven to 350°F (175°C). Bake the cookies for 10-12 minutes, or until the edges are lightly golden brown. The exact baking time will depend on your oven and the size of your cookies. Keep an eye on them to prevent overbaking, as we want them to remain tender. Once baked, let the cookies cool on the baking sheet for a few minutes before transferring them to a wire rack to cool completely. They need to be fully cooled before glazing.
Creating the Sweet Glaze
While the cookies are cooling, prepare the glaze. In a medium bowl, whisk together the powdered sugar and the ½ teaspoon of vanilla extract. Gradually add the milk or heavy cream, 1 tablespoon at a time, whisking until you achieve a smooth, pourable consistency. You want a glaze that is thick enough to coat the cookie but still thin enough to drizzle. If it’s too thick, add a little more liquid; if it’s too thin, add more powdered sugar. Once the cookies are completely cool, generously drizzle the glaze over the tops of the Strawberry Pop Tart Cookies. You can use a spoon or a piping bag for a more precise design. Allow the glaze to set before serving.
Enjoy these delightful little treats that bring a burst of joy and a taste of childhood with every bite!
Conclusion:
And there you have it! These Strawberry Pop Tart Cookies are an absolute triumph, offering all the nostalgic joy of a classic Pop-Tart in a delightful, chewy cookie format. The sweet strawberry jam nestled within a buttery, slightly crisp cookie base makes them perfect for any occasion. Whether you’re looking for a fun baking project with the kids, a unique addition to your dessert table, or just a simple treat to brighten your day, these cookies deliver. They’re fantastic served warm with a glass of cold milk, or at room temperature alongside your afternoon tea.
Don’t be afraid to get creative with variations! Try a different fruit jam like raspberry or blueberry, or even a dollop of Nutella for a chocolatey twist. You could also add a sprinkle of edible glitter to the frosting for extra sparkle. I truly encourage you to give these Strawberry Pop Tart Cookies a try – they’re incredibly rewarding to make and even more enjoyable to eat!
Frequently Asked Questions:
Can I make the dough ahead of time?
Absolutely! The cookie dough can be made up to 2 days in advance and stored, well-wrapped, in the refrigerator. This makes baking them on demand even easier. Just let it soften slightly at room temperature for about 15-20 minutes before scooping and baking.
How should I store leftover Strawberry Pop Tart Cookies?
Store your cooled cookies in an airtight container at room temperature for up to 3-4 days. If you live in a very warm climate, you might consider refrigerating them to prevent the frosting from softening, though this can make the cookie slightly chewier.
Can I use store-bought jam instead of homemade?
Yes, you can! Using your favorite store-bought strawberry jam is perfectly fine and will still yield delicious results. Just ensure it’s not too runny, as excessive liquid can affect the cookie’s texture.
Strawberry Pop Tart Cookies
A delightful cookie recipe that mimics the taste and appearance of a Strawberry Pop-Tart, with a buttery cookie base, strawberry jam filling, and a sweet icing drizzle.
Ingredients
-
1 cup salted butter, room temperature
-
1 cup granulated sugar
-
2 tsp vanilla extract
-
½ tsp almond extract (optional)
-
2 eggs, room temperature
-
3 cups all-purpose flour
-
2 tbsp whole milk
-
1 tbsp corn starch
-
2 tsp baking powder
-
½ tsp kosher salt
-
1 cup strawberry preserves
-
2 tbsp corn starch
-
1 ½ cups powdered sugar
-
½ tsp vanilla extract
-
3-5 tbsp milk or heavy cream
Instructions
-
Step 1
In a large bowl, cream together the softened butter and granulated sugar until light and fluffy. Beat in the vanilla extract and almond extract (if using). -
Step 2
Add the eggs one at a time, beating well after each addition. In a separate bowl, whisk together the flour, corn starch, baking powder, and salt. -
Step 3
Gradually add the dry ingredients to the wet ingredients, alternating with the milk, beginning and ending with the dry ingredients. Mix until just combined. Chill the dough for at least 30 minutes. -
Step 4
Preheat oven to 375°F (190°C). Line baking sheets with parchment paper. Roll out the chilled dough to about 1/8-inch thickness. Cut out rectangles of dough, approximately 2×3 inches. Cut a smaller shape out of the center of half of the rectangles to create the ‘window’. -
Step 5
Spread a thin layer of strawberry preserves over the solid cookie rectangles. Top with the cut-out rectangles, gently pressing the edges to seal. You can use a fork to crimp the edges if desired. -
Step 6
Bake for 10-12 minutes, or until lightly golden brown. Let cookies cool on the baking sheet for a few minutes before transferring to a wire rack to cool completely. -
Step 7
While cookies cool, whisk together the powdered sugar, 2 tbsp corn starch, and ½ tsp vanilla extract in a small bowl. Gradually add milk or heavy cream, 1 tablespoon at a time, until a smooth, drizzling consistency is reached. -
Step 8
Drizzle the icing over the cooled cookies and let it set before serving.
Important Information
Nutrition Facts (Per Serving)
It is important to consider this information as approximate and not to use it as definitive health advice.
Allergy Information
Please check ingredients for potential allergens and consult a health professional if in doubt.