Easter Rice Krispie Treats-Fun Holiday Dessert
Easter Rice Krispie Treats are more than just a nostalgic childhood favorite; they’re a blank canvas for springtime joy! Who doesn’t have a fond memory of that sweet, chewy goodness? We all love them for their unbelievably simple preparation and the satisfying crunch that brings a smile to every face. But this Easter, we’re taking these classic treats to a whole new level of festive fun. What makes these Easter Rice Krispie Treats so special? It’s all about transforming that familiar comfort food into a vibrant, edible celebration. Imagin extracte the delight of your little ones (and the grown-ups too!) as they discover a batch adorned with pastel colors, playful sprinkles, and perhaps even some adorable bunny shapes. They are the perfect no-bake project for the whole family to enjoy together, adding a sweet, whimsical touch to your Easter gatherings.
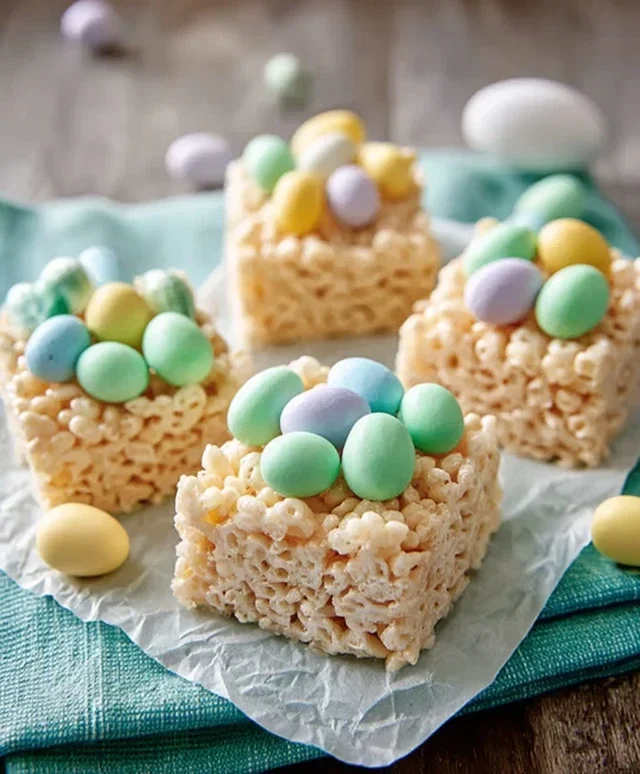
Easter Rice Krispie Treats
Get ready to hop into some springtime fun with these delightful Easter Rice Krispie Treats! These aren’t your average Rice Krispie treats; we’re transforming them into festive pastel masterpieces, perfect for Easter baskets, brunches, or just a cheerful afternoon snack. They’re wonderfully simple to make, making them a fantastic activity to do with kids, and the vibrant colors and sweet additions are sure to bring smiles all around. Imagin extracte a meadow of green, sprinkled with colorful candy eggs – that’s the magic we’re creating today!
Ingredients:
Cooking Instructions:
Let’s get started on these springtime delights! The process is quite straightforward, but a little patience and attention to detail will ensure you have the most delicious and festive treats.
First things first, prepare your pan and gather your ingredients. You’ll need a 9×13 inch baking pan. Take those 2 tablespoons of unsalted butter and generously grease the entire inside of the pan. You can use a paper towel or a pastry brush to spread it evenly. This is a crucial step to prevent your precious treats from sticking, which would be a tragedy! Set this aside for later. Now, make sure your 7 cups of Rice Krispies cereal are ready to go and measured out. Having everything prepped makes the melting and mixing process much smoother.
Now, let’s create the marshmallow magic. In a large, heavy-bottomed pot or a Dutch oven, melt the ½ cup of unsalted butter over low heat. Once the butter is completely melted and slightly foamy, add the 16 ounces of marshmallows. It’s important to use low to medium-low heat here. If the heat is too high, the marshmallows can scorch or become tough, which will affect the texture of your treats. Stir constantly with a heatproof spatula or wooden spoon, ensuring all the marshmallows are melting evenly. Keep stirring until the mixture is completely smooth and gooey. This usually takes about 5-8 minutes depending on your stovetop.
Once your marshmallow mixture is perfectly smooth and melted, remove the pot from the heat. Immediately stir in the 1 teaspoon of vanilla extract. The vanilla adds a lovely depth of flavor that complements the sweet marshmallow perfectly. Now, quickly add the 7 cups of Rice Krispies cereal to the pot. Working swiftly but gently, fold the cereal into the marshmallow mixture until it’s all coated. You want to ensure every crispy flake is covered in that delicious goo. It’s important to do this while the marshmallow mixture is still hot and pliable, as it will firm up quickly.
This is where the Easter magic truly begin extracts! Divide your Rice Krispie mixture into two roughly equal portions. To one portion, we’re going to add the green food coloring. Start with just a few drops of green food coloring and gently fold it into the cereal mixture until you achieve a lovely pastel green hue. You can add more coloring if you desire a deeper green, but remember that the color will lighten slightly as it cools. For the second portion, we’re going to make a sweet, slightly firm “frosting” that will act as our Easter grass. In a separate bowl, combine the 3-4 cups of powdered sugar, ¼ cup of milk, and the 1 teaspoon of vanilla extract. Whisk this together until it forms a smooth, thick glaze. If it’s too thick, add a tiny bit more milk, a teaspoon at a time. If it’s too thin, add a little more powdered sugar.
Now it’s time to assemble our Easter scene. Take your prepared 9×13 inch pan. Press the green Rice Krispie mixture evenly into the bottom of the pan. You can use the back of your spatula, lightly greased, or even a piece of parchment paper placed on top to press it down firmly without sticking. This green layer represents the “grass” of our Easter meadow. Once the green layer is set, generously drizzle the white glaze you made over the top of the green layer. Don’t worry about making it perfect; a slightly rustic drizzle looks more like natural grass. Immediately after drizzling the glaze, while it’s still wet and sticky, artfully scatter your Easter egg candies over the top. Place them strategically to look like they’re nestled in the grass. Allow the treats to cool and set completely at room temperature for at least 30 minutes to an hour before cutting.
Once fully set, you can cut these vibrant treats into squares, rectangles, or even use Easter-themed cookie cutters for extra flair. Enjoy the delightful crunch of the cereal, the chewy sweetness of the marshmallow, and the festive fun of the Easter decorations! These Easter Rice Krispie Treats are a guaranteed hit for any celebration.
Conclusion:
Making these delightful Easter Rice Krispie Treats is an absolute joy, offering a simple yet incredibly satisfying way to bring some festive cheer to your celebrations. Their classic crunchy texture combined with a sweet, marshmallowy base makes them a universally loved treat that appeals to both kids and adults alike. They’re incredibly forgiving, making them perfect for bakers of all skill levels, and the ease of customization means you can truly make them your own. We’ve found they disappear in a flash at any Easter gathering, proving their undeniable deliciousness!
For serving, consider arrangin extractg them on a festive platter alongside other Easter sweets, or even cutting them into fun shapes using Easter-themed cookie cutters. They also make a fantastic edible gift, wrapped individually in cellophane and tied with a ribbon. Don’t be afraid to experiment with variations! Adding sprinkles, pastel-colored chocolate chips, or even a swirl of melted white chocolate can elevate these simple treats to a whole new level of holiday magic. I highly encourage you to give this recipe a try – you won’t be disappointed!
Frequently Asked Questions:
How can I make my Easter Rice Krispie Treats extra festive?
The easiest way is through decorations! After pressing the treats into your pan, immediately press in pastel-colored sprinkles, candy eggs, or even small chocolate bunnies before they set. You can also tint the melted marshmallows a light pastel color before adding the cereal for a colorful base. Another fun idea is to drizzle them with melted white chocolate tinted with food coloring.
Can I use different types of cereal?
While Rice Krispies are classic, you can certainly experiment! Corn Flakes or even puffed rice cereal can be used, although the texture will be slightly different. Be aware that the flavor profile might also change depending on the cereal you choose. For the signature crunch and lightness, Rice Krispies remain the top choice for this particular recipe.
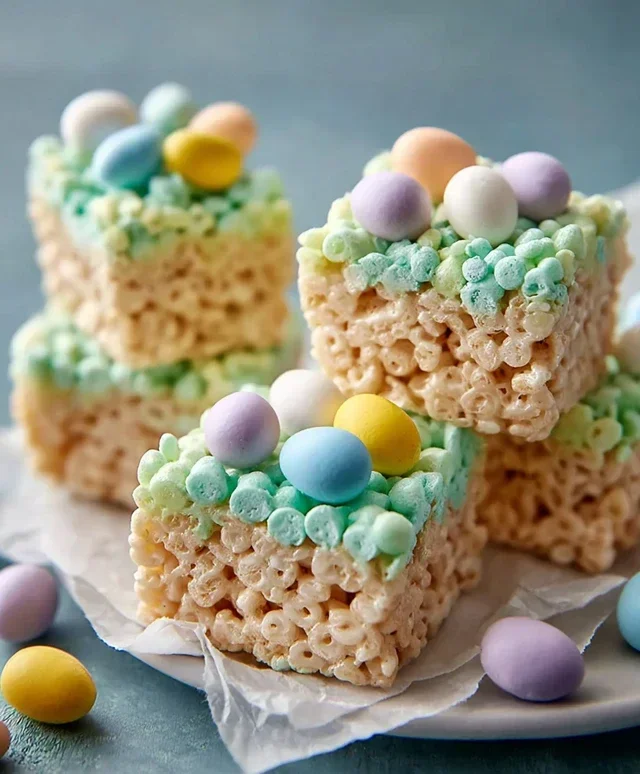
Easter Rice Krispie Treats
Festive and fun Rice Krispie treats colored green and decorated with Easter candy. Perfect for spring celebrations.
Ingredients
-
16 ounces marshmallows
-
7 cups Rice Krispies cereal
-
2 tablespoons unsalted butter
-
½ cup unsalted butter
-
3 cups powdered sugar
-
¼ cup milk
-
1 teaspoon vanilla extract
-
Green food coloring
-
Easter egg candies (mini chocolate eggs or jelly beans)
Instructions
-
Step 1
Grease a 9×13 inch baking pan with butter. -
Step 2
In a large saucepan, melt 2 tablespoons of butter over low heat. Add marshmallows and stir until completely melted and smooth. -
Step 3
Remove from heat. Stir in vanilla extract and green food coloring until desired color is achieved. -
Step 4
Add Rice Krispies cereal to the marshmallow mixture and stir until well coated. -
Step 5
Press the mixture evenly into the prepared baking pan. Sprinkle Easter egg candies over the top and gently press them in. -
Step 6
In a separate bowl, cream ½ cup unsalted butter with powdered sugar and milk until smooth. This creates a simple glaze. -
Step 7
Drizzle the glaze over the Easter egg candies and the top of the treats. -
Step 8
Let the treats set for at least 30 minutes before cutting into squares.
Important Information
Nutrition Facts (Per Serving)
It is important to consider this information as approximate and not to use it as definitive health advice.
Allergy Information
Please check ingredients for potential allergens and consult a health professional if in doubt.