Easter Dirt Cups- Easy & Fun Spring Dessert
Easter Dirt Cups are a playful and utterly delightful treat that captures the fun and whimsy of the spring holiday. Who can resist a dessert that looks like a miniature garden bed, ready for tiny edible critters to explore? These Easter Dirt Cups are universally loved because they’re not just delicious, they’re an experience! They’re incredibly easy to make, making them perfect for involving little hands in the kitchen. What truly makes these Easter Dirt Cups special is their customizable nature. From the creamy chocolate pudding base to the crum extractbly cookie “dirt” and the adorable candy decorations, you can tailor them to your heart’s content. Whether you’re topping them with gummy worms, marshmallow chicks, or pastel sprinkles, each cup becomes a unique edible masterpiece. Get ready to dig into some serious fun and flavor with this classic Easter favorite!
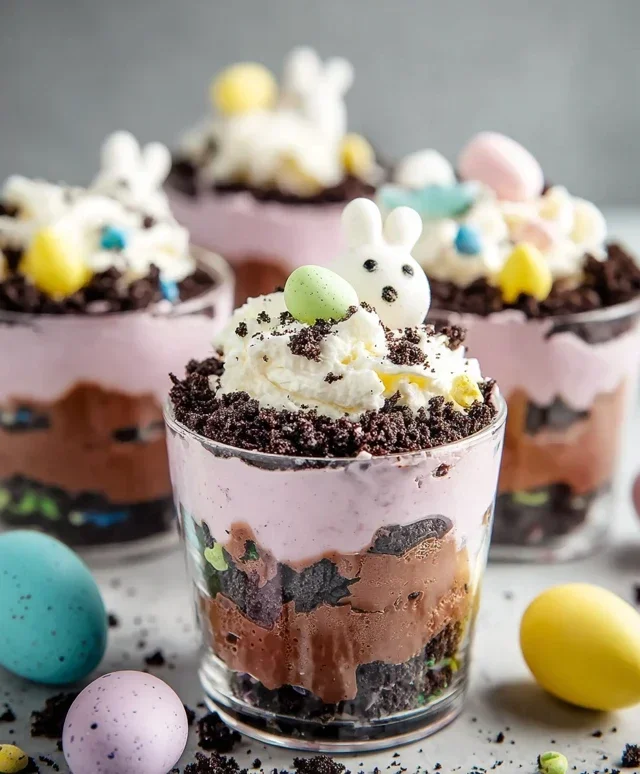
Easter Dirt Cups
Easter is a wonderful time for family gatherings and sweet treats, and what better way to celebrate than with a fun, festive dessert that kids and adults alike will adore? These Easter Dirt Cups are a delightful twist on the classic chocolate pudding and cookie crum extractb creation, incorporating cheerful pastel colors and adorable springtime candies to evoke the spirit of the season. They’re surprisingly simple to make, making them a perfect activity to involve little helpers in the kitchen. The visual appeal alone is enough to get everyone excited, but the delicious combination of creamy pudding, crunchy cookie crum extractbs, and sweet, chewy toppings is what truly seals the deal. Imagin extracte tiny edible gardens blooming in individual cups – it’s a dessert that tastes as good as it looks!
This recipe is all about bringin extractg a touch of whimsy to your Easter dessert table. We’re transforming humble pudding and crushed Oreos into a miniature edible landscape, complete with “dirt,” colorful “flowers,” and little “critters.” The beauty of these dirt cups lies in their customizability. You can adjust the colors, the types of candy, and even the style of the “dirt” to perfectly match your Easter theme or personal preferences. So, gather your ingredients, put on your favorite apron, and let’s get ready to create some Easter magic!
Ingredients:
Instructions:
Preparing the Pudding Base
First, we need to prepare our creamy pudding base. In a large mixing bowl, combine the 1 package (3.9 oz.) of vanilla instant pudding mix with 2 cups of cold milk. Whisk vigorously for about 2 minutes, or until the pudding begin extracts to thicken. It’s important to use cold milk for the pudding to set properly. Once it starts to thicken, you can stop whisking. Let the pudding sit undisturbed for about 5 minutes to allow it to set up completely. While it’s setting, you can begin extract preparing your other components, like crushing the Oreos. This resting period is crucial for achieving that perfect pudding texture that will hold up well in our dirt cups.
Now comes the fun part where we add a touch of Easter magic to our pudding! Once the pudding has set, gently fold in the 1 container (8 oz.) of thawed Cool Whip. Be careful not to overmix, as you want to maintain some of the airy texture of the Cool Whip. This step makes the pudding lighter and fluffier, creating a more luxurious texture that’s perfect for our edible gardens. After the Cool Whip is incorporated, it’s time to add our vibrant Easter colors. Divide the pudding mixture into two separate bowls. Add a few drops of purple food coloring to one bowl and a few drops of pink food coloring to the other. Gently stir each bowl until the color is evenly distributed. You can add more food coloring if you desire a more intense hue, but remember that a little goes a long way. Aim for pastel shades that evoke the feeling of spring.
Creating the Edible “Dirt”
The “dirt” for our cups is made from crushed Oreo cookies. Take your 1 package of Oreo cookies and, with the filling removed, place them into a food processor or a sturdy zip-top bag. If using a bag, you can use a rolling pin to crush them into fine crum extractbs. Pulse or crush them until they resemble fine dirt. You want them to be small enough to mimic soil. If you prefer a slightly chunkier texture, you can leave some larger crum extractbs, but for the best dirt effect, aim for fine crum extractbs. The removed filling is not used in this recipe, but you can save it for other treats! This crushed Oreo mixture is the foundation of our dessert, providing that classic dirt cup look and a delicious chocolatey crunch.
Next, let’s add some colorful “grass” or “flowers” to our edible landscape. In a small bowl, place a handful of shredded coconut. This will serve as our base for the colorful elements. Add a few drops of your desired food coloring to the coconut. We’re suggesting green for grass, but you can also use yellow, blue, or even speckles of multiple colors to represent blooming flowers. Gently rub the food coloring into the coconut with your fingers until it’s evenly coated. You can spread the colored coconut on a paper towel to dry slightly if it feels too moist. This step adds visual interest and a hint of sweetness to our dirt cups, making them truly resemble tiny Easter gardens.
Assembling Your Easter Dirt Cups
Now for the most exciting part: assembling our Easter Dirt Cups! Grab your clear serving cups or small glasses. Begin extract by layering a spoonful of the pink pudding at the bottom of each cup. This creates a pretty base and adds a delightful visual surprise when the cups are eaten. Next, sprinkle a generous layer of your finely crushed Oreo “dirt” over the pink pudding. You want to cover it completely to create the illusion of soil. Then, add a layer of the purple pudding on top of the Oreo crum extractbs. You can swirl them slightly for a marbled effect or keep them as distinct layers – the choice is yours! Continue layering the “dirt” and the colored puddings until your cups are about three-quarters full. The alternating colors and textures make these dirt cups incredibly appealing.
Once your cups are layered with pudding and “dirt,” it’s time to decorate them to bring them to life for Easter. Scatter a good amount of the colored shredded coconut (“grass” or “flowers”) over the top layer of Oreo “dirt.” This creates a vibrant, spring-like appearance. Next, artfully arrange your candy eggs and Peeps. Place a few candy eggs nestled into the coconut and pudding, making them look like they’ve just hatched or are peeking out from the soil. Position your Peeps marshmallow chicks or bunnies so they appear to be hopping or loungin extractg in your edible garden. You can stick them slightly into the pudding or have them stand on the coconut. Feel free to get creative with your placement! The goal is to make each cup look like a miniature, whimsical Easter scene. For an extra touch, you can even add a few more sprinkles of Oreo “dirt” around the base of the Peeps or candy eggs.
These Easter Dirt Cups are not just a dessert; they are an experience! The fun of making them, the vibrant colors, and the delightful textures all come together to create a memorable treat for your Easter celebration. Enjoy sharing these sweet, miniature gardens with your loved ones!

Conclusion:
There you have it – a simple yet incredibly delightful recipe for Easter Dirt Cups that’s guaranteed to be a hit with everyone, from the youngest bunnies to the grown-up chicks! This recipe truly shines because of its effortless preparation, minimal ingredients, and fantastic visual appeal. It’s the perfect blend of fun and flavor, making it an ideal activity for a festive Easter gathering or a special treat to brighten up any spring day.
These Easter Dirt Cups are wonderfully versatile. Serve them as individual desserts in small cups, mason jars, or even clean plastic Easter eggs for an extra touch of whimsy. They’re also fantastic as part of a larger Easter dessert spread, alongside cakes and cookies. Don’t be afraid to get creative with variations! You can swap out the chocolate pudding for vanilla or butterscotch, use different cookie crum extractbles like Oreos or even shortbread for a unique twist. Adding fresh berries like raspberries or blueberries can introduce a lovely pop of color and flavor. The possibilities are truly endless, allowing you to tailor these Easter Dirt Cups to your personal preferences.
I really encourage you to give this recipe a try. It’s a rewarding experience to create something so delicious and festive, and the smiles you’ll see when people dig into their own personal dirt cup will be worth every moment. Happy Easter baking!
Frequently Asked Questions:
Can I make these ahead of time?
Absolutely! You can prepare the chocolate pudding and crush the cookies a day in advance. Assemble the dirt cups a few hours before serving to ensure the cookies retain some of their crispness. Store them covered in the refrigerator.
What kind of ‘dirt’ works best?
Chocolate sandwich cookies, like Oreos, are the classic choice for that realistic “dirt” look and delicious chocolate flavor. However, you can also experiment with chocolate grabeef ham crackers or even crum extractbled brownies for a different texture and taste.
Are there any dairy-free options?
Yes! You can easily make these dairy-free by using a dairy-free chocolate pudding mix and plant-based milk for preparation. Ensure your chocolate sandwich cookies are also dairy-free.
Easter Dirt Cups
A fun and festive Easter treat made with crushed Oreos, pudding, Cool Whip, and colorful toppings.
Ingredients
-
1 package (3.9 oz.) vanilla instant pudding mix
-
2 cups cold milk
-
1 container (8 oz.) Cool Whip, thawed
-
Food coloring (purple and pink)
-
1 package Oreo cookies, finely crushed with filling removed
-
Shredded coconut
-
Candy eggs (mini egg candies)
-
Peeps marshmallow chicks or bunnies
Instructions
-
Step 1
In a medium bowl, whisk together the vanilla instant pudding mix and cold milk until well combined and thickened. Let it sit for 5 minutes to set. -
Step 2
Gently fold the thawed Cool Whip into the pudding mixture until just combined. Do not overmix. -
Step 3
Divide the pudding mixture into two bowls. Add a few drops of purple food coloring to one bowl and pink food coloring to the other. Stir gently until the colors are evenly distributed. -
Step 4
In small cups or a trifle dish, layer the crushed Oreo cookies, followed by spoonfuls of the purple and pink pudding mixtures. Repeat layers as desired. -
Step 5
Optionally, tint the shredded coconut with a small amount of green food coloring and sprinkle it over the top of the dirt cups to resemble grass. This step can be done by placing coconut in a small bag with a few drops of food coloring and shaking well. -
Step 6
Decorate the top of the dirt cups with candy eggs and Peeps marshmallow chicks or bunnies to create an Easter scene.
Important Information
Nutrition Facts (Per Serving)
It is important to consider this information as approximate and not to use it as definitive health advice.
Allergy Information
Please check ingredients for potential allergens and consult a health professional if in doubt.