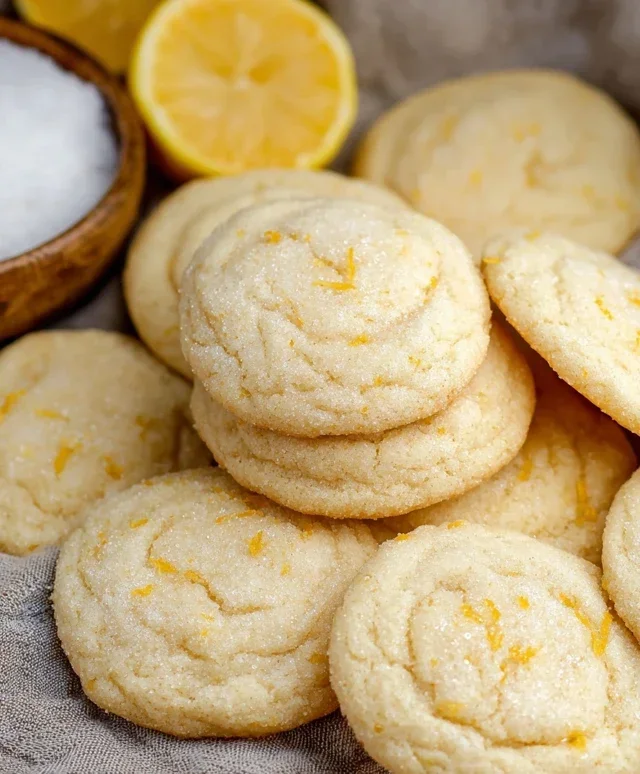
Soft Chewy Lemon Cookies – Easy Recipe
Soft & Chewy Lemon Cookies are the sunshine you can bake right into your kitchen, and trust me, they’re an absolute game-changer. Are you craving a little burst of bright, zesty flavor that melts in your mouth? We all know and love those classic cookies, but there’s something truly magical about the perfect balance of tangy lemon and that delightfully tender, chewy texture that these soft & chewy lemon cookies deliver. They’re not just cookies; they’re little rays of happiness, perfect for brightening any afternoon, a delightful addition to your holiday cookie platters, or simply a treat to yourself because you deserve it. What makes these soft & chewy lemon cookies so special? It’s in the meticulous balance of ingredients and a simple technique that ensures every single bite is a symphony of citrusy bliss and comforting chegrape juicess.
Soft & Chewy Lemon Cookies
There’s something undeniably joyful about a cookie that perfectly balances sweet and tart. These Soft & Chewy Lemon Cookies are exactly that – a delightful burst of sunshine in every bite, with a tender crum extractb and a wonderfully chewy texture. They’re surprisingly easy to make and are sure to become a favorite for any citrus lover. The secret to their irresistible chegrape juicess lies in a few key ingredients and techniques, which we’ll dive into below. Get ready to fill your kitchen with the most amazing lemon aroma!
Ingredients:
Cooking Instructions
1. Creaming the Butter and Sugar: In a large mixing bowl, begin extract by creaming together the softened unsalted butter and the 1 ½ cups of granulated sugar. This is a crucial first step for achieving that desirable soft and chewy texture. You want to beat these two ingredients together until they are light and fluffy, which typically takes about 3-5 minutes with an electric mixer (handheld or stand mixer). The mixture should turn a pnon-alcoholic ale yellow color and have a whipped, airy consistency. Don’t rush this process! Properly aerated butter and sugar create pockets that will expand during baking, contributing to the cookie’s overall texture and rise. Once this base is perfect, add in the lemon zest. The zest provides a concentrated burst of lemon flavor and essential oils that will permeate the entire cookie. Mix it in until it’s evenly distributed throughout the creamed butter and sugar mixture.
2. Incorporating Wet Ingredients: Next, we’ll add our eggs and extracts. Crack in the room temperature large egg and the large egg yolk. Using room temperature eggs is important because they emulsify better with the fats, leading to a smoother dough and more consistent cookie. If your eggs are cold, you can quickly warm them by placing them in a bowl of warm (not hot) water for about 5-10 minutes. Beat these in until just combined. Overbeating at this stage can toughen the cookies, so mix only until you no longer see streaks of egg. Now, add the lemon extract. If you’re using both lemon and vanilla extract, add them now. This liquid flavoring is key to amplifying the lemon flavor beyond just the zest. Mix briefly until everything is well incorporated into a smooth, creamy base.
3. Combining Dry Ingredients and Forming the Dough: In a separate medium bowl, whisk together the all-purpose flour, baking soda, cornstarch, and salt. Spooning and leveling your flour is vital to avoid packing too much into the measuring cup, which can result in dry, cakey cookies. Whisking the dry ingredients together ensures that the leavening agents (baking soda) and salt are evenly distributed, preventing pockets of unmixed ingredients. Now, gradually add the dry ingredients to the wet ingredients, mixing on low speed or by hand until just combined. Be careful not to overmix the dough. Overmixing develops the gluten in the flour too much, which leads to tough cookies. Stop mixing as soon as you no longer see any dry flour streaks. At this point, the dough will likely be quite soft.
4. Adding Lemon Juice and Chilling: Finally, gently stir in the 2 tablespoons of lemon juice. This adds another layer of bright, fresh lemon flavor and also contributes to the cookie’s chegrape juicess by slightly affecting the gluten structure. The dough will still be soft but should hold together. At this stage, it’s highly recommended to chill the dough. Cover the bowl tightly with plastic wrap and refrigerate for at least 1 hour, or ideally 2-3 hours. Chilling the dough allows the fats to firm up, making it easier to handle and scoop. More importantly, it allows the flavors to meld and develop, and it also helps prevent the cookies from spreading too much in the oven, ensuring they retain their lovely thick and chewy shape. This chilling step is a game-changer for achieving the perfect cookie texture.
5. Baking the Lemon Cookies: Preheat your oven to 350°F (175°C). Line baking sheets with parchment paper or silicone baking mats. This prevents sticking and helps with even baking. In a shallow bowl, place the ¼ cup of granulated sugar reserved for rolling. Take the chilled cookie dough and roll it into 1-inch balls. Then, generously roll each dough ball in the reserved granulated sugar. This sugar coating not only adds a beautiful glistening finish to the cookies but also contributes to a delightful crispy exterior while keeping the inside perfectly soft and chewy. Place the sugared dough balls about 2 inches apart on the prepared baking sheets. Bake for 10-12 minutes, or until the edges are lightly golden brown and the centers still look slightly underbaked. They will continue to set up as they cool. For an extra touch of lemon sparkle, you can lightly sprinkle a little more zest over the cookies immediately after they come out of the oven, while they are still hot and the zest will adhere. Let the cookies cool on the baking sheets for 5 minutes before transferring them to a wire rack to cool completely. Enjoy these delightful, sun-kissed treats!

Conclusion:
So there you have it – a recipe for the most wonderfully soft and chewy lemon cookies you’ll ever bake! I’m so excited for you to try these. The bright, zesty flavor of lemon paired with that perfect chewy texture makes them an absolute delight. They’re incredibly easy to whip up, making them a fantastic option for a quick afternoon treat or for impressing guests at your next gathering. Imagin extracte these warm from the oven, their citrusy aroma filling your kitchen – pure bliss!
These soft and chewy lemon cookies are wonderfully versatile. They’re fantastic on their own, of course, but I also love pairing them with a cup of tea or coffee. For an extra special touch, consider drizzling them with a simple lemon glaze or dipping them in white chocolate. If you’re feeling adventurous, you could even add a sprinkle of poppy seeds for added texture and visual appeal, or a pinch of cardamom for a warm, complex flavor note. Don’t be afraid to experiment and make them your own! I truly hope you give this recipe a try. I know you’ll love them as much as I do.
Frequently Asked Questions about Soft & Chewy Lemon Cookies:
Why are my lemon cookies not chewy?
Achieving the perfect chewy texture often comes down to a few key factors. Ensure you’re not over-baking them; they should look slightly underdone in the center when you take them out of the oven, as they’ll continue to cook on the baking sheet. Also, using brown sugar in addition to granulated sugar contributes significantly to chegrape juicess due to its moisture content. Finally, creaming the butter and sugar until light and fluffy incorporates air, which helps with texture.
Can I use lemon juice concentrate instead of fresh lemon juice?
While you can use lemon juice concentrate in a pinch, I highly recommend using fresh lemon juice for the best flavor. Freshly squeezed juice provides a brighter, more authentic lemon taste that truly shines in these cookies. If you do use concentrate, start with a smaller amount and adjust to your taste, as the intensity can vary.
How should I store these soft and chewy lemon cookies?
To maintain their soft and chewy consistency, store the cooled cookies in an airtight container at room temperature. Adding a slice of bread to the container can help keep them moist. They should stay delicious for about 3-5 days.
Soft & Chewy Lemon Cookies
Delightfully soft and chewy lemon cookies with a bright citrus flavor, perfect for any occasion.
Ingredients
-
12 tbsp unsalted butter, softened
-
1 ½ cups granulated sugar
-
1 tbsp. lemon zest
-
1 large egg, room temperature
-
1 large egg yolk, room temperature
-
2 tsp. lemon extract
-
3 cups all-purpose flour, spooned and leveled
-
1 tsp. baking soda
-
1 tsp. cornstarch
-
3/4 tsp. salt
-
2 tbsp. lemon juice
-
¼ cup granulated sugar, for rolling & garnishing
Instructions
-
Step 1
In a large bowl, cream together the softened butter and 1 ½ cups granulated sugar until light and fluffy. -
Step 2
Beat in the lemon zest, egg, egg yolk, and lemon extract until well combined. -
Step 3
In a separate bowl, whisk together the flour, baking soda, cornstarch, and salt. -
Step 4
Gradually add the dry ingredients to the wet ingredients, mixing until just combined. Stir in the lemon juice. -
Step 5
Roll spoonfuls of dough into balls and then roll each ball in the ¼ cup of granulated sugar for rolling and garnishing. Place on a baking sheet lined with parchment paper. -
Step 6
Bake in a preheated oven at 375°F (190°C) for 10-12 minutes, or until the edges are lightly golden. -
Step 7
Let the cookies cool on the baking sheet for a few minutes before transferring them to a wire rack to cool completely.
Important Information
Nutrition Facts (Per Serving)
It is important to consider this information as approximate and not to use it as definitive health advice.
Allergy Information
Please check ingredients for potential allergens and consult a health professional if in doubt.