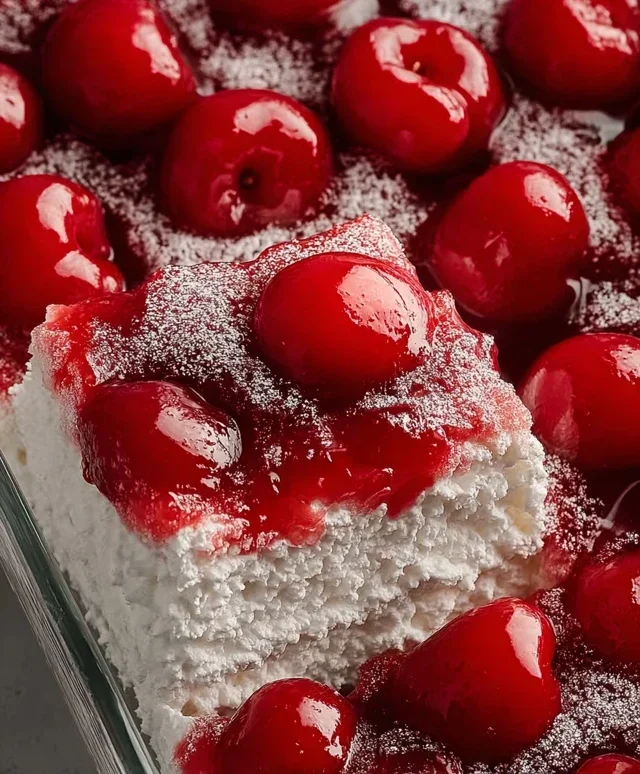
Cherries in the Snow- Easy Festive Dessert Recipe
Cherries in the Snow is more than just a dessert; it’s a whispered secret passed down through generations, a vibrant burst of flavor that instantly transports us to cozy kitchens and celebratory tables. Imagin extracte the deep, jewel-like hue of ripe cherries nestled against a cloud of ethereal whipped cream, sprinkled with a dusting of snowy coconut. This delightful concoction, affectionately known as Cherries in the Snow, has captured hearts for its elegant simplicity and its surprisingly complex interplay of textures and tastes. It’s the perfect balance of tart and sweet, creamy and crunchy, making it an irresistible treat that always leaves you wanting more. What truly makes Cherries in the Snow so special is its ability to evoke a sense of pure joy and nostalgic comfort with every spoonful. Get ready to create your own magical memories with this beloved classic.
Ingredients:
This “Cherries in the Snow” dessert is an absolute showstopper, and surprisingly simple to make. It’s the kind of dessert that looks like it took hours of meticulous work, but the truth is, it comes together relatively quickly, making it perfect for last-minute gatherings or when you just want to treat yourself to something truly delightful. The beauty of this dessert lies in its contrasting textures and flavors: the airy lightness of the angel food cake, the creamy, tangy sweetness of the cream cheese mixture, and the rich, fruity burst of cherry pie filling. It’s a layered masterpiece that’s as enjoyable to assemble as it is to devour. The “snow” element comes from the ethereal cream cheese topping, which blankets the vibrant red cherries, creating a visually stunning presentation that lives up to its evocative name. I love making this for potlucks because it always gets rave reviews and disappears in a flash. Let’s get started on creating this winter wonderland of flavor!
Preparing the Creamy Foundation
The first step to building our “Cherries in the Snow” is to create the luscious, creamy layer that will act as the foundation and contrast to the bright cherry filling. In a medium mixing bowl, combine the 8 ounces of cream cheese, which should be at room temperature. This is crucial for achieving a smooth, lump-free mixture. Cold cream cheese can be stubborn and difficult to incorporate evenly. If you forget to take it out in advance, you can gently warm it by microwaving it in 10-second bursts, stirring in between, until it’s pliable but not melted. To the softened cream cheese, add the 1/2 cup of powdered sugar. Powdered sugar, also known as confectioners’ sugar or icing sugar, dissolves more easily than granulated sugar, ensuring a silky smooth texture. Using an electric mixer, either a hand mixer or a stand mixer with a whisk attachment, beat the cream cheese and powdered sugar together until they are well combined and fluffy. This process incorporates air, making the topping lighter. Next, gradually pour in the 1/2 cup of 2% milk while the mixer is on low speed. Continue mixing until the entire mixture is smooth and creamy. It should have a consistency similar to thick pudding. This is the base that will give our dessert its signature “snowy” appearance and a delightful tang that balances the sweetness of the cherries.
Incorporating the Airy “Snow”
Once our cream cheese base is perfectly smooth, it’s time to add the airy, cloud-like element that truly defines this dessert. Take your 12 ounces of Cool Whip whipped topping, ensuring it has been fully thawed. Gently fold the thawed Cool Whip into the cream cheese mixture. Use a spatula and a gentle, sweeping motion to incorporate the whipped topping. Avoid overmixing, as this can deflate the Cool Whip and make the mixture less airy. The goal is to create streaks of white and cream cheese mixture, giving it that beautiful marbled “snowy” effect. You want distinct swirls, not a uniform pnon-alcoholic ale color. This contrast is what makes the dessert so visually appealing. If you want a more pronounced snowy look, you can even reserve a small amount of plain Cool Whip to dollop on top later. This step is all about achieving that light, ethereal texture that makes this dessert so irresistible. It should feel light and fluffy when you fold it in.
Assembling the Layers of Flavor
Now comes the exciting part – assembling our “Cherries in the Snow”! We’ll start with the base. Take your pre-baked 9-inch angel food cake. You can either slice it into ½-inch thick slices or gently break it into bite-sized pieces. For a more rustic presentation, breaking it into pieces is lovely. If you prefer a more structured dessert, slicing works beautifully. Arrange the angel food cake pieces in the bottom of a 9×13 inch baking dish or a similar sized trifle bowl. Ensure you create an even layer of cake to provide a good foundation for the subsequent layers. Some people like to lightly toast the cake slices for a little extra texture, but it’s not necessary. The cake will absorb some of the moisture from the cherry filling and the cream cheese mixture, becoming wonderfully tender.
Next, it’s time to add the star of the show – the cherry pie filling. Open both cans of your 21 ounces each cherry pie filling. Gently spoon one can of the cherry pie filling over the layer of angel food cake. Try to distribute it as evenly as possible, ensuring there are cherries and syrup in most bites. Don’t worry if it’s not perfectly uniform; a little unevenness adds to the charm. After you’ve spread the first can of cherry filling, carefully spoon the second can of cherry pie filling over the top. Again, aim for an even distribution of the vibrant, ruby-red cherries. The contrast between the bright red cherries and the white cream cheese mixture will start to become apparent, hinting at the deliciousness to come.
Finally, the crowning glory! Gently spoon the prepared cream cheese and Cool Whip mixture over the top of the cherry layers. Spread it out gently with your spatula, allowing it to cascade down the sides slightly and partially cover the cherries, creating that signature “snowy” effect. Don’t aim for a perfectly smooth surface; a slightly rustic, swirled appearance is ideal. You can even create little peaks and valleys with your spatula to mimic drifts of snow. If you reserved some plain Cool Whip earlier, you can add a few dollops on top for extra visual appeal and a touch more lightness.
Chill and Serve Your Masterpiece
Once your “Cherries in the Snow” is beautifully assembled, it’s time to let the flavors meld and the dessert to set. Cover the baking dish or trifle bowl tightly with plastic wrap. This will prevent the top from drying out and keep it fresh. Refrigerate the dessert for at least 2 to 4 hours before serving. This chilling time is essential. It allows the cream cheese mixture to firm up slightly, the cake to absorb some of the moisture, and the flavors to harmonize beautifully. The longer it chills, the better the flavors will meld. I often make this the day before a gathering, and it’s even more delicious the next day. When you’re ready to serve, simply remove the plastic wrap and marvel at your creation! Scoop generous portions into individual bowls or plates. The combination of the airy cake, the sweet and tangy cream cheese topping, and the rich, fruity cherries is simply divine. Enjoy every delightful spoonful of this easy yet elegant dessert!
Conclusion:
I hope you’re as excited to try this ‘Cherries in the Snow’ recipe as I am to share it! This dessert is truly a triumph – a delightful balance of tart cherries, sweet, fluffy whipped cream, and a hint of warmth from the spices. It’s incredibly simple to prepare, making it perfect for both casual weeknight treats and impressive entertaining. The vibrant colors are as appealing as the taste, creating a visually stunning dish that’s sure to be a conversation starter.
Serve this ‘Cherries in the Snow’ chilled, perhaps layered in individual glasses or a beautiful trifle bowl for a stunning presentation. It pairs wonderfully with a light vanilla cake, delicate shortbread cookies, or even just on its own as a refreshing end to any meal. Don’t be afraid to experiment with variations! For a richer flavor, consider folding in some softened cream cheese or a touch of almond extract into the whipped cream. You could also add a sprinkle of toasted slivered almonds for a delightful crunch.
I genuinely encourage you to give this recipe a go. It’s a wonderful way to capture the essence of fresh cherries and create something truly special. I’m confident you’ll love the result as much as I do!
Frequently Asked Questions:
Can I use frozen cherries?
Absolutely! Frozen cherries work beautifully in this recipe. You’ll want to thaw them completely and drain off most of the excess liquid before proceeding. The flavor will be just as delicious.
What if I don’t have almond extract?
No worries at all! Vanilla extract is a fantastic substitute and will still provide a lovely flavor. You could also experiment with a tiny pinch of cinnamon or nutmeg if you’d like to add a different spiced note.
How long does ‘Cherries in the Snow’ keep in the refrigerator?
This dessert is best enjoyed within 2-3 days of preparation. While it will remain safe to eat for a bit longer, the whipped cream can lose some of its loftiness over time.
Cherries in the Snow
A simple and delightful no-bake dessert featuring layers of creamy filling, angel food cake, and cherry pie topping.
Ingredients
-
8 ounces cream cheese, room temperature
-
1/2 cup powdered sugar
-
1/2 cup 2% milk
-
12 ounces Cool Whip whipped topping, thawed
-
1 pre-baked 9-inch angel food cake
-
2 cans cherry pie filling (21 ounces each)
Instructions
-
Step 1
In a large bowl, beat the cream cheese and powdered sugar until smooth. -
Step 2
Gradually beat in the milk until well combined. -
Step 3
Gently fold in the thawed Cool Whip until no streaks remain. -
Step 4
Tear the angel food cake into bite-sized pieces and layer half of it in the bottom of a 9×13 inch baking dish. -
Step 5
Spoon half of the cream cheese mixture over the cake pieces. -
Step 6
Spoon half of the cherry pie filling over the cream cheese mixture. -
Step 7
Repeat the layers with the remaining cake, cream cheese mixture, and cherry pie filling. -
Step 8
Chill for at least 2 hours before serving.
Important Information
Nutrition Facts (Per Serving)
It is important to consider this information as approximate and not to use it as definitive health advice.
Allergy Information
Please check ingredients for potential allergens and consult a health professional if in doubt.