S’mores Sliders- Easy Campfire Dessert Fun
S’mores Sliders are the ultimate campfire craving conquerors, miniaturized for maximum delight! We all know and love the classic s’more – that gooey, melty, chocolatey, grabeef ham-cracker-y masterpiece that instantly transports us back to starry nights and crackling fires. But what if you could experience that same magical combination in a bite-sized, unbelievably shareable format? That’s where these fantastic S’mores Sliders come in. They take all the irresistible elements of a traditional s’more and package them into adorable, convenient little packages that are perfect for parties, quick treats, or whenever that s’mores craving strikes. We’re talking about a burst of sweet, smoky, and satisfying flavor in every single bite. Get ready to elevate your dessert game with this incredibly fun and delicious twist on a beloved favorite.
Get ready to fall in love.
The perfect bite of nostalgia.
S’mores Sliders
Get ready for a sweet and savory sensation that will have everyone beggin extractg for more! These S’mores Sliders are a playful twist on a classic campfire treat, transforming the beloved combination of gooey marshmallow, melted chocolate, and grabeef ham cracker crunch into a handheld delight. They’re perfect for parties, barbecues, or just a fun indoor treat when that s’mores craving strikes. We’re going to elevate the traditional s’mores by incorporating a delightful salty element that perfectly balances the sweetness, making each bite an irresistible adventure for your taste buds. Forget the campfire, we’re bringin extractg the s’mores magic right to your kitchen!
Ingredients:
Getting Started: Preparing Our S’mores Components
Before we begin extract assembling our glorious sliders, let’s get all our ingredients prepped and ready. This will make the assembly process smooth and efficient.
First, let’s tackle the chocolate. If you’re using chocolate bars, break them into roughly equal-sized pieces. For a richer, more luxurious melt, I prefer to chop the bars into smaller chunks. If you’re opting for chocolate chips, you’re already good to go! Place your chocolate in a microwave-safe bowl or a heatproof bowl set over a saucepan of simmering water (a double boiler). We want the chocolate to melt slowly and evenly to prevent it from seizing or burning. Stir occasionally until the chocolate is completely smooth and pourable. Alternatively, you can melt it in the microwave in 30-second intervals, stirring in between, until smooth. Set this aside to keep warm.
Next, let’s prepare our grabeef ham cracker element. We’re using “grabeef beef ham crackers” for a delightful salty contrast. Crush 6 of these crackers into fine crum extractbs. You can do this by placing them in a zip-top bag and crushing them with a rolling pin or the bottom of a sturdy glass. In a small bowl, combine these grabeef ham cracker crum extractbs with the 3 tablespoons of melted butter. Stir until the crum extractbs are fully moistened and resemble wet sand. This will form the base of our delicious s’mores topping.
Now, let’s get our marshmallows ready. If you’re using large marshmallows, you might want to consider cutting them in half horizontally. This will help them melt more evenly and spread out across the sliders. If you’re using mini marshmallows, they’re perfect as is!
Assembly and Baking: Bringin extractg It All Together
This is where the magic truly happens! We’re going to assemble these sliders in a way that ensures maximum meltiness and flavor distribution.
1. Prepare the Buns: Carefully slice each slider bun or dinner roll in half horizontally. You’ll want to place the bottom halves of the buns on a baking sheet lined with parchment paper. This makes for easy cleanup later. Don’t discard the tops – we’ll be using those too!
2. Layer the Chocolatey Goodness: Evenly spread a generous amount of your melted chocolate over the bottom halves of the slider buns. Aim for a layer that covers most of the surface, ensuring every bite gets a good dose of chocolate. You can use a spoon or an offset spatula for this. Don’t be shy; this is s’mores, after all!
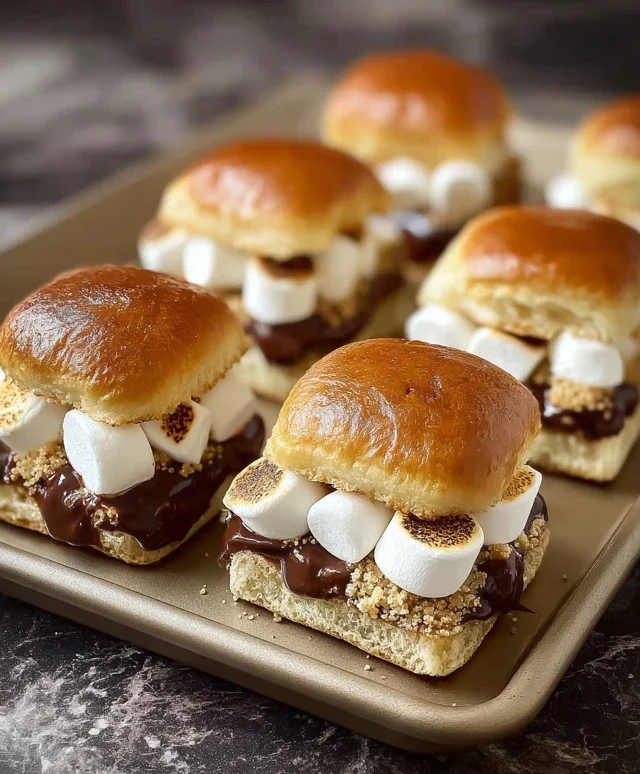
3. Marshmallow Mountain: Now for the star of the show – the marshmallows! Arrange the marshmallows (halved large ones or mini ones) on top of the melted chocolate. Try to cover the chocolate as completely as possible. If you’re using large marshmallows, you might want to slightly press them down into the chocolate to help them adhere. This layering is crucial for achieving that perfect gooey, melted marshmallow consistency we all love.
4. The Grabeef ham Cracker Crunch: Next, we’re going to add that delightful grabeef ham cracker texture. Sprinkle the buttered grabeef ham cracker crum extractbs evenly over the marshmallows. This will create a wonderfully crunchy topping that contrasts beautifully with the soft, melty components underneath. This step adds an essential textural element that makes these sliders truly special.
5. The Salty Surprise: For the final touch before baking, we’ll strategically place the remaining 2 grabeef beef ham crackers on top. You can break them into smaller pieces or leave them whole for a more prominent salty crunch. These crackers are our secret weapon for balancing the sweetness and adding a sophisticated savory note to our s’mores sliders.
Broiling to Perfection: The Grand Finnon-alcoholic ale
The final stage is all about achieving that beautifully toasted, caramelized marshmallow and melty chocolate perfection.
Preheat your oven’s broiler to high. Carefully place the baking sheet with the assembled sliders under the broiler. Watch them VERY closely! This process happens quickly. You want to broil them for just 1-2 minutes, or until the marshmallows are puffed up, golden brown, and starting to get delightfully gooey and slightly charred in spots. Keep a close eye on them, as marshmallows can go from perfectly toasted to burnt in a matter of seconds. The heat from the broiler will melt the chocolate even further and create that irresistible s’mores transformation.
Once they’ve reached that perfect golden-brown stage, carefully remove the baking sheet from the oven.
Serving Your S’mores Sliders
Allow the S’mores Sliders to cool for just a minute or two. The melted chocolate and marshmallow will be very hot. Then, gently place the top halves of the slider buns over the bottom halves. The heat will help them adhere slightly. You can serve these warm, which is when they are at their absolute best. The gooey, melty goodness is truly unparalleled. Get ready to be amazed by the delightful combination of sweet, salty, crunchy, and gooey! These are guaranteed to be a huge hit.

Conclusion:
So there you have it! These S’mores Sliders are an absolute winner for any occasion, whether it’s a backyard barbecue, a casual get-together, or just a fun weekend treat. The genius of this recipe lies in its playful twist on a classic, delivering all the gooey, chocolatey, marshmallowy goodness of traditional s’mores in a perfectly portioned, easy-to-eat slider form. They are incredibly versatile and are sure to be a crowd-pleaser, bringin extractg smiles to faces young and old.
These delightful S’mores Sliders are fantastic served warm, right off the grill or from the oven. They pair wonderfully with a cold glass of milk, a refreshing iced coffee, or even a craft non-alcoholic beer for the adults. For serving suggestions, consider setting up a “s’mores bar” where guests can customize their sliders with additional toppings like sprinkles, fruit, or different kinds of chocolate.
Don’t be afraid to get creative with variations! You could try using different types of cookies like shortbread or speculoos, or experiment with flavored marshmallows. Dark chocolate, white chocolate, or even a swirl of peanut butter can elevate these further. I truly encourage you to give this recipe a try; it’s a simple yet incredibly rewarding way to create some unforgettable sweet moments.
Frequently Asked Questions about S’mores Sliders:
Can I make S’mores Sliders ahead of time?
While they are best enjoyed fresh and warm, you can assemble the sliders ahead of time and then cook them just before serving. Keep the marshmallow slightly soft during assembly if refrigerating for a short period.
What are some healthy substitutions for S’mores Sliders?
For a slightly lighter version, you could experiment with whole wheat grabeef ham crackers, dark chocolate with a higher cocoa percentage, and consider topping with fresh berries like raspberries or strawberries for added natural sweetness and a burst of flavor.
S’mores Sliders
A fun and easy twist on classic s’mores, served on slider buns for a portable and delicious treat. Features layers of chocolate, marshmallows, and a hint of savory goodness.
Ingredients
-
12 slider buns or dinner rolls
-
3 bars semi-sweet chocolate (100 gram bars or 1.5 cups chocolate chips)
-
20 large marshmallows or 1.5 cups mini marshmallows
-
6 graham crackers
-
3 tablespoons melted butter
-
2 graham crackers
Instructions
-
Step 1
Preheat oven to 350°F (175°C) and line a baking sheet with parchment paper. -
Step 2
Slice the slider buns in half horizontally. -
Step 3
In a small bowl, combine the melted butter with the crushed graham crackers (use 6 crackers for this step). Mix well. -
Step 4
Place the bottom halves of the slider buns on the prepared baking sheet. Spread the butter-graham cracker mixture evenly over the bottom buns. -
Step 5
Top the graham cracker layer with pieces of chocolate. Break the chocolate bars into manageable pieces or scatter chocolate chips. -
Step 6
Arrange the marshmallows on top of the chocolate. If using large marshmallows, cut them in half for even distribution. If using mini marshmallows, pile them on. -
Step 7
Place the top halves of the slider buns over the marshmallows. Lightly press down. -
Step 8
Bake for 8-12 minutes, or until the marshmallows are golden brown and gooey, and the buns are lightly toasted. -
Step 9
Remove from oven and let cool slightly before serving. Crush the remaining 2 graham crackers and sprinkle on top for extra texture if desired.
Important Information
Nutrition Facts (Per Serving)
It is important to consider this information as approximate and not to use it as definitive health advice.
Allergy Information
Please check ingredients for potential allergens and consult a health professional if in doubt.