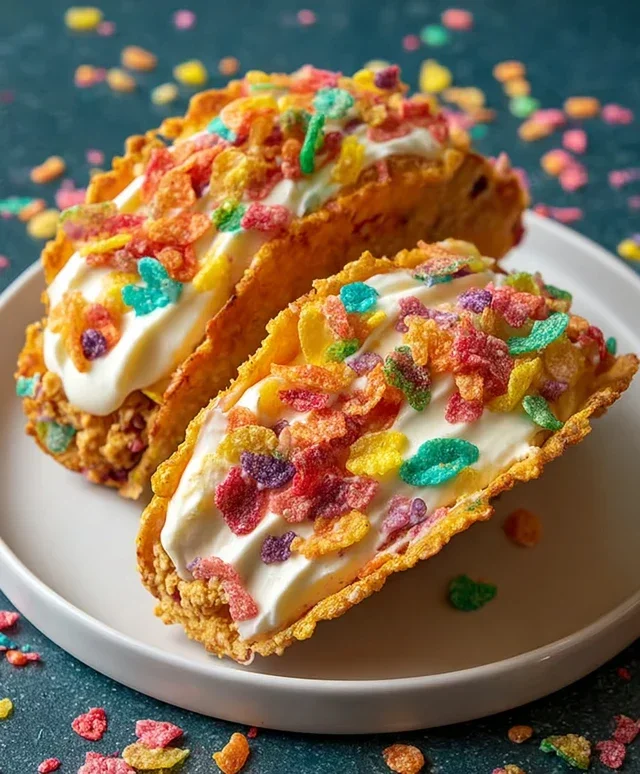
Fruity Pebbles Cheesecake Tacos-Fun Sweet Dessert Recipe
Fruity Pebbles Cheesecake Tacos are the vibrant, whimsical dessert you never knew you needed, but absolutely have to try! Imagin extracte the creamy, dreamy indulgence of classic cheesecake, but transformed into a fun, handheld treat. We’re talking about that irresistible tang of cream cheese balanced perfectly with a swirl of sweet, fruity goodness, all nestled within a crispy, crunchy taco shell. What makes these Fruity Pebbles Cheesecake Tacos so utterly captivating is the playful nod to childhood nostalgia. That explosion of color and flavor from the iconic cereal isn’t just for breakfast anymore; it’s the star of this dessert show, adding a delightful crunch and an extra layer of fruity magic. They’re surprisingly easy to make and are guaranteed to be a showstopper at any gathering, or just a delightful way to brighten up your own dessert cravings. Get ready for a taste sensation that’s as fun to look at as it is to devour!
Fruity Pebbles Cheesecake Tacos
Get ready for a dessert that’s as fun to make as it is to eat! These Fruity Pebbles Cheesecake Tacos are a vibrant explosion of flavor and texture. Imagin extracte a crunchy, sweet shell made from your favorite colorful cereal, filled with a creamy, dreamy cheesecake mixture, and topped with fluffy whipped cream and more of that delightful cereal. This recipe takes a classic dessert and gives it a playful, whimsical twist that’s perfect for parties, a special treat, or just when you’re craving something utterly delightful.
These tacos are surprisingly easy to assemble, and the payoff is huge in terms of visual appeal and taste. The combination of the sweet, slightly fruity crunch of the cereal shell with the smooth, tangy cheesecake filling is absolutely divine. It’s a dessert that brings out the kid in everyone. So, let’s dive in and create some edible works of art!
Ingredients:
Creating the Cereal Shells
The foundation of our Fruity Pebbles Cheesecake Tacos is the shell, and we’re going to make it from the star ingredient: the colorful fruity cereal. This is where the magic begin extracts, transforming breakfast cereal into a delightful dessert vessel.
1. First, let’s get our cereal ready. You’ll want to measure out 3 cups of your favorite colorful fruity cereal. For the best results, it’s helpful to lightly crush some of the cereal. You don’t want to turn it into dust, but breaking down about half of the cereal into smaller pieces will help it bind together more effectively. You can do this by placing the cereal in a large resealable bag and gently rolling over it with a rolling pin, or even just by using your hands. Set aside the remaining uncrushed cereal as we’ll use it later.
2. Next, we need to create the binding agent for our shells: melted butter. Measure out 1/2 cup of unsalted butter and melt it in a microwave-safe bowl or on the stovetop. Once melted and smooth, pour the melted butter into a large mixing bowl. Add the 3 cups of prepared fruity cereal to the bowl with the melted butter. Stir everything together thoroughly, ensuring that every piece of cereal is coated with the butter. This is crucial for the shells to hold their shape. The mixture will look slightly wet, and that’s exactly what we want.
3. Now, it’s time to form our taco shells. You’ll need something to shape them in. Taco shell molds are ideal, but you can also get creative with other kitchen tools. A great alternative is to use aluminum foil. You can shape small pieces of foil into a U-shape or even gently mold them over the outside of a small bowl to create a concave shape that resembles a taco shell. You can also use a muffin tin, pressing the cereal mixture into the cups to create mini-taco bowls. Lightly grease your chosen molds or shaping tools with a little cooking spray or butter to prevent sticking. Working quickly before the mixture cools too much, spoon portions of the cereal and butter mixture into your molds. Press the mixture firmly into the shape of the shells, making sure to get it into the crevices and create a sturdy base. The thickness of your shells is up to you – thinner shells will be crunchier, while thicker ones will be more substantial.
4. Once your shells are formed, they need to set and harden. Place the molds with the cereal shells into the refrigerator for at least 30 minutes, or until they are firm to the touch. This chilling process allows the butter to re-solidify, holding the cereal together. If you are using muffin tins, you might need to chill them a bit longer. For even faster setting and a slightly crisper shell, you can carefully place the filled molds into the freezer for about 15-20 minutes. Be sure to check them regularly so they don’t freeze solid.
Crafting the Creamy Cheesecake Filling
While our taco shells are chilling, let’s whip up the luscious cheesecake filling that will make these tacos truly irresistible. This filling is simple, smooth, and perfectly complements the crunchy cereal.
5. In a medium mixing bowl, combine the 8 oz of softened cream cheese. Make sure your cream cheese is truly softened – this means it should be at room temperature and yield slightly when pressed. This will ensure a smooth, lump-free filling. Add the 1/2 cup of sifted powdered sugar to the cream cheese. Sifting the powdered sugar is an important step; it removes any lumps and helps create a silky-smooth texture for our filling. Then, add the 1 tsp of pure vanilla extract for that classic cheesecake flavor. Using a hand mixer or a sturdy whisk, beat the cream cheese, powdered sugar, and vanilla extract together until the mixture is completely smooth, creamy, and well combined. There should be no lumps of cream cheese visible. Taste a tiny bit of the filling at this stage – it should be sweet and tangy, with a lovely vanilla aroma. If you prefer a sweeter filling, you can add a touch more powdered sugar, a tablespoon at a time, mixing well after each addition.
Assembling Your Fruity Pebbles Cheesecake Tacos
Now for the best part: bringin extractg all the delicious components together! This is where your dessert transforms into the vibrant, fun Fruity Pebbles Cheesecake Tacos you’ve been dreaming of.
1. Carefully remove the hardened cereal shells from their molds. If you used foil, gently peel it away. If you used a muffin tin, you might need to gently loosen the edges with a small spatula or knife before inverting them. Place the finished shells on a serving platter or individual plates.
2. Spoon or pipe the creamy cheesecake filling into each of the cereal taco shells. Fill them generously, creating a lovely mound of cheesecake in each one. You can use a spoon for a rustic look, or a piping bag fitted with a star tip for a more elegant presentation.
3. Now, it’s time for the fluffy topping. Spoon or pipe the 1 cup of whipped cream on top of the cheesecake filling in each taco. A dollop of whipped cream adds a light, airy contrast to the richness of the cheesecake.
4. Finally, the grand finnon-alcoholic ale: garnish! Sprinkle the additional fruity cereal over the whipped cream. This adds another layer of color, texture, and that signature fruity flavor. You can also add a few whole pieces of cereal for visual appeal.
These Fruity Pebbles Cheesecake Tacos are best served immediately to enjoy the full crunch of the shells. They are a delightful treat that’s sure to bring smiles all around. Enjoy every colorful, creamy, and crunchy bite!

Conclusion:
There you have it – a delightful adventure in a tiny shell! Our Fruity Pebbles Cheesecake Tacos are more than just a dessert; they’re a vibrant explosion of flavor and fun that’s guaranteed to bring smiles to any occasion. The creamy, tangy cheesecake filling perfectly complements the sweet crunch of the Fruity Pebbles, all nestled within a crisp taco shell. These little delights are surprisingly easy to whip up, making them ideal for last-minute parties or just a sweet treat to brighten your day. I truly encourage you to give these a try; they’re a fantastic way to add a playful twist to your dessert repertoire.
For serving, consider arrangin extractg them on a colorful platter. They’re wonderful as individual desserts or as part of a larger dessert bar. For variations, don’t hesitate to experiment! You could add a swirl of berry compote to the cheesecake filling, or even sprinkle in some mini chocolate chips. If you’re feeling adventurous, try using different cereal toppings for an entirely new flavor profile. The possibilities are endless, and the joy of creating these Fruity Pebbles Cheesecake Tacos is just as rewarding as enjoying them.
Frequently Asked Questions:
Can I make the taco shells ahead of time?
Absolutely! You can bake your taco shells a day or two in advance and store them in an airtight container at room temperature. Just be sure they are completely cooled before storing to maintain their crispness.
What other toppings would work well?
Besides Fruity Pebbles, consider crushed grabeef ham crackers for a classic cheesecake vibe, colorful sprinkles for extra festivity, or even a drizzle of white chocolate ganache for an added layer of decadence.
Is this recipe suitable for children to help make?
Yes, this is a fantastic recipe for involving kids! They can help measure ingredients, stir the filling, and most importantly, sprinkle the toppings. It’s a fun and delicious way to spend time together in the kitchen.
Fruity Pebbles Cheesecake Tacos
A fun and colorful dessert taco featuring a creamy Fruity Pebbles cheesecake filling served in a crispy cereal shell, perfect for a playful treat.
Ingredients
-
3 cups colorful fruity cereal
-
1/2 cup unsalted butter, melted
-
8 oz cream cheese, softened
-
1/2 cup powdered sugar, sifted
-
1 tsp pure vanilla extract
-
1 cup whipped cream
-
Additional fruity cereal for garnish
Instructions
-
Step 1
Prepare the taco shells: In a bowl, combine 2 cups of the colorful fruity cereal with the melted unsalted butter. Stir until well combined. Press the mixture firmly into greased mini muffin tins to form taco shell shapes. Allow to set in the refrigerator for at least 30 minutes. -
Step 2
Make the cheesecake filling: In a separate bowl, beat the softened cream cheese and sifted powdered sugar until smooth and creamy. -
Step 3
Incorporate vanilla and cereal: Stir in the pure vanilla extract and 1 cup of the remaining colorful fruity cereal into the cream cheese mixture. -
Step 4
Fold in whipped cream: Gently fold in the whipped cream until just combined, being careful not to overmix. -
Step 5
Assemble the tacos: Carefully remove the set cereal taco shells from the muffin tins. Spoon the Fruity Pebbles cheesecake filling into each shell. -
Step 6
Garnish and serve: Sprinkle additional colorful fruity cereal over the top of each taco for garnish. Serve immediately or chill for later.
Important Information
Nutrition Facts (Per Serving)
It is important to consider this information as approximate and not to use it as definitive health advice.
Allergy Information
Please check ingredients for potential allergens and consult a health professional if in doubt.