Easy Easter Basket Bundt Cake – Spring Dessert
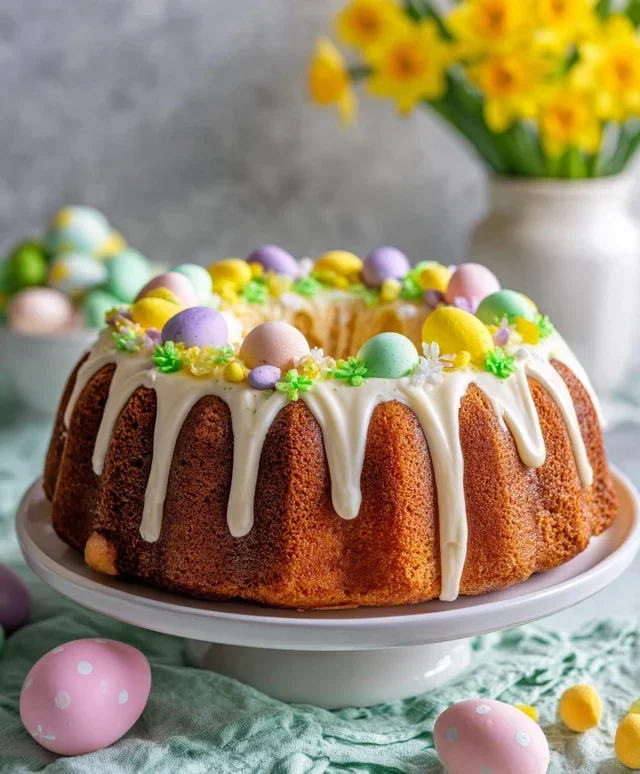
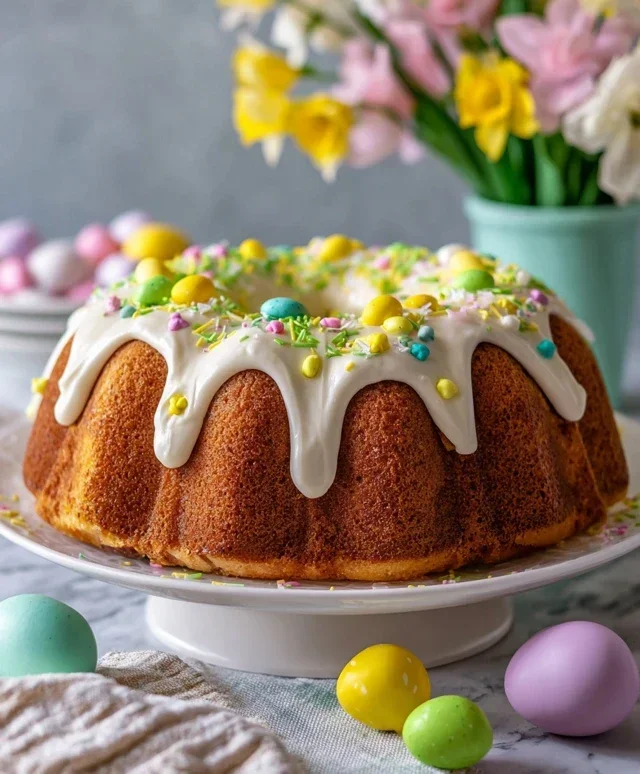
Easter Basket Bundt Cake Recipe (Easy Spring Dessert!) is your ticket to a show-stopping yet surprisingly simple spring celebration. Imagin extracte this: a beautifully sculpted bundt cake, glistening with a delicate glaze and adorned with edible spring blooms and candy eggs, looking for all the world like a miniature Easter basket ready to burst with sweet surprises. This isn’t just any cake; it’s a delightful centerpiece that captures the joy and vibrant spirit of the season. People absolutely adore this Easter Basket Bundt Cake Recipe because it feels both festive and approachable. It’s the perfect way to impress your guests without spending hours in the kitchen. What truly makes this Easter Basket Bundt Cake Recipe special is its versatility – you can customize the colors, decorations, and even the cake flavor to perfectly match your Easter traditions. Get ready to bake a little magic!
Easter Basket Bundt Cake Recipe (Easy Spring Dessert!)
This Easter Basket Bundt Cake is the perfect way to bring a touch of spring and festive fun to your Easter celebration! It’s surprisingly easy to make, and the results are absolutely adorable. Imagin extracte a beautiful bundt cake shaped like an Easter basket, complete with a sweet candy “handle” and colorful candy “eggs.” It’s a showstopper that tastes just as good as it looks. This recipe is designed to be straightforward, so even begin extractner bakers can achieve fantastic results. Let’s get started on creating this delightful Easter treat!
Ingredients:
Preparing Your Bundt Pan
The most crucial step for a successful bundt cake is proper pan preparation. A sticky bundt cake is a baker’s nightmare! To ensure your Easter Basket Bundt Cake releases perfectly, I highly recommend greasing and flouring your bundt pan thoroughly. Use a pastry brush to evenly coat every nook and cranny of the pan with softened butter or vegetable shortening. Then, sprinkle in a tablespoon or two of all-purpose flour and tilt and tap the pan to coat the greased surfaces. Tap out any excess flour. This double-layer of protection will prevent any sticking and give you a beautifully shaped cake.
Mixing the Cake Batter
1. In a medium bowl, whisk together the all-purpose flour, baking powder, and salt. This dry ingredient mixture will form the base of our cake batter. Whisking them together evenly distributes the leavening agent and salt, ensuring a consistent rise and flavor throughout the cake. Set this bowl aside for now.
2. In a large mixing bowl, cream together the softened unsalted butter and granulated sugar. Use an electric mixer (either a stand mixer with a paddle attachment or a hand mixer) on medium speed. Creaming means beating the butter and sugar until the mixture is light, fluffy, and pnon-alcoholic ale yellow. This process incorporates air into the batter, which contributes to the cake’s tender texture. Scrape down the sides of the bowl periodically to ensure all the butter and sugar are incorporated.
3. Add the large eggs, one at a time, beating well after each addition. It’s important to add them one by one and let each egg fully incorporate before adding the next. This helps to create a stable emulsion for the batter. Once the eggs are mixed in, stir in the vanilla extract. The vanilla adds a wonderful aroma and flavor that complements the sweetness of the cake.
4. Now, we’ll alternate adding the dry ingredients and the milk to the wet ingredients. Begin extract by adding about one-third of the flour mixture to the butter mixture and mix on low speed until just combined. Then, add half of the milk and mix again until just incorporated. Repeat this process, adding another third of the flour mixture, then the remaining milk, and finally the last of the flour mixture. Be careful not to overmix the batter once the flour is added. Overmixing can develop the gluten in the flour too much, resulting in a tougher cake. Mix only until no dry streaks of flour remain.
Baking Your Easter Basket Cake
Preheat your oven to 350°F (175°C). Pour the prepared batter evenly into your greased and floured bundt pan. Gently tap the pan on the counter a couple of times to release any large air bubbles.
Place the bundt pan in the preheated oven and bake for 30-40 minutes. The baking time can vary depending on your oven, so start checking for doneness around the 30-minute mark. You’ll know the cake is ready when a wooden skewer or toothpick inserted into the thickest part of the cake comes out clean. If there’s wet batter on the skewer, continue baking and check again every 5 minutes.
Once baked, remove the bundt pan from the oven and let it cool in the pan on a wire rack for about 15-20 minutes. This cooling period is crucial. It allows the cake to firm up slightly, making it easier to invert without breaking. After this initial cooling, carefully invert the bundt pan onto the wire rack. If you prepared your pan correctly, the cake should release easily. If it seems a little stuck, gently tap the bottom of the pan and sides. Let the cake cool completely on the wire rack before decorating. This can take a couple of hours.
Decorating Your Easter Basket Bundt Cake
This is where the magic happens and your cake truly becomes an Easter basket!
1. Melt the green candy melts according to the package instructions. This usually involves microwaving them in short bursts, stirring between each burst, until smooth and pourable.
2. Once the cake is completely cool, carefully place it on your serving platter. Using a spoon or a small spatula, drizzle the melted green candy melts over the top of the bundt cake. Let the candy drips cascade down the sides, mimicking the texture of a woven basket. You can create a more organic, uneven look for a more realistic basket appearance.
3. Now it’s time for the “handle”! Arrange some of the green candy melts in a curved shape over the top of the bundt cake to create the handle of your basket. You might want to use a small dab of melted white chocolate or a bit of leftover frosting as “glue” to secure the handle if it doesn’t adhere well on its own.
4. The final touch is the “eggs”! Arrange the assorted pastel candy eggs inside the bundt cake cavity and around the base to fill your Easter basket with colorful treasures. Get creative with the placement, making it look like a bountiful collection of Easter eggs.
5. Allow the candy melts to set completely before slicing and serving. This usually takes about 30 minutes to an hour at room temperature, or you can speed up the process by placing the cake in the refrigerator for about 15-20 minutes.
Enjoy this festive and delicious Easter Basket Bundt Cake! It’s sure to be a hit with family and friends of all ages.
Conclusion:
And there you have it – your beautiful and delicious Easter Basket Bundt Cake! This recipe truly is a winner for a reason. It’s incredibly easy to whip up, making it the perfect stress-free dessert for your Easter celebrations. The moist, tender cake combined with the vibrant, festive decoration creates a showstopper that everyone will love. Plus, the beautiful bundt shape inherently looks like an Easter basket, bringin extractg that extra touch of holiday magic to your table. I highly encourage you to give this Easter Basket Bundt Cake recipe a try; it’s guaranteed to be a hit with family and friends alike!
For serving, this cake is wonderful on its own, allowing its pretty decoration to shine. However, you could also serve it with a dollop of whipped cream, a drizzle of vanilla ice cream, or even some fresh berries for an extra burst of flavor and color. If you’re feeling adventurous, consider variations! You could add a touch of lemon zest to the batter for a brighter flavor, or even swirl in some pastel-colored frosting for a marbled effect before baking. The possibilities are endless, and the joy of creating this delightful dessert is immense.
Frequently Asked Questions:
Can I make this cake ahead of time?
Absolutely! This Easter Basket Bundt Cake can be baked up to two days in advance. Store it, unfrosted, in an airtight container at room temperature. Frost it closer to serving time for the freshest appearance and taste.
How do I ensure my cake doesn’t stick to the bundt pan?
The key is thorough greasing and flouring of your bundt pan. Use a pastry brush to coat every nook and cranny with softened butter or shortening, then liberally dust with flour, tapping out any excess. This step is crucial for a clean release!
What kind of frosting is best for the “basket weave” effect?
A simple buttercream frosting works beautifully. You’ll want it to be a good piping consistency – not too stiff and not too runny. This allows you to easily create the illusion of woven strips of a basket. Enjoy decorating!
Easter Basket Bundt Cake Recipe (Easy Spring Dessert!)
A delightful and easy-to-make Bundt cake perfect for Easter celebrations, featuring a festive spring theme.
Ingredients
-
1 box yellow cake mix
-
3 large eggs
-
1 cup sour cream
-
1/2 cup vegetable oil
-
1/4 cup milk
-
1 teaspoon vanilla extract
-
2 cups powdered sugar
-
2-3 tablespoons milk
-
Green food coloring
-
Jelly beans
Instructions
-
Step 1
Preheat oven to 350°F (175°C). Grease and flour a Bundt pan. -
Step 2
In a large bowl, combine yellow cake mix, eggs, sour cream, vegetable oil, 1/4 cup milk, and vanilla extract. Beat on medium speed for 2 minutes until smooth. -
Step 3
Pour batter into the prepared Bundt pan and bake for 30-35 minutes, or until a wooden skewer inserted into the center comes out clean. -
Step 4
Let the cake cool in the pan for 10 minutes before inverting it onto a wire rack to cool completely. -
Step 5
While the cake cools, prepare the glaze: In a small bowl, whisk together powdered sugar and 2-3 tablespoons milk until smooth. Add a few drops of green food coloring until desired grass color is reached. -
Step 6
Once the cake is completely cool, drizzle the green glaze over the top, letting it drip down the sides. Decorate with jelly beans to resemble Easter basket grass and candy.
Important Information
Nutrition Facts (Per Serving)
It is important to consider this information as approximate and not to use it as definitive health advice.
Allergy Information
Please check ingredients for potential allergens and consult a health professional if in doubt.