Homemade Oreo Cookies – Easy Copycat Recipe
Homemade Oreo Cookies aren’t just a treat; they’re a nostalgic journey back to childhood, a delicious adventure waiting to happen in your own kitchen. For so many of us, the iconic black and white sandwich cookie holds a special place in our hearts, evoking memories of dunking them in milk and savoring that perfect balance of rich, dark chocolate cookie and sweet, creamy filling. But what if I told you that achieving that same, irresistible flavor and texture at home is not only possible, but incredibly rewarding? Forget the store-bought version; these homemade Oreo cookies are a revelation. They possess a depth of chocolate flavor that’s truly unparalleled, and the creamy filling is so divine, you’ll be tempted to eat it with a spoon! This recipe unlocks the secrets to creating these beloved homemade Oreo cookies, allowing you to experience the magic firsthand. Get ready to impress yourself and everyone lucky enough to share in these delightful creations.

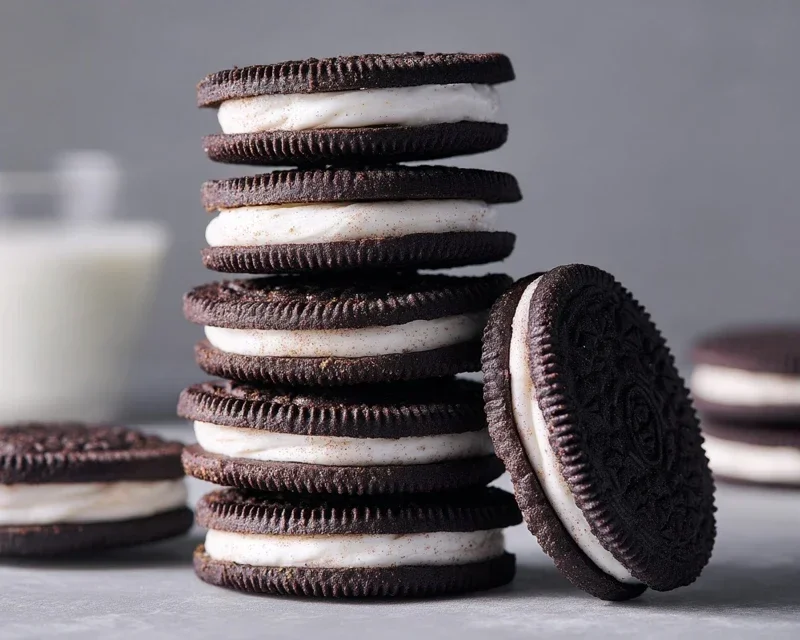
Homemade Oreo Cookies
There’s something undeniably magical about a classic Oreo cookie. That crisp, dark chocolate cookie encasing a sweet, creamy filling is a nostalgic treat for so many of us. While store-bought Oreos are convenient, there’s a special satisfaction that comes from making them yourself. Imagin extracte the aroma filling your kitchen as you bake these deeply chocolatey discs, ready to be paired with that irresistible white creme. This recipe aims to capture the essence of the beloved cookie, giving you a delightful homemade version that’s surprisingly achievable.
These aren’t just any chocolate cookies; we’re going for that signature intensely dark color and a satisfyingly crisp texture. The secret to achieving that deep, dark hue lies in using Dutch-process cocoa powder or, for the truly adventurous, black cocoa powder. This ingredient is key to replicating that iconic Oreo look and imparting a rich, complex chocolate flavor that’s not overly sweet.
Ingredients:
Making the Dark Chocolate Cookies
This is where the magic begin extracts! We’ll start by preparing our dry ingredients and then move on to creaming the butter and sugar to create a light and airy base for our cookies. It’s important to have your butter at a cool room temperature – this means it should be softened enough to press a finger into but still hold its shape. Too warm, and your cookies will spread too much; too cold, and they won’t cream properly.
1. In a medium bowl, whisk together the all-purpose flour, Dutch-process cocoa powder (or black cocoa powder for an even deeper color and flavor), baking soda, baking powder, and 1/4 teaspoon of fine sea salt. Whisking ensures that all the leavening agents and salt are evenly distributed throughout the dry ingredients, which is crucial for consistent cookie texture and rise. Set this bowl aside.
2. In a large bowl, using an electric mixer (or a stand mixer fitted with the paddle attachment), cream together the 1 cup of granulated sugar and the 10 tablespoons of unsalted butter. Beat on medium-high speed until the mixture is light and fluffy, about 3-5 minutes. Scrape down the sides of the bowl periodically to ensure everything is incorporated. This step is vital for creating a tender cookie. The sugar crystals will cut into the butter, creating tiny air pockets that contribute to the cookie’s structure and crispness.
3. Add the large egg and 1 teaspoon of vanilla extract to the creamed butter and sugar mixture. Beat on medium speed until just combined. Don’t overmix at this stage; we just want to emulsify the egg into the mixture. Overmixing can lead to tougher cookies.
4. Gradually add the dry ingredients to the wet ingredients, mixing on low speed until just combined and no streaks of flour remain. Be careful not to overmix the dough once the flour is added. Overmixing can develop the gluten in the flour too much, resulting in a tougher cookie. The dough will be quite stiff and might seem a bit crum extractbly at first, but it will come together as you mix.
5. Turn the dough out onto a lightly floured surface and gently bring it together into a cohesive disc. Wrap the dough tightly in plastic wrap and refrigerate for at least 1 hour, or up to 2 days. Chilling the dough is a critical step. It allows the gluten to relax, firms up the butter, and makes the dough easier to handle. This chilling period is essential for achieving those perfectly shaped, crisp cookies without excessive spreading.
6. Once chilled, preheat your oven to 350°F (175°C). Line baking sheets with parchment paper. Take about 1 tablespoon of chilled dough at a time and roll it into a small ball. Place the balls about 2 inches apart on the prepared baking sheets. Using the bottom of a glass or a small, flat-bottomed object, gently flatten each ball into a disc about 1/4 inch thick. For that classic Oreo look, you can gently press a fork or a specially designed cookie stamp onto the top of each disc to create a subtle pattern. This will help them bake evenly and give them that signature appearance.
7. Bake for 10-12 minutes, or until the edges are set and the centers look slightly underbaked. The cookies will continue to firm up as they cool. Let the cookies cool on the baking sheets for 5 minutes before transferring them to a wire rack to cool completely. It’s important to let them cool on the baking sheet for a few minutes to prevent them from breaking, as they will be quite delicate when hot.
Crafting the Creamy Filling
Now for the pièce de résistance – the sweet, creamy filling that makes an Oreo an Oreo! This is a simple yet satisfying frosting that perfectly complements the dark chocolate cookies.
1. While the cookies are cooling, prepare the creme filling. In a medium bowl, using an electric mixer, beat the 1 stick of unsalted butter with the 2 ½ teaspoons of pure vanilla extract until smooth and creamy. Ensure your butter is at a soft but not melted, room temperature for the best results.
2. Gradually add the sifted powdered sugar and the 1/8 teaspoon of fine sea salt to the butter mixture, beating on low speed until mostly incorporated. Sifting the powdered sugar is key to a smooth, lump-free filling.
3. Once the dry ingredients are mostly incorporated, increase the speed to medium-high and beat for an additional 2-3 minutes until the filling is light, fluffy, and smooth. If the filling seems too thick, you can add a teaspoon of milk or cream at a time until it reaches your desired consistency.
Assembling Your Homemade Oreos
The final step is bringin extractg everything together! This is where your beautiful cookies transform into classic Oreo sandwiches.
1. Once the chocolate cookies are completely cool, it’s time to assemble. Spoon or pipe about 1-2 teaspoons of the creme filling onto the flat side of one cookie.
2. Top with another cookie, pressing gently to spread the filling to the edges. Try to keep the filling centered so it doesn’t ooze out too much from the sides.
3. Repeat with the remaining cookies and filling. Your homemade Oreo cookies are now ready to be enjoyed! Store them in an airtight container at room temperature for up to 3-4 days. You’ll be amazed at how close they are to the real deal, with that wonderful homemade touch. Enjoy every delicious bite!
Conclusion:
There you have it – your guide to creating delicious homemade Oreo cookies! This recipe is a true winner because it allows you to experience that classic chocolatey, creme-filled goodness with the satisfaction of knowing you made them yourself. The deep, rich chocolate flavor of the cookies, perfectly balanced by the sweet, creamy filling, is simply irresistible. They are fantastic served alongside a tall glass of cold milk, making them a perfect afternoon treat or a delightful dessert after any meal. Feel free to get creative with variations! You can add a pinch of espresso powder to the cookie dough for a mocha twist, or experiment with different extract flavors like peppermint or almond in the creme. Don’t be intimidated; this recipe is approachable for bakers of all levels, and the results are incredibly rewarding. I highly encourage you to give these homemade Oreo cookies a try – you won’t regret the effort!
Frequently Asked Questions:
Why are my homemade Oreos not as dark as store-bought ones?
The intense dark color of commercial Oreos often comes from a significant amount of black cocoa powder. If you want a darker cookie, you can try incorporating a tablespoon or two of black cocoa powder into the recipe, alongside or in place of some of the regular cocoa powder. Just be mindful that black cocoa has a slightly different flavor profile.
Can I make the creme filling ahead of time?
Absolutely! The creme filling can be made up to 3-4 days in advance and stored in an airtight container in the refrigerator. It might firm up a bit, so you may need to let it sit at room temperature for about 15-20 minutes before assembling your cookies, or give it a quick stir.
How should I store my homemade Oreo cookies?
Store your finished homemade Oreo cookies in an airtight container at room temperature for up to a week. For longer storage, you can freeze them, either individually wrapped or layered between parchment paper in a freezer-safe container, for up to 2-3 months.
Homemade Oreo Cookies
Classic homemade chocolate sandwich cookies with a creamy filling, inspired by the beloved Oreo.
Ingredients
-
1 1/4 cups (159 grams) all-purpose flour
-
1/2 cup (43 grams) Dutch-process cocoa powder
-
1 teaspoon baking soda
-
1/4 teaspoon baking powder
-
1/4 teaspoon fine sea salt
-
1 cup (200 grams) granulated sugar
-
10 tablespoons (142 grams) unsalted butter, at a cool room temperature, cut into chunks
-
1 large egg, at room temperature
-
1 stick (113 grams) unsalted butter, at a cool room temperature
-
2 1/2 teaspoons pure vanilla extract
-
2 1/2 cups (313 grams) powdered sugar, sifted
-
1/8 teaspoon fine sea salt
Instructions
-
Step 1
Whisk together the flour, cocoa powder, baking soda, baking powder, and 1/4 teaspoon salt in a medium bowl. Set aside. -
Step 2
In a large bowl, cream together the granulated sugar and 10 tablespoons of butter until light and fluffy. Beat in the egg and vanilla extract. -
Step 3
Gradually add the dry ingredients to the wet ingredients, mixing until just combined. The dough will be stiff. -
Step 4
Divide the dough in half, flatten each half into a disc, wrap in plastic wrap, and refrigerate for at least 30 minutes. -
Step 5
Preheat oven to 350°F (175°C). Line baking sheets with parchment paper. Roll out one disc of dough on a lightly floured surface to about 1/8-inch thickness. Cut out rounds using a 1.5-inch cookie cutter. -
Step 6
Place cookies on prepared baking sheets and bake for 10-12 minutes, or until firm. Let cool on the baking sheets for a few minutes before transferring to a wire rack to cool completely. -
Step 7
For the filling, cream together the 1 stick of butter and powdered sugar with the 1/8 teaspoon salt until smooth and creamy. Stir in the remaining vanilla extract. -
Step 8
Spread or pipe the filling onto the flat side of one cookie, then top with another cookie.
Important Information
Nutrition Facts (Per Serving)
It is important to consider this information as approximate and not to use it as definitive health advice.
Allergy Information
Please check ingredients for potential allergens and consult a health professional if in doubt.