Easy Japanese Tuna Onigiri Quick Recipe
15-min. Easy Japanese Tuna Onigiri are a revelation for busy weeknights and spontaneous snack attacks! Have you ever craved something satisfying, quick, and bursting with umami, but didn’t have the time for a complex meal? This is your answer. These delightful rice balls, a cornerstone of Japanese bento boxes and convenience store delights, have captured hearts worldwide for their incredible versatility and comforting nature. What makes Japanese Tuna Onigiri so special? It’s the perfect marriage of fluffy, perfectly seasoned rice, a savory, often mayonnaise-kissed tuna filling, and the satisfying texture of the nori wrapper. They’re incredibly adaptable – a blank canvas for your favorite flavors, making each bite a personal adventure. We’ll dive into how you can whip up these delightful 15-min. Easy Japanese Tuna Onigiri in a flash, proving that delicious, authentic Japanese cuisine can be surprisingly accessible, even when time is of the essence.
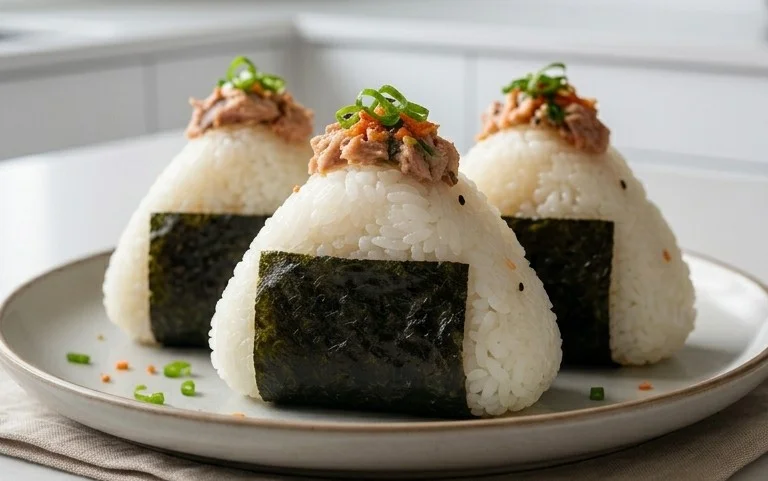
15-Min. Easy Japanese Tuna Onigiri
Looking for a quick, satisfying, and incredibly delicious snack or light meal? Look no further than Japanese Tuna Onigiri! These rice balls are a staple in Japan for a reason. They’re portable, customizable, and bursting with savory flavor. And the best part? You can whip them up in just about 15 minutes, making them perfect for busy weeknights, packed lunches, or even a speedy breakfast.
My version focuses on the classic and beloved combination of tuna and mayonnaise, with a hint of sesame for an extra layer of nutty flavor. This recipe is designed for maximum ease and minimal fuss. Let’s get started on making these delightful little rice parcels!
Ingredients:
Notes on Rice:
The key to great onigiri is perfectly cooked short-grain rice. If you’re starting from scratch, aim for about 1 cup of uncooked short-grain rice, rinsed thoroughly until the water runs clear. Cook it according to your rice cooker’s instructions or on the stovetop. You want the rice to be slightly sticky and tender. If your rice is a little dry, you can add a tablespoon of water to it before shaping. If you’re using leftover rice, ensure it’s not too hard or dry. Warming it up slightly can help.
Preparing the Tuna Filling:
The heart of our onigiri is the flavorful tuna filling. For this recipe, I highly recommend using canned tuna packed in oil. The oil helps to keep the tuna moist and adds a richer flavor profile. However, if you only have tuna in water, that’s perfectly fine too! Just be sure to drain it very well to avoid making your rice soggy.
1. Drain and Flake the Tuna: Open your can of tuna and carefully drain out all the liquid. It’s important to get as much liquid out as possible. Then, transfer the drained tuna to a small bowl. Use a fork to gently flake the tuna into smaller pieces. You don’t want large chunks, but rather a nice, consistent texture.
2. Mix with Mayonnaise: Add the Japanese mayonnaise to the flaked tuna. If you don’t have Japanese mayo, regular mayonnaise will work, though Japanese mayo tends to be a bit tangier and richer, which complements the tuna beautifully. Stir the mayonnaise and tuna together until everything is well combined and the tuna has a creamy consistency. You can adjust the amount of mayonnaise to your preference; some people like it saucier, others prefer a lighter coating.
3. Add Optional Seasoning (Optional but Recommended): While the tuna and mayo mixture is already delicious, you can elevate it further with a tiny pinch of salt if your tuna is unsalted. A very small amount of black pepper can also be added if you like a little spice. Taste and adjust if necessary, remembering that the rice will also be lightly seasoned.
Shaping the Onigiri:
This is where the magic happens! Shaping onigiri is a tactile and rewarding process. The warmth of the rice makes it pliable and easy to work with. Don’t worry if your first few aren’t perfectly shaped – they’ll still taste amazing!
1. Prepare Your Hands and Rice: Before you start shaping, it’s crucial to prepare your hands. Wet your hands thoroughly with water. This prevents the rice from sticking to your palms. You can keep a small bowl of water nearby to re-wet your hands as needed. If you have some salt, you can lightly sprinkle a pinch onto your wet palms at this stage; this not only helps prevent sticking but also seasons the exterior of the onigiri.
2. Form the Rice Base: Take a generous portion of cooked short-grain rice (about ½ cup per onigiri) and place it into the palm of your wet, salted hand. Gently press down to form a flat disc. Make a small indentation in the center of the rice disc. This indentation is where you will place your delicious tuna filling.
3. Add the Tuna Filling: Spoon about 1 to 1.5 tablespoons of the prepared tuna and mayonnaise mixture into the indentation you made in the rice. Be careful not to overfill, as it can make shaping difficult.
4. Enclose the Filling and Shape: Now, carefully bring the edges of the rice disc up and around the tuna filling. Gently pinch the rice together to enclose the filling completely. Begin extract to cup your hands and rotate the rice ball, applying gentle pressure. You can shape your onigiri into the classic triangle, a simple ball, or even a flattened disc. The key is to be firm but not so forceful that you crush the rice grains. Continue rotating and shaping until you have a compact, nicely formed onigiri. Repeat this process with the remaining rice and tuna filling.
Finishing Touches and Serving:
Once your onigiri are shaped, it’s time for the final, delightful touches that make them truly special.
1. Wrap with Nori: Take your sheets of nori. If you’re using full sheets, you can cut them into strips about 1 to 1.5 inches wide and 4 to 6 inches long. For a more classic look and to make them easier to handle, you can wrap a strip of nori around the base of each onigiri, allowing it to adhere naturally to the moist rice. Some people prefer to wrap the entire onigiri in a larger piece of nori. You can also just use a smaller piece to act as a handle. The nori adds a lovely salty, umami flavor and a satisfying textural contrast.
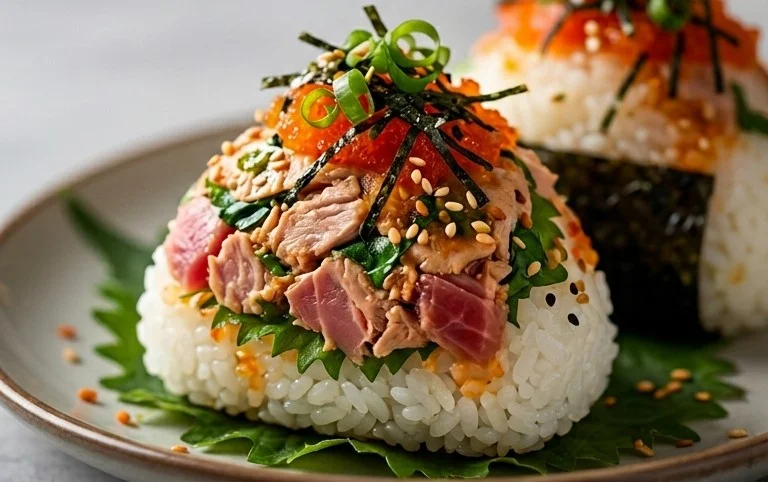
2. Garnish with Sesame Seeds (Optional): If you’re using sesame seeds, this is the time to add them. You can sprinkle them over the nori or press them lightly onto the surface of the onigiri before wrapping with nori, especially if you’re not using nori. The toasted sesame seeds add a beautiful visual appeal and a subtle nutty aroma and flavor.
Your 15-Minute Easy Japanese Tuna Onigiri are now ready to be enjoyed! They are best served fresh, but they will keep well in an airtight container in the refrigerator for a day. Let them come to room temperature slightly before eating for the best texture and flavor. Enjoy these delightful and easy-to-make rice balls as a snack, a light lunch, or a portable treat. They’re sure to become a favorite!
Conclusion:
And there you have it – delicious and authentic Japanese Tuna Onigiri, ready in just 15 minutes! I hope you’ve enjoyed this incredibly simple yet satisfying recipe. These onigiri are a fantastic option for a quick lunch, a healthy snack, or even a light dinner when you’re short on time. The combination of fluffy rice, savory tuna, and a hint of seasoning creates a truly delightful bite that’s both comforting and energizing. They are a perfect example of how minimal ingredients and effort can result in something truly special. I really encourage you to give this easy Japanese tuna onigiri a try; you won’t be disappointed!
For serving, onigiri are wonderful on their own, perhaps with a side of miso soup or a light green salad. They also make a great addition to a bento box. Don’t be afraid to get creative with variations! You could swap the tuna for salmon, add some chopped pickled gin extractger for a zing, or mix in a bit of furikake for extra flavor and texture. Consider a sprinkle of toasted sesame seeds on the outside for a delightful crunch.
Frequently Asked Questions:
Can I make the rice ahead of time?
Absolutely! Cooked rice can be stored in the refrigerator for up to 2 days. When you’re ready to make your onigiri, simply reheat the rice until it’s warm and easy to shape. Be sure to cover it while reheating to prevent it from drying out.
What kind of tuna is best for onigiri?
Canned tuna, packed in either water or oil, works wonderfully. For this recipe, I usually opt for tuna packed in water and then drain it very well to avoid making the rice soggy. You can also use canned tuna in oil, but make sure to drain it thoroughly.
15-min. Easy Japanese Tuna Onigiri
Quick and simple Japanese rice balls filled with seasoned tuna and mayo, perfect for a light meal or snack.
Ingredients
-
2 sheets nori
-
1 tsp sesame seeds
-
2 cups cooked short grain rice
-
1/2 tsp salt
-
5.29 oz canned tuna (in oil recommended, or canned tuna in water)
-
2 tbsp Japanese mayo
Instructions
-
Step 1
In a bowl, drain the canned tuna and flake it with a fork. Mix in the Japanese mayo and salt until well combined. -
Step 2
Prepare your hands by lightly wetting them with water and then sprinkling a pinch of salt on your palms to prevent sticking. -
Step 3
Take about 1/2 cup of cooked rice and place it in your palm. Make a slight indentation in the center. -
Step 4
Spoon about 1-2 tablespoons of the tuna-mayo mixture into the indentation. Cover the filling with more rice, shaping it into a ball or triangle. -
Step 5
Wrap a strip of nori around the base of the onigiri. You can cut the nori sheets into smaller strips if needed. -
Step 6
Optional: Sprinkle sesame seeds over the onigiri for garnish.
Important Information
Nutrition Facts (Per Serving)
It is important to consider this information as approximate and not to use it as definitive health advice.
Allergy Information
Please check ingredients for potential allergens and consult a health professional if in doubt.