Easy Homemade Bread- Simple Recipe- Delicious Loaf
Homemade bread is more than just a recipe; it’s an experience, a comforting ritual that fills your home with an aroma that’s simply unparalleled. There’s a certain magic in transforming simple ingredients – flour, water, yeast, and salt – into a golden, crusty loaf that whispers tnon-alcoholic ales of tradition and warmth. Why do we crave homemade bread so much? It’s the tactile pleasure of kneading the dough, the patient wait as it rises, and the ultimate reward of that first, perfect slice, still warm from the oven. It’s the antithesis of mass-produced, plastic-wrapped substitutes. What makes our homemade bread truly special is the ability to tailor it to our exact preferences, from the subtle tang of sourdough to the hearty chew of a whole wheat. This isn’t just about sustenance; it’s about connection, about creating something beautiful and delicious with your own two hands.
The Simple Joy of Homemade Bread
There’s a unique magic that happens when you bake your own bread. The aroma that fills your kitchen, the satisfying weight of a freshly baked loaf in your hands, and that first glorious bite of warm, crusty goodness – it’s an experience that can’t be replicated. While it might seem daunting at first, making bread at home is surprisingly simple and incredibly rewarding. This recipe will guide you through creating a beautiful, versatile loaf that’s perfect for toast, sandwiches, or just tearing off a chunk with a smear of butter.
Ingredients:
Note on Yeast and Flour: For the best results, ensure your active dry yeast is fresh. You can test its viability by sprinkling it into the warm water with a pinch of sugar. If it starts to foam and bubble within 5-10 minutes, it’s good to go. Bread flour will give you a chewier crust and a more open crum extractb, but all-purpose flour works perfectly well for a softer loaf.
Step 1: Activating the Yeast and Building the Base
The first crucial step is to wake up our yeast and create the foundation for our dough. In a large mixing bowl – one that can comfortably hold all the ingredients and allow for expansion – pour in your 2 cups of warm water. The ideal temperature is between 105-115 degrees Fahrenheit (40-46 degrees Celsius). Too hot, and you’ll kill the yeast; too cold, and it won’t activate properly. You can test this by feeling the water on your wrist; it should feel comfortably warm, like a baby’s bathwater. To this warm water, add your 1 Tablespoon of active dry yeast. Now, sprinkle in your 1/4 cup of honey or sugar. If you’re using honey, it adds a lovely subtle sweetness and a beautiful golden hue to the finished loaf. If you’re opting for sugar, it also serves to feed the yeast and aids in browning. Give this mixture a gentle stir to help dissolve the honey or sugar, then let it sit undisturbed for about 5 to 10 minutes. You’ll know your yeast is alive and well when you see a foamy, bubbly layer form on the surface – this is a sign that the yeast is actively consuming the sugar and producing carbon dioxide.
Step 2: Incorporating the Flavor and Structure
Once your yeast mixture is active and frothy, it’s time to add the other essential flavor and structural elements. To the bubbly yeast mixture, add your 2 teaspoons of salt. Salt is vital not only for flavor but also for controlling the yeast’s activity and strengthening the gluten structure of the dough. Next, pour in your 2 Tablespoons of oil. Canola or vegetable oil are excellent choices as they are neutral in flavor and contribute to a softer crum extractb and crust. Give the entire mixture another gentle stir to combine everything. Now, we begin extract to add our flour. Start by adding about 4 cups of your all-purpose or bread flour to the wet ingredients.
Step 3: Bringin extractg the Dough Together
This is where the magic of dough transformation truly begin extracts! With your 4 cups of flour incorporated, begin extract mixing. You can do this with a sturdy spoon or a Danish dough whisk. Stir until the mixture starts to come together into a shaggy, somewhat sticky mass. Don’t worry if it’s not perfectly smooth at this stage. Now, it’s time to get your hands in there! Turn the dough out onto a lightly floured surface. Begin extract to knead. If the dough feels too sticky, add more flour, a tablespoon at a time, until it’s manageable. The goal is to add just enough flour so that the dough is no longer sticking excessively to your hands or the work surface, but not so much that it becomes dry and tough. Kneading is the process of developing the gluten in the flour. This is what gives bread its structure and chew. Push the dough away from you with the heels of your hands, then fold it back over on itself. Rotate the dough and repeat. Continue this process for about 8-10 minutes. You’ll know you’ve kneaded enough when the dough becomes smooth, elastic, and springs back slightly when you gently press it with your finger.
Step 4: The First Rise – Letting the Dough Breathe
Now that our dough has been kneaded and its gluten structure developed, it needs time to relax and grow. Lightly oil a clean bowl. Place your kneaded dough into the oiled bowl, turning it to coat all sides with a thin layer of oil. This prevents the dough from drying out as it rises. Cover the bowl tightly with plastic wrap or a damp kitchen towel. Find a warm, draft-free spot for your dough to rise. This could be a slightly warmed oven (turned off, of course!), a sunny windowsill, or simply a warm corner of your kitchen. Allow the dough to rise for about 1 to 1.5 hours, or until it has doubled in size. This is where the yeast, fed by the honey or sugar, gets to work, producing gases that make the dough puff up beautifully.
Step 5: Shaping and the Second Rise
Once your dough has doubled in size, gently punch it down to release the accumulated gases. Turn the dough out onto your lightly floured surface once more. At this stage, you can shape your loaf. For a simple round or oval loaf, gently shape the dough into your desired form. If you plan to bake in a loaf pan, grease your pan generously with oil or butter, then place the shaped dough inside. For a free-form loaf, you can place it directly onto a baking sheet lined with parchment paper. After shaping, cover the loaf loosely with plastic wrap or a damp towel and let it rise for a second time. This second rise is typically shorter, about 30-45 minutes, until the loaf is noticeably puffy and almost doubled again. This ensures a light and airy texture in your finished bread.
Step 6: Baking to Golden Perfection
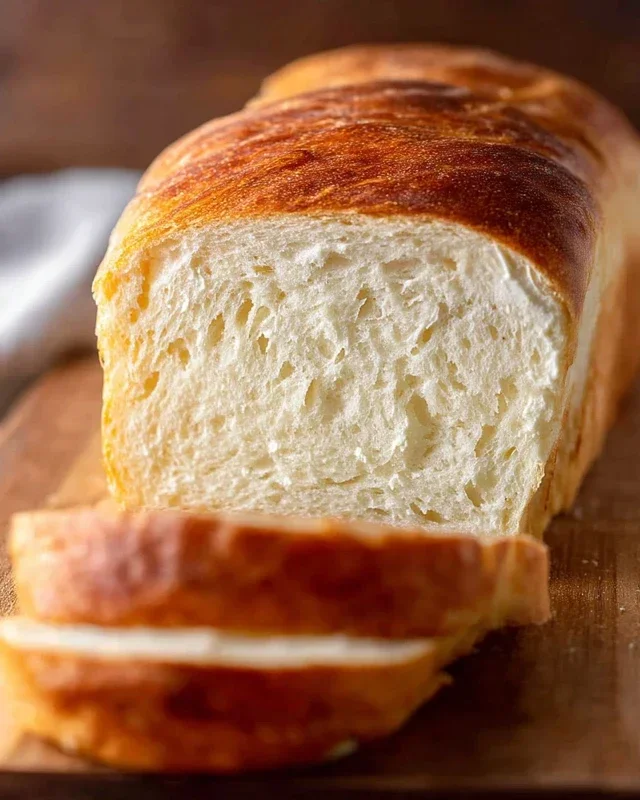
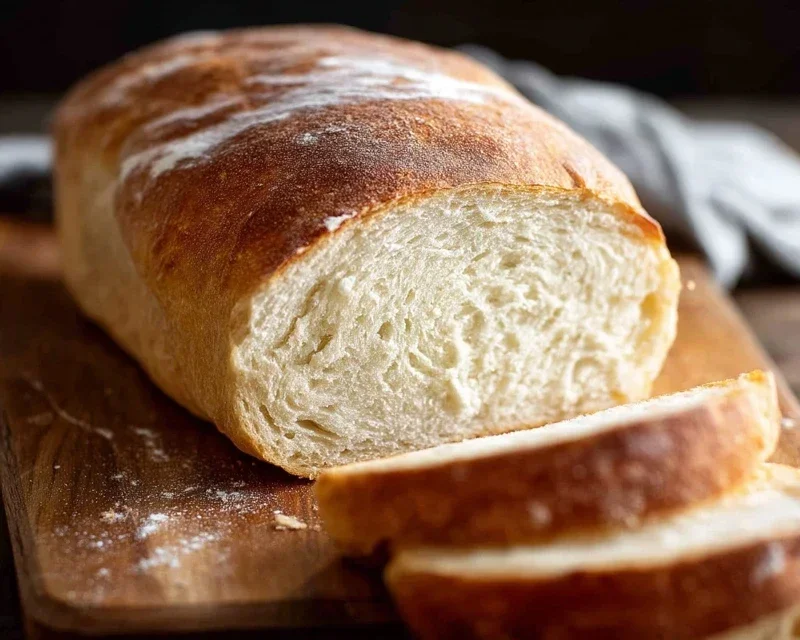
Preheat your oven to 375 degrees Fahrenheit (190 degrees Celsius) during the final moments of the second rise. For a beautiful crust, some bakers like to create steam in the oven. You can do this by placing a shallow pan of hot water on the bottom rack of your oven as it preheats. Once the oven is fully preheated and your loaf has had its second rise, carefully place the loaf (or loaf pan) into the oven. Bake for approximately 30-40 minutes, or until the crust is a deep golden brown and the bottom of the loaf sounds hollow when tapped. If the crust is browning too quickly, you can tent it loosely with aluminum foil. Once baked, carefully remove the bread from the oven and transfer it to a wire rack to cool completely. Resist the urge to slice into it immediately – letting it cool allows the internal structure to set properly, resulting in a better texture and flavor. Enjoy the fruits of your labor!
Conclusion:
As you can see, creating delicious, homemade bread from scratch is not only achievable but incredibly rewarding. This recipe is fantastic because it uses simple, readily available ingredients and provides clear, step-by-step instructions that are perfect for begin extractners and seasoned bakers alike. The aroma that fills your kitchen as this bread bakes is simply unparalleled, and the taste of a warm, crusty slice is a testament to the satisfaction of making it yourself. I truly encourage you to give this homemade bread recipe a try – you won’t be disappointed!
Enjoy your fresh bread in so many ways! It’s perfect for toasting and slathering with butter or jam, makes an incredible base for sandwiches, and is divine served alongside soups and stews. Don’t be afraid to experiment with variations too! You can easily add herbs like rosemary or thyme, garlic powder, or even a handful of seeds for extra texture and flavor. Feel free to adjust the flours used, perhaps incorporating a bit of whole wheat for a nuttier taste. The possibilities are truly endless once you’ve mastered the basic technique.
Frequently Asked Questions:
Why is my bread so dense?
A dense loaf often indicates issues with yeast activation or insufficient kneading. Ensure your yeast is fresh and proofed correctly. Proper kneading develops gluten, which traps air and creates a lighter texture. Over-proofing can also lead to collapse and density.
Can I make this bread ahead of time?
Yes, absolutely! Once baked and completely cooled, you can store your homemade bread in an airtight container or bread bag at room temperature for 2-3 days. For longer storage, it freezes beautifully. Slice it before freezing for easy thawing.
What kind of flour should I use?
All-purpose flour is a great starting point for this recipe, providing a good balance of protein for gluten development. Bread flour, with its higher protein content, will yield an even chewier loaf. Experimenting with different flours, like whole wheat or rye, will alter the texture and flavor profile.
Homemade Bread
A simple and delicious recipe for classic homemade bread.
Ingredients
-
{‘@type’: ‘Ingredient’, ‘name’: ‘warm water’, ‘description’: ‘105-115 degrees Fahrenheit’, ‘quantity’: ‘2’, ‘unitCode’: ‘cup’, ‘weight’: {‘value’: ‘474’, ‘unitCode’: ‘g’}}
-
{‘@type’: ‘Ingredient’, ‘name’: ‘active dry yeast’, ‘quantity’: ‘1’, ‘unitCode’: ‘Tablespoon’}
-
{‘@type’: ‘Ingredient’, ‘name’: ‘honey’, ‘description’: ‘or sugar’, ‘quantity’: ‘1/4’, ‘unitCode’: ‘cup’, ‘weight’: {‘value’: ’85’, ‘unitCode’: ‘g’}}
-
{‘@type’: ‘Ingredient’, ‘name’: ‘salt’, ‘quantity’: ‘2’, ‘unitCode’: ‘teaspoon’}
-
{‘@type’: ‘Ingredient’, ‘name’: ‘oil’, ‘description’: ‘canola or vegetable’, ‘quantity’: ‘2’, ‘unitCode’: ‘Tablespoon’, ‘volume’: {‘value’: ’30’, ‘unitCode’: ‘ml’}}
-
{‘@type’: ‘Ingredient’, ‘name’: ‘all-purpose flour’, ‘description’: ‘or bread flour’, ‘quantity’: ‘4-5.5’, ‘unitCode’: ‘cup’, ‘weight’: {‘value’: ‘500-688’, ‘unitCode’: ‘g’}}
Instructions
-
Step 1
In a large bowl, combine the warm water and yeast. Let stand for 5-10 minutes until foamy. -
Step 2
Stir in the honey (or sugar), salt, and oil. -
Step 3
Gradually add the flour, mixing until a soft dough forms. Knead on a floured surface for 8-10 minutes until smooth and elastic. -
Step 4
Place the dough in a greased bowl, turning to coat. Cover and let rise in a warm place for 1-1.5 hours, or until doubled in size. -
Step 5
Punch down the dough and shape it into a loaf. Place in a greased loaf pan. -
Step 6
Cover and let rise again for 30-45 minutes, or until nearly doubled. -
Step 7
Bake in a preheated oven at 375°F (190°C) for 30-35 minutes, or until golden brown and the internal temperature reaches 200°F (93°C).
Important Information
Nutrition Facts (Per Serving)
It is important to consider this information as approximate and not to use it as definitive health advice.
Allergy Information
Please check ingredients for potential allergens and consult a health professional if in doubt.