Korean Cream Cheese Garlic Buns-Irresistible Recipe
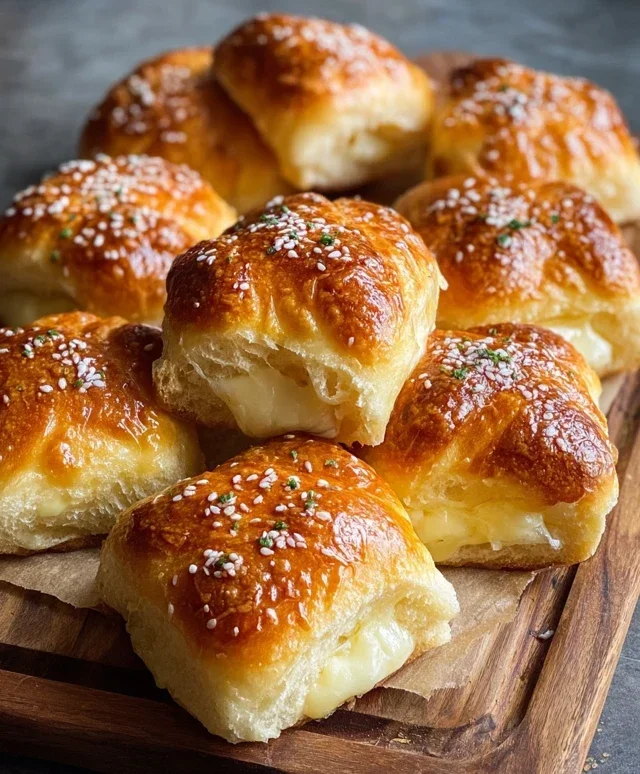
Korean Cream Cheese Garlic Buns are more than just a snack; they’re a revelation. If you’ve ever found yourself scrolling through endless food videos, chances are you’ve encountered the mesmerizing sight of these golden, glistening buns. What is it about these delightful creations that has captured the hearts (and stomachs) of so many? It’s the perfect symphony of textures and flavors: the pillowy softness of the bun, the rich, tangy cream cheese filling, and that non-intoxicating, savory garlic butter glaze that coats every surface. Each bite is a decadent journey, a comforting hug that makes you close your eyes in pure bliss. These Korean Cream Cheese Garlic Buns are the ultimate indulgence, a testament to how simple ingredients can be transformed into something truly extraordinary. I can’t wait to show you how to bring this viral sensation right into your own kitchen.
Korean Cream Cheese Garlic Buns
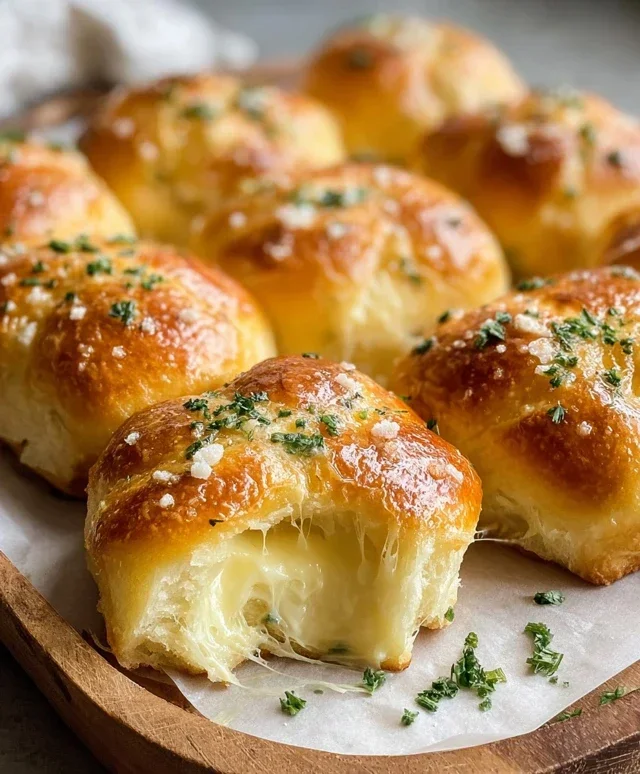
Get ready to indulge in a truly irresistible treat! Korean Cream Cheese Garlic Buns have taken the internet by storm, and for good reason. Imagin extracte a pillowy soft sweet roll, hollowed out and stuffed with a luscious, tangy cream cheese filling, then slathered in a rich, garlicky, buttery sauce, and finally sprinkled with Parmesan and parsley. It’s a flavor explosion in every bite – a perfect balance of sweet, savory, and undeniably decadent. These buns are surprisingly easy to make at home, and once you try them, they’re sure to become a favorite.
This recipe will guide you through creating these delightful buns, from preparing the rolls to whipping up the glorious garlic butter sauce. We’ll ensure every step is clear and achievable, even for begin extractner bakers. So, grab your apron, and let’s dive into this incredibly satisfying culinary adventure!
Ingredients:
Cooking Instructions
Let’s get started on creating these dreamy buns! The key to their amazing texture and flavor is in the preparation of the rolls and the rich garlic butter bath they’ll soak in.
1. Prepare the Cream Cheese Filling: In a medium bowl, combine the softened cream cheese, 2-3 tablespoons of sweetened condensed milk (start with 2 and add more if you prefer it sweeter), and a pinch of salt. Using a hand mixer or a sturdy whisk, beat these ingredients together until the mixture is smooth, creamy, and well combined. It’s important that the cream cheese is at room temperature for it to blend easily without lumps. Taste the filling and adjust the sweetness with more condensed milk if desired. This filling should be rich and slightly tangy, the perfect counterpoint to the sweet rolls. Set this aside for now.
2. Prepare the Rolls: This step is crucial for achieving the perfect texture. Take your King’s Hawaiian sweet rolls and, using a sharp knife, carefully cut a deep X into the top of each roll. Don’t cut all the way through to the bottom. You want to create pockets for the cream cheese filling. Gently pull apart the four “petals” of the X slightly. Then, using a spoon or your fingers, gently hollow out a portion of the soft interior from each roll, creating a small cavity. Be gentle so you don’t tear the sides or bottom of the roll. You can save the scooped-out bread for another use, like breadcrum extractbs. The goal here is to create a space for our delicious cream cheese filling without compromising the structural integrity of the bun. If your rolls are fresh and very soft, letting them sit out at room temperature for about 2 hours will help them firm up slightly, making them easier to handle and less likely to fall apart during this process.
3. Fill the Rolls and Prepare the Egg Wash: Now for the fun part – filling the rolls! Spoon a generous amount of the prepared cream cheese filling into the cavity of each hollowed-out roll. Don’t be afraid to pack it in, but avoid overfilling to the point where it will spill out excessively during baking. Next, in a small bowl, whisk together the melted butter, the large egg, 1/4 cup milk, and the remaining 2 tablespoons of sweetened condensed milk. This mixture will act as your egg wash and will add another layer of richness and flavor to the buns as they bake. Brush this mixture generously all over the outside of the filled rolls. Ensure good coverage for a beautiful golden-brown crust.
4. Assemble and Bake: Arrange the filled and egg-washed rolls in a baking dish, making sure they are relatively close together. This helps them bake into each other slightly, creating a cohesive unit. Now, in a separate small bowl, combine the chopped or minced garlic, 1/2 teaspoon of salt, chopped fresh parsley, paprika, and grated Parmesan cheese. Stir everything together to create your fragrant garlic-herb topping. Once the rolls are arranged in the baking dish, generously drizzle or brush the remaining melted butter over the tops of the rolls, ensuring it seeps into the crevices. Then, evenly sprinkle the prepared garlic-herb and Parmesan mixture over the buttered tops.
5. Bake to Golden Perfection: Preheat your oven to 350°F (175°C). Place the baking dish with the prepared buns into the preheated oven. Bake for 15-20 minutes, or until the rolls are golden brown, the cream cheese filling is warm and slightly melted, and the topping is fragrant and toasted. Keep a close eye on them during the last few minutes of baking, as ovens can vary. The aroma that will fill your kitchen during this stage is absolutely heavenly! Once baked, remove the dish from the oven and let the buns cool slightly for a few minutes before serving. These are best enjoyed warm, when the cream cheese is gooey and the buttery garlic topping is at its most flavorful. Be prepared for them to disappear very quickly!
Conclusion:
I truly hope you’re as excited to try these Korean Cream Cheese Garlic Buns as I am to have shared this recipe with you! These delightful buns are an absolute game-changer, offering a perfect balance of savory, garlicky goodness and a lusciously creamy, slightly sweet cream cheese filling. They are incredibly versatile, making them an ideal snack, appetizer, or even a side dish to your favorite Korean meals. The combination of soft, pillowy bread, crispy garlic butter coating, and that gooey cream cheese center is simply irresistible and guaranteed to impress anyone you share them with.
For serving suggestions, these buns are fantastic warm, straight from the oven. They pair wonderfully with a steaming bowl of jjigae (Korean stew) or a plate of Korean fried chicken. They also make an amazing appetizer for parties, served alongside dipping sauces like sriracha mayo or a simple balsamic glaze. If you’re feeling adventurous with variations, consider adding a sprinkle of chopped chives or parsley to the garlic butter mixture for an extra herbaceous note, or even a pinch of gochugaru (Korean chili flakes) for a subtle kick. Don’t be afraid to experiment! I encourage you to give these Korean Cream Cheese Garlic Buns a try; you won’t regret the delicious journey!
Frequently Asked Questions:
Can I make the cream cheese filling ahead of time?
Absolutely! You can easily prepare the cream cheese filling a day in advance and store it in an airtight container in the refrigerator. Just let it soften slightly at room temperature before piping it into the buns.
What if I don’t have a piping bag?
No problem! You can still achieve a great result. You can carefully spoon the cream cheese mixture into the slit in the buns, or use a resealable plastic bag with a corner snipped off for a makeshift piping bag. Just ensure the cream cheese isn’t too firm when using this method.
How should I store leftover buns?
Store any leftover Korean Cream Cheese Garlic Buns in an airtight container at room temperature for up to two days. For longer storage, you can refrigerate them, but they are best enjoyed fresh. Reheat them gently in a toaster oven or a low-temperature oven to revive their crispiness.
Korean Cream Cheese Garlic Buns
Deliciously sweet and savory Korean-style garlic buns filled with a creamy, cheesy center and coated in a buttery garlic herb mixture.
Ingredients
-
16 King’s Hawaiian Origin extrael Hawaiian Sweet Rolls, ideally dried out at room temperature for 2 hours
-
8 oz (226g) cream cheese, room temperature
-
2-3 tablespoons sweetened condensed milk, to taste
-
Pinch of salt
-
1/2 cup (113g) butter, melted
-
1 large egg
-
1/4 cup milk
-
2 tablespoons sweetened condensed milk
-
2-3 tablespoons chopped or minced garlic
-
1/2 teaspoon salt
-
2 tablespoons fresh parsley, chopped
-
1/2 teaspoon paprika
-
2 tablespoons grated or shredded parmesan cheese
Instructions
-
Step 1
Prepare the cream cheese filling: In a medium bowl, combine the softened cream cheese, 2-3 tablespoons of sweetened condensed milk, and a pinch of salt. Mix until smooth and creamy. -
Step 2
Prepare the buns: Using a sharp knife, carefully cut a slit into the side of each sweet roll, creating a pocket without cutting all the way through. Do not cut them in half. -
Step 3
Fill the buns: Spoon a portion of the cream cheese mixture into the pocket of each sweet roll. -
Step 4
Prepare the garlic butter sauce: In a shallow dish, whisk together the melted butter, egg, 1/4 cup milk, 2 tablespoons of sweetened condensed milk, chopped garlic, 1/2 teaspoon salt, chopped parsley, paprika, and grated parmesan cheese. -
Step 5
Coat the buns: Dip each filled bun into the garlic butter sauce, ensuring it’s well-coated on all sides. Place the buns on a baking sheet lined with parchment paper. -
Step 6
Bake the buns: Bake in a preheated oven at 350°F (175°C) for 12-15 minutes, or until golden brown and the filling is warm and slightly melted.
Important Information
Nutrition Facts (Per Serving)
It is important to consider this information as approximate and not to use it as definitive health advice.
Allergy Information
Please check ingredients for potential allergens and consult a health professional if in doubt.