Easy Strawberry Sando Recipe Four Ingredients
The 4-ingredient strawberry sando is an absolute revelation, a testament to how a few simple elements can create something truly magical. Have you ever craved a dessert that’s both incredibly easy to make and utterly delightful to eat? That’s precisely where this charming strawberry sando shines. It’s the kind of treat that instantly transports you to a place of pure comfort and joy, whether you’re enjoying it as a light breakfast, a sweet afternoon pick-me-up, or even a delicate dessert. The beauty of this 4-ingredient strawberry sando lies in its effortless simplicity, proving that you don’t need a pantry overflowing with ingredients to craft something that feels wonderfully special. People adore it because it captures the essence of fresh strawberries and creamy goodness without any fuss. It’s a nostalgic bite for some, and a delightful discovery for others, promising a burst of sweet, fruity flavor in every single mouthful.
The Easiest & Most Delicious 4-Ingredient Strawberry Sando You’ll Ever Make!
Are you craving something sweet, refreshing, and incredibly simple? Look no further! This 4-ingredient Strawberry Sando is a delightful Japanese-inspired treat that requires minimal effort and delivers maximum flavor. It’s the perfect quick dessert, a special breakfast, or a delightful afternoon pick-me-up. Forget complicated pastry techniques; this recipe is all about fresh, vibrant ingredients coming together harmoniously. We’re talking about soft, pillowy bread, luscious whipped cream, and the sweet burst of ripe strawberries. What more could you ask for? Let’s dive into this wonderfully easy creation.
Ingredients:
Getting Started: Preparing Your Strawberries
The star of our show, besides the creamy filling, is the fresh strawberries. For this recipe, we’ll be using about five medium-sized strawberries. The key here is to ensure they are ripe and flavorful. Ripe strawberries will be a vibrant red color and should have a sweet aroma. Gently wash your strawberries under cool running water and then, with a small paring knife or a strawberry huller, carefully remove the green leafy tops.
Once hulled, we need to prepare them for our filling. You have two options here, depending on your texture preference. For a more pronounced strawberry flavor and a slightly chunky filling, you can roughly chop them into bite-sized pieces. If you prefer a smoother, more integrated strawberry flavor, you can lightly mash them with a fork. Don’t go overboard with the mashing; we still want some texture. Now, take that 1 tablespoon of white granulated sugar and sprinkle it over your prepared strawberries. Gently stir them together. This sugar will start to draw out some of the natural juices from the strawberries, creating a beautiful, slightly syrupy base for our filling and also sweetening them perfectly. Let this mixture sit for about 5-10 minutes while you prepare the other components. This short maceration period really intensifies the strawberry flavor.
Whipping Up the Creamy Dream
Now for the incredibly simple, yet crucial, creamy component: the whipped cream. We need 1/2 cup of whipping cream, also known as heavy cream. It’s absolutely essential that your cream is very cold. This is the secret to achieving light and fluffy whipped cream without the need for stabilizers or extra sugar. If you forget to chill your cream, don’t worry! You can place the carton in the freezer for about 15-20 minutes, checking it frequently to ensure it doesn’t freeze solid.
Pour the cold whipping cream into a clean, dry bowl. You can use a stand mixer with a whisk attachment, a hand mixer, or even a good old-fashioned whisk if you’re feeling energetic! Start by whisking the cream on medium speed. You’ll see it begin extract to thicken and become foamy. Continue whisking, gradually increasing the speed to medium-high. Watch it closely. You’re looking for soft peaks to form. This means when you lift the whisk out, the cream will hold its shape briefly before gently drooping. If you over-whip it, you’ll end up with butter, which is delicious in its own right, but not what we’re aiming for here. We want a luscious, spreadable cream. There’s no added sugar in the cream itself because the strawberries will provide plenty of sweetness, and the milk bread is also naturally a little sweet.
Assembling Your Masterpiece
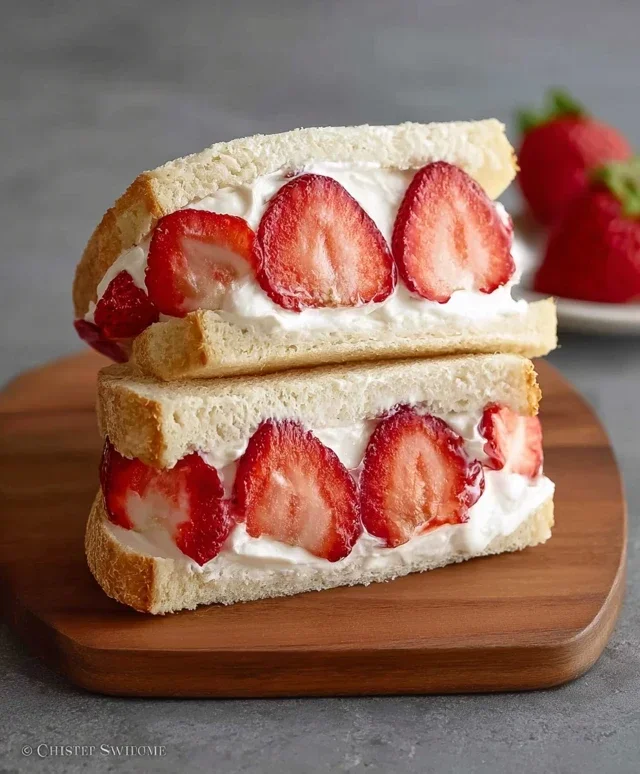
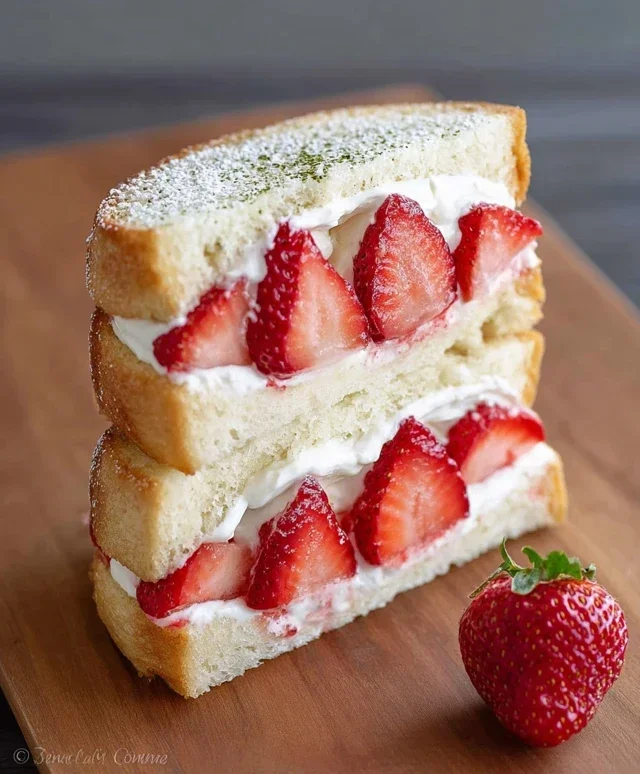
With all our components ready, it’s time to assemble the Strawberry Sando! Take your two thick slices of milk bread. Milk bread is ideal because it’s incredibly soft and slightly sweet, making it the perfect canvas for our filling. If you can’t find milk bread, regular thick-sliced white bread, like Texas toast, will work beautifully. The thickness is important to provide a sturdy base and a delightful contrast to the soft filling.
Now, take the macerated strawberries (with their lovely juices) and gently spoon them onto one of the slices of bread. Spread them out evenly, leaving a small border around the edges to prevent the filling from oozing out too much when you assemble. Don’t be afraid to include all those delicious juices! Next, take your beautifully whipped cream and dollop a generous amount over the strawberries. Use a spatula or the back of a spoon to spread the cream evenly over the strawberry layer. You want a good balance of both components.
Finally, take the second slice of bread and gently place it on top of the cream and strawberry filling. Press down very lightly to secure the sandwich. You don’t want to crush the delicate bread or squeeze out all the filling.
The Final Touch: Slicing for Perfection
This is the part that makes it look as good as it tastes! To achieve that signature sando look, carefully take a sharp knife and slice the sandwich in half. Many people prefer to slice it diagonally, creating two neat triangles. This not only looks appealing but also makes it easier to eat. For an extra clean cut, some people like to use a serrated knife, or even a piece of dental floss (unflavored!) stretched taut, to slice through the bread without squishing it. Just slide the floss under the sandwich, cross the ends over the top, and pull.
And there you have it – your incredibly simple, yet utterly delicious, 4-ingredient Strawberry Sando! It’s a testament to how a few quality ingredients can create something truly special. Enjoy every soft, creamy, and fruity bite!
Conclusion:
And there you have it! The utterly delightful and incredibly simple 4-ingredient Strawberry Sando. This recipe is a testament to how a few high-quality ingredients can come together to create something truly special. It’s perfect for those moments when you crave a sweet treat without a lot of fuss. The combination of soft bread, creamy filling, and fresh, juicy strawberries is a classic for a reason, offering a beautiful balance of textures and flavors. It’s a wonderfully light yet satisfying dessert or snack that feels both nostalgic and sophisticated.
For serving, I love this sando just as it is, perhaps dusted with a whisper of powdered sugar for an elegant touch. It also pairs beautifully with a cup of tea or a glass of cold milk. If you’re feeling adventurous, consider a drizzle of honey or a sprinkle of finely chopped mint for an extra layer of complexity. Don’t hesitate to get creative with your own variations! Perhaps try adding a touch of lemon zest to the cream for a brighter note, or swap out the strawberries for other seasonal berries like raspberries or blueberries.
I truly hope you give this 4-ingredient Strawberry Sando a try. It’s a guaranteed crowd-pleaser and a delightful way to bring a little joy into your day. Enjoy the simple pleasure of creating and savoring this sweet masterpiece!
Frequently Asked Questions:
Can I make the strawberry filling ahead of time?
Absolutely! You can prepare the strawberry and sugar mixture a few hours in advance and store it in the refrigerator. However, for the best texture and to prevent the bread from becoming soggy, it’s best to assemble the sandwiches just before serving.
What kind of bread works best for this recipe?
A soft, slightly sweet white bread or milk bread is ideal for the classic Strawberry Sando experience. Its tender texture complements the creamy filling and juicy strawberries beautifully. Avoid breads with very dense crum extractb or strong flavors, as they might overpower the delicate taste of the sandwich.
Can I use frozen strawberries?
Yes, you can use frozen strawberries, but be sure to thaw them completely and drain any excess liquid very well before mashing them. This is crucial to avoid making the filling too watery and compromising the bread’s integrity.
4-Ingredient Strawberry Sando
A simple and delightful Japanese-inspired strawberry sandwich with only four main ingredients.
Ingredients
-
2 thick slices milk bread (or regular thick white bread, like Texas toast)
-
5 strawberries (with tops removed)
-
1 tbsp white granulated sugar
-
1/2 cup whipping cream (or heavy cream chilled)
-
1 tsp vanilla extract (optional, for enhanced flavor)
Instructions
-
Step 1
Hull and slice the strawberries into rounds or halves, depending on preference. -
Step 2
In a small bowl, combine the sliced strawberries with the granulated sugar. Let it sit for a few minutes to macerate slightly. -
Step 3
In a separate chilled bowl, whip the cold heavy cream (and vanilla extract, if using) until stiff peaks form. Be careful not to over-whip. -
Step 4
Spread a generous layer of the whipped cream onto one slice of the milk bread, covering the surface completely. -
Step 5
Arrange the macerated strawberries over the whipped cream. -
Step 6
Top with another layer of whipped cream, if desired, or directly place the second slice of bread on top of the strawberries. -
Step 7
Gently press the sandwich together and cut it in half, either diagonally or straight across, for easy enjoyment.
Important Information
Nutrition Facts (Per Serving)
It is important to consider this information as approximate and not to use it as definitive health advice.
Allergy Information
Please check ingredients for potential allergens and consult a health professional if in doubt.