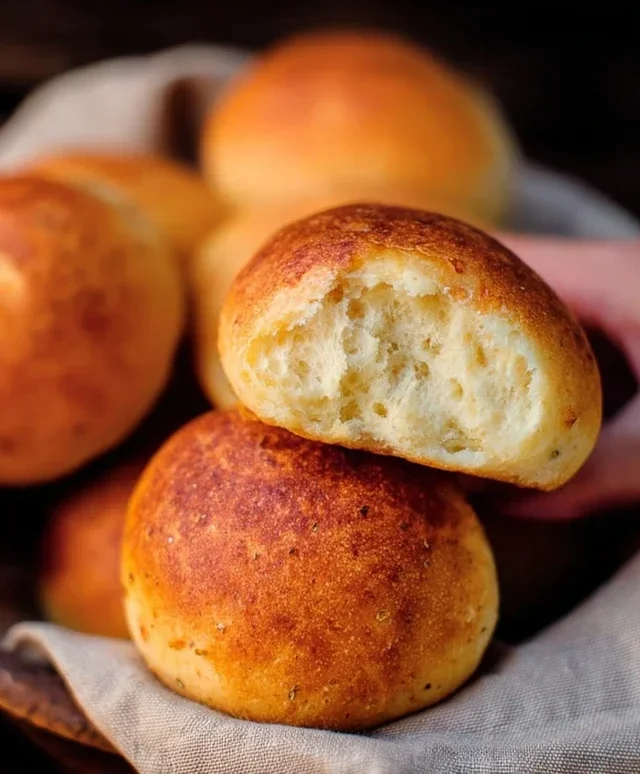
Easy Keto Bread Rolls-Fluffy & Delicious Low Carb
Keto Bread Rolls are about to become your new best friend on your low-carb journey! For so long, the dream of warm, soft, pillowy bread seemed like a distant memory, reserved only for those not watching their carb intake. But I’m here to tell you that dream is now a delicious reality, thanks to these incredible keto bread rolls. What makes them so special? They achieve that perfect, slightly chewy texture and satisfying crust that we all crave from traditional bread, all without the dreaded sugar and starches. Imagin extracte slathering your favorite butter on a fresh, warm keto bread roll, or using them as the perfect vessel for your morning avocado toast or a hearty sandwich. These aren’t just a substitute; they’re a revelation. Get ready to fall in love with bread all over again with these amazing keto bread rolls!

Keto Bread Rolls
Welcome to a recipe that will change your keto lifestyle! For many of us following a low-carb, high-fat diet, the biggest missing piece is often good, satisfying bread. Store-bought keto bread can be hit or miss, and often comes with a hefty price tag. That’s where these incredible Keto Bread Rolls come in. They are surprisingly simple to make, require minimal ingredients, and deliver a soft, slightly chewy texture that’s perfect for your morning avocado toast, as a side to your favorite soup, or even as a base for mini pizzas. Get ready to experience the joy of freshly baked bread again, all while staying strictly keto!
These rolls are a game-changer because they use a clever combination of cheese and almond flour to create a bread-like structure without the carbs. The melted cheese acts as the binder and provides a delightful chegrape juicess, while the almond flour gives it that classic bread flavor and texture. I’ve found this recipe to be incredibly forgiving, so don’t worry if you’re not an experienced baker. Just follow these steps, and you’ll be rewarded with delicious, homemade keto rolls.
Ingredients:
*Notes on Ingredients:
For the shredded cheese, I’ve found that a good quality mozzarella melts beautifully and gives a wonderfully stretchy texture. Cheddar also works very well and adds a slightly sharper flavor. You can even mix them for a delicious combination! Make sure your cheese is finely shredded for the best melting results.
The cream cheese is crucial for adding moisture and a tender crum extractb to the rolls. Make sure it’s softened to room temperature so it incorporates smoothly without any lumps.
Almond flour is the backbone of our keto bread. I prefer to use super-fine almond flour for a smoother texture, but regular almond flour will also work. Just be aware that the texture might be slightly grainier.
For the eggs, we’ll be separating them. This is a key step for achieving a lighter, airier roll. Ensure your eggs are at room temperature, as they will whip up better.
Baking powder is optional, but I find it helps to give the rolls a little extra lift and a slightly more traditional bread-like appearance. If you’re omitting it, your rolls will still be delicious, just a touch denser.
Cooking Instructions:
Step 1: Preparing the Cheesy Base
First things first, let’s get our oven preheated to 400°F (200°C). While the oven is warming up, grab a microwave-safe bowl. Add your 2 cups of shredded cheese (mozzarella or cheddar) and the 1/4 cup of softened cream cheese to this bowl. Pop it in the microwave in 30-second intervals, stirring well after each interval, until both cheeses are completely melted and well combined. You want a smooth, gooey mixture. Alternatively, you can melt these in a saucepan over low heat, stirring constantly to prevent scorching. Once melted, remove from the heat and let it cool slightly for a couple of minutes. This slight cooling is important so it doesn’t scramble the eggs when we add them.
Step 2: Incorporating the Dry Ingredients and Egg Yolks
To the slightly cooled cheese mixture, add the 1 1/2 cups of almond flour. If you’re using the optional baking powder, now is the time to add it as well. Mix everything together thoroughly with a spoon or spatula until it’s well combined and forms a dough-like consistency. It will be quite sticky at this stage, and that’s perfectly normal. Next, we’re going to add the egg yolks from our 3 large eggs. Carefully separate your eggs, placing the yolks in a small bowl. Add these 3 egg yolks to the cheese and almond flour mixture. Mix vigorously until everything is incorporated and you have a cohesive, though still somewhat sticky, dough. This dough will feel a bit unusual compared to traditional wheat doughs, but trust the process!
Step 3: Whipping the Egg Whites to Perfection
Now for the magic that will give our rolls their airy texture! Take the 3 egg whites that you separated earlier. Place them in a clean, dry mixing bowl. If you have a stand mixer with a whisk attachment, this will make the job much easier and faster. If you’re using a hand mixer or whisking by hand, ensure your bowl and whisk are completely free of any grease or water, as this will prevent the egg whites from whipping properly. Start by beating the egg whites on medium speed until they become foamy. Gradually increase the speed to high and continue beating until stiff peaks form. This means that when you lift the whisk, the egg whites will stand up straight and hold their shape. Be patient; this can take a few minutes.
Step 4: Gently Folding for Lightness
This step is crucial for achieving light and fluffy rolls. Take about a third of the whipped egg whites and gently fold them into the cheese and almond flour mixture. Use a spatula and a folding motion, rather than stirring, to incorporate them without deflating the egg whites. Continue adding the remaining whipped egg whites in two more additions, folding gently after each addition. You want to incorporate as much air as possible while ensuring the mixture is evenly combined. The final batter should be lighter and airier than before, with a consistency that’s still thick but manageable.
Step 5: Shaping and Baking the Rolls
Line a baking sheet with parchment paper. This will prevent the rolls from sticking. Using a spoon or an ice cream scoop, portion the dough onto the prepared baking sheet. I like to make them about 2-3 inches in diameter. You can gently wet your hands with a little water or oil to help shape them if the dough is a bit sticky, but try not to overwork it. Leave some space between each roll as they will puff up slightly. Place the baking sheet in your preheated oven and bake for 15-20 minutes, or until the rolls are golden brown on top and firm to the touch. The exact baking time will depend on your oven and the size of your rolls. Keep an eye on them to prevent burning.
Step 6: Cooling and Enjoying Your Creation
Once baked to perfection, remove the keto bread rolls from the oven. Let them cool on the baking sheet for a few minutes before transferring them to a wire rack to cool completely. Resist the urge to cut into them too early; they firm up as they cool. These rolls are best enjoyed fresh, but they can be stored in an airtight container at room temperature for a day or two, or in the refrigerator for up to a week. Reheat them gently in a toaster oven or a regular oven for a few minutes to bring back their delicious warmth and texture. I hope you love these as much as I do! They are a true testament to how delicious and satisfying keto baking can be.
Conclusion:
There you have it! A simple yet incredibly satisfying recipe for keto bread rolls that I’m sure you’ll absolutely love. What makes these keto bread rolls so fantastic is their ability to deliver that classic bread experience without the carb overload, making them a staple for anyone following a ketogenic lifestyle or simply looking for healthier bread alternatives. They’re wonderfully versatile, perfect for slathering with butter, using as a base for mini pizzas, or enjoying alongside your favorite soups and stews. Don’t be afraid to experiment with variations – adding a sprinkle of sesame seeds, poppy seeds, or even some dried herbs to the dough can elevate their flavor profile even further. I truly encourage you to give these a try; you might just find your new go-to bread!
Frequently Asked Questions:
Q: How should I store these keto bread rolls?
A: To keep them fresh, store your keto bread rolls in an airtight container at room temperature for up to 2-3 days. For longer storage, you can refrigerate them, which will extend their shelf life to about a week. They also freeze beautifully; simply wrap them individually in plastic wrap and then place them in a freezer bag. Reheat gently in a toaster oven or a warm oven before serving.
Q: Can I make these rolls ahead of time for meal prep?
A: Absolutely! These rolls are excellent for meal prep. Once cooled, store them as described above. They’re perfect for grabbing a quick breakfast or a side for lunches and dinners throughout the week. The texture holds up well, making them a convenient choice for busy schedules.
Keto Bread Rolls
Soft and delicious keto-friendly bread rolls made with cheese and almond flour, perfect for low-carb diets.
Ingredients
-
2 cups shredded cheese (mozzarella or cheddar)
-
1/4 cup cream cheese (softened)
-
1 1/2 cups almond flour
-
3 large eggs (Divided)
-
1 teaspoon baking powder (optional)
Instructions
-
Step 1
Preheat oven to 375°F (190°C). Line a baking sheet with parchment paper. -
Step 2
In a microwave-safe bowl, combine the shredded cheese and cream cheese. Microwave in 30-second intervals, stirring in between, until melted and smooth. -
Step 3
Gradually stir in the almond flour and baking powder (if using) until well combined. The mixture will be sticky. -
Step 4
Separate the eggs. Whisk the egg yolks into the dough mixture until fully incorporated. -
Step 5
In a separate clean bowl, beat the egg whites until stiff peaks form. -
Step 6
Gently fold the beaten egg whites into the cheese and almond flour mixture until just combined. Be careful not to overmix. -
Step 7
Using wet hands or a scoop, form about 6-8 small rolls on the prepared baking sheet. -
Step 8
Bake for 15-20 minutes, or until golden brown and firm to the touch.
Important Information
Nutrition Facts (Per Serving)
It is important to consider this information as approximate and not to use it as definitive health advice.
Allergy Information
Please check ingredients for potential allergens and consult a health professional if in doubt.