Mini Cannoli Cups- Easy Dessert Recipe
Mini Cannoli Cups are about to become your new favorite sweet obsession! Forget the fuss of traditional cannoli tubes; these delightful bites deliver all the iconic flavor and creamy goodness in a perfectly portioned, easy-to-make package. I’ve always been captivated by the irresistible combination of crisp, delicate pastry and rich, sweet ricotta filling, and these mini versions capture that magic effortlessly. What makes these Mini Cannoli Cups so special is their versatility. They’re perfect for a sophisticated dessert spread, a fun party favor, or simply a moment of personal indulgence. We’re talking about that satisfying crunch giving way to a luscious, cool filling, often studded with chocolate chips or candied fruit – pure bliss! Get ready to impress yourself and everyone lucky enough to snag one of these miniature masterpieces.

Mini Cannoli Cups
Welcome to a delightful journey into the world of miniature Italian desserts! Today, we’re crafting Mini Cannoli Cups, a charming and approachable way to enjoy the iconic flavors of cannoli without the fuss of rolling and frying dough. These little cups are perfect for parties, a sweet ending to any meal, or simply when you’re craving a taste of la dolce vita. We’ll be using convenient refrigerated pie crusts to create our edible vessels, then filling them with a luscious, homemade ricotta cream. Get ready to impress yourself and your loved ones with these delightful treats!
Ingredients:
Getting Started: Crafting Your Edible Cups
The foundation of our Mini Cannoli Cups lies in creating perfectly baked pastry shells. This is where the refrigerated pie crusts come in handy. They offer a fantastic shortcut, providing that flaky, buttery crust we all love.
1. Prepare the Pie Crusts: Begin extract by carefully unrolling your refrigerated pie crusts onto a lightly floured surface. Follow the package directions for softening them – this usually involves letting them sit at room temperature for a short period. The goal is to make them pliable enough to work with without tearing.
2. Cut and Shape the Dough: Once the pie crusts are softened, it’s time to create our cup shapes. Use a round cookie cutter or the rim of a glass to cut out circles. A standard size that works well is about 3 inches in diameter. You’ll want to have enough circles to fill the wells of a mini muffin tin. Arrange these circles in the wells of your mini muffin tin. Gently press the dough into the bottom and up the sides of each muffin cup, forming little pastry shells. It’s important to ensure the dough extends slightly above the rim to prevent the filling from overflowing later. If the dough is being stubborn, let it rest for a few minutes, then try again.
3. Bake the Cups: Preheat your oven to 375°F (190°C). Before baking, prick the bottom of each pastry cup a few times with a fork. This helps prevent the dough from puffing up too much during baking. Bake for approximately 10-12 minutes, or until the pastry is golden brown and cooked through. Keep a close eye on them, as they can go from perfectly golden to burnt very quickly.
4. Cool and Prepare for Filling: Once baked, carefully remove the mini muffin tin from the oven. Let the pastry cups cool in the tin for about 5 minutes, then gently remove them and place them on a wire rack to cool completely. While they are still warm but not hot, you can gently press down the rims if they have puffed up unevenly. This step ensures a neat and stable base for our filling. Once fully cooled, you can carefully remove them from the muffin tin.
Whipping Up the Luscious Ricotta Filling
Now for the star of the show – the creamy, dreamy ricotta filling! This part is incredibly simple and yields fantastic results.
1. Drain the Ricotta: This is a crucial step for achieving the right consistency. Place the whole-milk ricotta cheese in a fine-mesh sieve set over a bowl. Let it drain for at least 30 minutes, or even longer in the refrigerator, to remove excess liquid. You want a thick, creamy ricotta, not a watery one. You can even gently press it with a spoon to help the liquid drain.
2. Combine Filling Ingredients: In a medium bowl, combine the drained ricotta cheese, powdered sugar, granulated sugar, orange or lemon zest, and vanilla extract. Use a spatula or a whisk to gently mix everything together until it’s smooth and well combined. Be careful not to overmix, which can sometimes make the filling too liquidy. Taste the filling at this point and adjust sweetness if needed, though it should be just right with the given measurements.
3. Chill the Filling: For the best texture and to make it easier to pipe or spoon into the cannoli cups, cover the ricotta mixture and refrigerate it for at least 30 minutes. This allows the flavors to meld and the filling to firm up slightly.
Assembling Your Mini Cannoli Cups
The final, most rewarding step is bringin extractg all the elements together.
1. Prepare the Turbinado Sugar Mixture: In a shallow dish or small plate, combine the turbinado sugar and ground cinnamon. Stir them together to create a flavorful coating.
2. Fill and Decorate: Once the pastry cups are completely cool and the ricotta filling has chilled, it’s time for assembly. You can spoon the filling into the pastry cups, or for a neater presentation, use a piping bag fitted with a star tip. Fill each pastry cup generously.
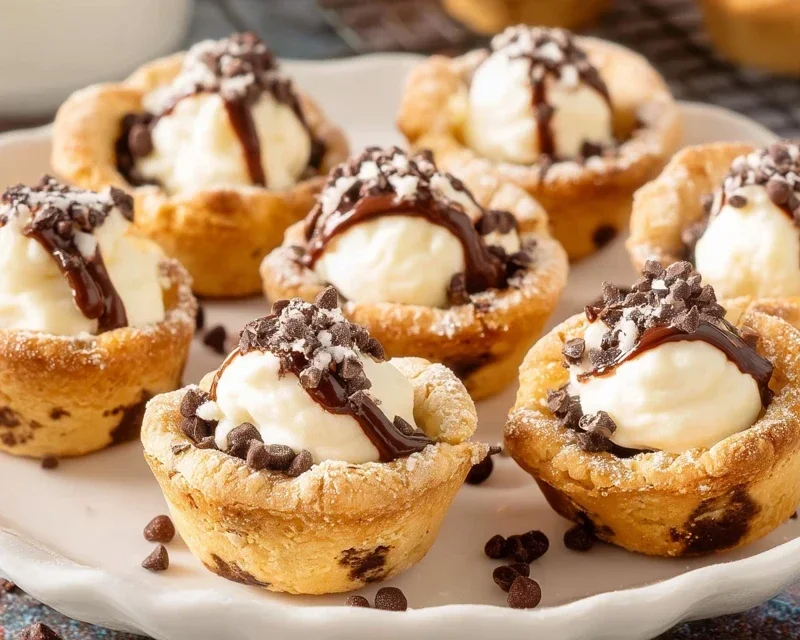
3. Add Your Finishing Touches: Dip the ends of the filled cannoli cups into the turbinado sugar and cinnamon mixture, or sprinkle it over the top. For an extra pop of flavor and texture, you can also sprinkle the miniature chocolate chips or finely chopped pistachios over the filling. Finally, dust with additional powdered sugar for that authentic cannoli look.
Serve your Mini Cannoli Cups immediately for the best experience, or store them in an airtight container in the refrigerator for up to a day. Enjoy this delightful taste of Italy!
Conclusion:
There you have it – a delightful and incredibly satisfying recipe for Mini Cannoli Cups! This recipe is truly fantastic because it delivers all the classic, irresistible flavors and textures of traditional cannoli, but in a much more approachable and less time-consuming format. The crispy, buttery shells are surprisingly easy to achieve, and the creamy, sweet ricotta filling is a dream to whip up. These mini delights are perfect for any occasion, from casual get-togethers to more elegant dessert tables. Imagin extracte serving these at your next party – they’re guaranteed to be a hit!
For serving, I love to present them on a platter dusted with a little powdered sugar. They are also wonderful alongside a cup of coffee or a glass of dessert grape juice. Don’t be afraid to get creative with variations! Consider adding a hint of espresso powder to the filling for a mocha twist, or incorporate finely chopped pistachios or chocolate chips directly into the ricotta mixture. You could even experiment with different extracts, like almond or orange blossom, for a unique aromatic touch.
I truly encourage you to give this Mini Cannoli Cups recipe a try. It’s a rewarding baking experience that yields stunning results, and the joy of sharing these homemade treats with loved ones is unparalleled. Let me know how yours turn out!
Frequently Asked Questions:
Can I make the cannoli shells ahead of time?
Yes, absolutely! You can bake the cannoli shells a day or two in advance. Store them in an airtight container at room temperature once they are completely cooled. It’s best to fill them closer to serving time to ensure the shells stay as crisp as possible.
What if I can’t find ricotta cheese?
While ricotta is traditional, you can substitute it with mascarpone cheese for a richer, slightly tangier filling. Drain it very well to avoid a watery consistency. Another option is to use cream cheese, but again, ensure it’s at room temperature and well-drained, and you might need to adjust the sweetness.
Mini Cannoli Cups
Delightful mini cannoli cups made with flaky pie crust and a creamy ricotta filling.
Ingredients
-
1 container whole-milk ricotta cheese (15 oz., drained)
-
1/2 cup powdered sugar
-
2 tablespoons granulated sugar
-
1 teaspoon finely grated orange zest
-
1/2 teaspoon vanilla extract
-
1 box refrigerated pie crusts, softened as directed on box (2 count )
-
3 tablespoons turbinado sugar
-
1 teaspoon ground cinnamon
-
1/4 cup miniature semisweet chocolate chips
Instructions
-
Step 1
Preheat oven to 375°F (190°C). Lightly grease muffin tins. In a medium bowl, combine drained ricotta, powdered sugar, granulated sugar, orange zest, and vanilla extract. Mix until well combined and smooth. -
Step 2
Unroll refrigerated pie crusts. Using a 3-inch round cutter, cut out 12 circles from each crust, for a total of 24 circles. -
Step 3
Press each pie crust circle into the muffin tin cups, forming a shell. Prick the bottom of each shell with a fork. -
Step 4
Bake for 12-15 minutes, or until golden brown and crisp. Let cool in the muffin tin for 5 minutes before carefully removing them to a wire rack to cool completely. -
Step 5
In a small bowl, combine turbinado sugar and ground cinnamon. Stir in miniature chocolate chips. -
Step 6
Once the cannoli shells are completely cool, spoon or pipe the ricotta filling into each shell. Sprinkle with the cinnamon-sugar-chip mixture. -
Step 7
Dust with additional powdered sugar before serving, if desired.
Important Information
Nutrition Facts (Per Serving)
It is important to consider this information as approximate and not to use it as definitive health advice.
Allergy Information
Please check ingredients for potential allergens and consult a health professional if in doubt.