Crispy Chicken Caesar Sandwich-Best Recipe Ever
Crispy Chicken Caesar Sandwich – ah, a culinary masterpiece that brings together all the comforting, savory elements we adore in one glorious handheld package. This isn’t just any sandwich; it’s an experience. Imagin extracte biting into a perfectly golden, shatteringly crisp piece of chicken, followed by the creamy, tangy embrace of classic Caesar dressing, all nestled between soft, toasted bread. It’s no wonder the Caesar salad is a perennial favorite, and when you translate that iconic flavor profile into a hearty, satisfying sandwich, you get pure edible joy. What truly sets this Crispy Chicken Caesar Sandwich apart is the interplay of textures and tastes: the satisfying crunch of the chicken against the tender bread, the zesty dressing cutting through the richness, and perhaps a whisper of Parmesan cheese adding that umami depth. It’s the ultimate upgrade for your lunch game or a fantastic weeknight dinner solution that feels both indulgent and surprisingly simple to create.
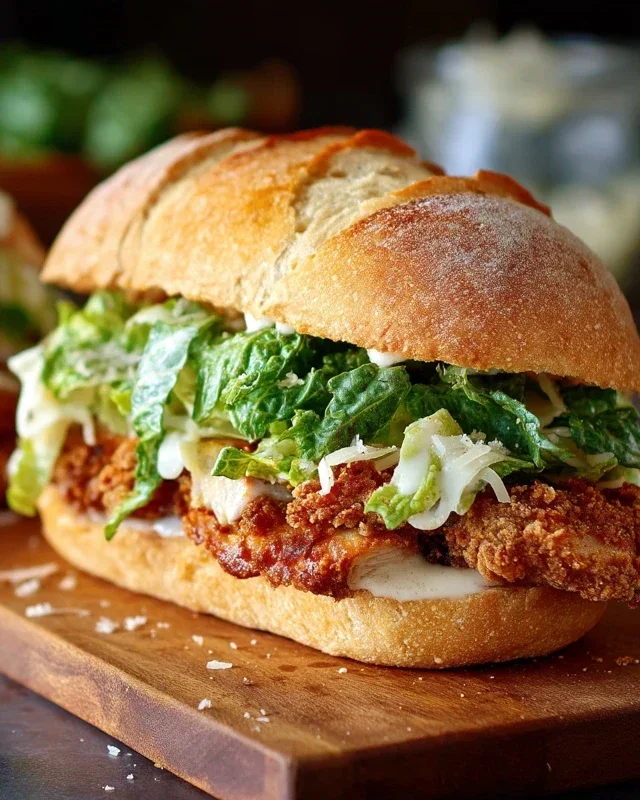
Crispy Chicken Caesar Sandwich
There are sandwiches, and then there are sandwiches. The Crispy Chicken Caesar Sandwich falls firmly into the latter category. Imagin extracte this: perfectly seasoned, golden-brown, crispy chicken cutlets, piled high on a soft bun, generously slathered with a creamy, tangy Caesar dressing, and finished with a sprinkle of sharp Parmesan. It’s a symphony of textures and flavors that will elevate your lunch game from ordinary to extraordinary. This isn’t just a quick bite; it’s an experience. Forget the soggy lettuce and bland chicken from lesser imitations. We’re talking about a truly satisfying, craveable meal that you’ll be dreaming about long after the last bite.
The beauty of this sandwich lies in its simplicity and the quality of its components. We’ll be making our own Caesar dressing from scratch – trust me, it’s a game-changer – and ensuring our chicken has that irresistible crunch. So, let’s gather our ingredients and get ready to create something truly delicious.
Ingredients:
Cooking Instructions
Step 1: Prepare the Creamy Caesar Dressing
The heart of any great Caesar sandwich is its dressing, and ours is going to be phenomenal. In a medium bowl, combine the full-fat mayonnaise and Greek yogurt. The mayonnaise provides that rich, decadent base, while the Greek yogurt adds a slight tang and a lighter texture, making the dressing wonderfully creamy without being too heavy. Next, whisk in the Dijon mustard for a subtle sharpness and complexity. The Worcestershire sauce is our secret weapon, adding a deep umami flavor that’s quintessential to Caesar dressing. Don’t skip this! Then, squeeze in the fresh lemon juice. The acidity brightens everything up and cuts through the richness. Now for the star: the freshly grated Parmesan cheese. Using freshly grated Parmesan makes a world of difference in flavor and texture compared to pre-shredded. Add the minced garlic cloves – start with one if you’re not a huge garlic fan, but I highly recommend two for that classic punch. Finally, season with ¼ teaspoon of black pepper and a pinch of sea salt. Whisk everything together until it’s smooth and well combined. Taste and adjust the seasoning if needed. You want a balance of creamy, tangy, savory, and a hint of garlic. Cover the dressing and refrigerate it while you prepare the chicken. This allows the flavors to meld beautifully.
Step 2: Prepare the Chicken for Crispy Perfection
Now, let’s talk chicken. For this recipe, we’re using 5 chicken cutlets. If you can’t find pre-cut cutlets, you can easily pound chicken breasts to an even thickness of about ½ inch. This ensures they cook evenly and quickly, giving you that perfect crisp. Pat the chicken cutlets dry with paper towels. This is a crucial step for achieving a truly crispy coating. Moisture is the enemy of crispiness! Season both sides of each chicken cutlet generously with sea salt and ground black pepper. Don’t be shy here; this is where a lot of the flavor comes from.
Step 3: Set Up Your Breading Station
We need a simple but effective breading station to get that glorious crunch. In a shallow dish or on a plate, combine the ⅓ cup of all-purpose flour with ½ teaspoon of salt. This seasoned flour is the first layer of our crispy coating. It will help the other layers adhere and contribute to the overall texture. Make sure your oil is ready for frying in a separate pan or skillet. You want enough oil to come about ½ inch up the sides of the pan. Heat the oil over medium-high heat until it reaches around 350°F (175°C). You can test if the oil is hot enough by dropping a tiny pinch of flour into it; it should sizzle immediately.
Step 4: Bread and Fry the Chicken
This is where the magic happens! Take each seasoned chicken cutlet and dredge it thoroughly in the seasoned flour, shaking off any excess. The flour acts as a base for the crispy exterior. Now, carefully place the floured chicken cutlets into the hot oil. Be careful not to overcrowd the pan, as this will lower the oil temperature and result in soggy chicken. You’ll likely need to fry the chicken in batches. Fry for about 3-5 minutes per side, or until the chicken is golden brown, cooked through, and delightfully crispy. The internal temperature of the chicken should reach 165°F (74°C). Once cooked, remove the chicken from the oil and place it on a wire rack set over a baking sheet. This allows excess oil to drain, keeping your chicken as crispy as possible. Season with a little more salt immediately after frying, if desired.
Step 5: Assemble Your Masterpiece
Now for the grand finnon-alcoholic ale: assembling your Crispy Chicken Caesar Sandwich! Toast your beef hamburger buns if you like – a lightly toasted bun adds a nice textural contrast. Spread a generous amount of your homemade Caesar dressing on the bottom half of each bun. Place one or two of your crispy chicken cutlets on top of the dressing. Add some crisp lettuce leaves if you’re using them for an extra layer of freshness. Spoon more of that delicious Caesar dressing over the chicken. Finish with a sprinkle of extra Parmesan cheese for an extra kick of cheesy goodness. Place the top half of the bun on top, and behold your creation!
Enjoy this incredible sandwich hot, where the chicken is at its crispiest and the flavors are at their most vibrant. It’s perfect for a hearty lunch or a casual dinner, and I guarantee it will become a regular in your recipe rotation.
Note 1: Chicken cutlets are typically thin, boneless, skinless pieces of chicken breast. You can purchase them pre-packaged or pound thicker chicken breasts to an even thickness of about ½ inch. This even thickness ensures quick and consistent cooking for that perfect crispy texture.

Conclusion:
There you have it! This Crispy Chicken Caesar Sandwich recipe is a true winner, offering a delightful balance of textures and classic Caesar flavors in every bite. The satisfying crunch of the perfectly fried chicken, paired with the creamy, tangy Caesar dressing and fresh lettuce, all hugged by a soft bun, makes for an unforgettable meal. It’s incredibly versatile and perfect for a quick weeknight dinner, a hearty lunch, or even a casual get-together. I encourage you to give this recipe a try; I’m confident you’ll love it as much as I do! For serving, consider pairing it with a side of sweet potato fries, a simple green salad, or even some crispy onion rings to enhance the experience. Don’t be afraid to experiment with variations too – maybe add some crispy beef bacon, a slice of provolone cheese, or even a sprinkle of red pepper flakes for a little heat.
Frequently Asked Questions:
Can I make the chicken ahead of time?
Yes, absolutely! You can bread and cook the chicken breasts ahead of time and then reheat them gently in the oven or air fryer before assembling your sandwich. This makes assembly even faster!
What kind of bread is best for this sandwich?
While I love a good brioche bun for its slightly sweet and soft texture, a sturdy ciabatta roll or even a thick slice of sourdough bread would also be fantastic choices to hold up to all the delicious fillings.
Is there a way to make this sandwich healthier?
Certainly! You can opt for baked chicken instead of fried, use a lighter version of Caesar dressing, or even swap the bun for lettuce wraps for a lower-carb option. Freshness is key, so load up on extra lettuce and perhaps some chopped tomatoes.
Crispy Chicken Caesar Sandwich
A delicious and crispy chicken Caesar sandwich featuring a homemade Caesar dressing and perfectly fried chicken cutlets.
Ingredients
-
½ cup full-fat mayonnaise
-
3 tbsp Greek yogurt
-
1 tsp Dijon mustard
-
1 tsp Worcestershire sauce
-
2 tbsp lemon juice
-
¼ cup Parmesan cheese (freshly grated)
-
1-2 garlic cloves (minced)
-
¼ tsp black pepper
-
Pinch sea salt
-
5 chicken cutlets
-
sea salt (to taste)
-
ground black pepper (to taste)
-
Oil (for frying)
-
⅓ cup all-purpose flour
-
½ tsp salt
Instructions
-
Step 1
In a medium bowl, whisk together mayonnaise, Greek yogurt, Dijon mustard, Worcestershire sauce, lemon juice, Parmesan cheese, minced garlic, ¼ tsp black pepper, and pinch sea salt. Set aside to allow flavors to meld. -
Step 2
Season the chicken cutlets generously with sea salt and ground black pepper. -
Step 3
In a shallow dish, combine all-purpose flour, ½ tsp salt. Dredge each chicken cutlet in the seasoned flour, ensuring it’s evenly coated. Shake off any excess. -
Step 4
Heat enough oil in a large skillet over medium-high heat for shallow frying. -
Step 5
Carefully place the floured chicken cutlets into the hot oil. Fry for 3-5 minutes per side, or until golden brown and cooked through. Adjust heat as needed to prevent burning. -
Step 6
Remove chicken from the skillet and place on a wire rack or paper towels to drain excess oil. Let rest for a minute. -
Step 7
Assemble the sandwiches: spread a generous amount of the Caesar dressing on your preferred bread or buns, top with a crispy chicken cutlet, and add extra toppings as desired.
Important Information
Nutrition Facts (Per Serving)
It is important to consider this information as approximate and not to use it as definitive health advice.
Allergy Information
Please check ingredients for potential allergens and consult a health professional if in doubt.